Jasper Alblas
Jasper Alblas
Data Engineering • Analytics • Business Intelligence
Welcome to this walkthrough of the TShark: The Basics Room on TryHackMe. It is time to learn another traffic analysis tool made by the creators of Wireshark, TShark. Learn the basics of TShark and take your protocol and PCAP analysis skills a step further.

https://tryhackme.com/room/tsharkthebasics
I am making these walkthroughs to keep myself motivated to learn cyber security, and ensure that I remember the knowledge gained by these challenges on HTB and THM. Join me on learning cyber security. I will try and explain concepts as I go, to differentiate myself from other walkthroughs.
TShark is an open-source command-line network traffic analyser. It is created by the Wireshark developers and has most of the features of Wireshark. It is commonly used as a command-line version of Wireshark. However, it can also be used like tcpdump. Therefore it is preferred for comprehensive packet assessments.
Learning Objectives
We suggest completing the Network Fundamentals and Wireshark modules before starting this room.
Answer: No answer needed
TShark is a command-line packet analysis tool that enables automation, data carving, and in-depth packet inspection. It works well with other CLI tools by allowing data to be pipelined efficiently.
Commonly used tools for packet analysis include:
For hands-on practice, navigate to the provided directory:
cd Desktop/exercise-files/Answer: No answer needed.
Simply run the following command to get som summarized capture file details:
capinfos demo.pcapng
Answer: 6ef5f0c165a1db4a3cad3116b0c5bcc0cf6b9ab7
TShark is a command-line network protocol analyzer tool, which is the terminal version of Wireshark. It is used for sniffing and analyzing network traffic. The key commands and parameters are as follows:
-h: Displays the help page with common features.-v: Displays version information about TShark.-D: Lists available interfaces for sniffing.-i: Specifies the interface to capture traffic on.Example usage:
tshark -vsudo tshark -Dtshark (default interface) or tshark -i 2 (specific interface, e.g., ‘lo’ for loopback).TShark requires superuser privileges for live traffic sniffing and listing interfaces. It captures traffic and displays detailed packet information like source, destination, protocol, and flags.
To list the version run:
tshark -v
Answer: 3.2.3
To list the available interfaces run:
tshark -D
As you can see, the number of interfaces is 12.
Answer: 12
Let’s cover more main parameters!
-r: Reads a capture file (e.g., tshark -r demo.pcapng).-c: Limits packet count (e.g., tshark -c 10).-w: Writes captured packets to a file (e.g., tshark -w sample.pcap).-V: Provides detailed (verbose) packet information.-q: Suppresses output (silent mode).-x: Displays packet details in hex and ASCII.-r, filter with -c to limit output.-w to save specific packets for further analysis.-x displays raw packet data for deeper insights.-V): Offers detailed breakdowns similar to Wireshark, useful after filtering packets.Simply run the following TShark read command:
tshark -r demo.pcapng
Here we see the PSH, ACK flags set on the 29th packet.
Answer: PSH, ACK
The “Ack” value of the 25th packet, is also on the above screenshot. You can find it here:

Answer: 12421
Once more seen on the earlier screenshot:

Answer: 9660
Shark, a network sniffer and packet analyzer, allows setting conditions to stop capturing packets automatically. There are two main parameter types:
-a) – Stops capturing after a specific condition is met:-a duration:1).-a filesize:10).-a filesize:10 -a files:3).-b) – Runs in an infinite loop, writing to new files while overwriting old ones:-b duration:1).-b filesize:10).-b filesize:10 -b files:3).Capture condition parameters apply only in live capturing mode, not when reading .pcap files. TShark allows combining -a and -b parameters, but infinite loops must include at least one -a parameter to ensure they stop.
Using the -b flag causes TShark to run in Ring Buffer Control, in other words: an infinite loop.
Answer: -b
Yes! TShark can combine autostop and ring buffer parameters, and infinite loops must actually include at least one autostop parameter to ensure they stop.
Answer: y
TShark provides two types of packet filtering: capture filters and display filters.
TShark supports both Wireshark filters and Berkeley Packet Filters (BPF).
Key parameters:
-f → Capture filters (same as BPF and Wireshark capture filters).-Y → Display filters (same as Wireshark display filters).For more details, refer to Wireshark’s Packet Operations room (Task 4 & 5).
This is a very easy question, and we just learned that the answer is -f.
Answer: -f
The answer is -Y.
Answer: -Y
Let’s learn how to use capture filters.
Wireshark uses Capture/BPF filters to filter network traffic based on specific criteria. Filters can be applied using tshark Summary of Capture Filters
Wireshark’s capture filter syntax (BPF) allows filtering network traffic based on specific criteria. Filters can be applied using different qualifiers:
host 10.10.10.10 → Filter specific hostnet 10.10.10.0/24 → Filter subnetport 80 → Filter specific portportrange 80-100 → Filter range of portssrc host 10.10.10.10 → Source addressdst host 10.10.10.10 → Destination addresstcp → Filter TCP trafficether host F8:DB:C5:A2:5D:81 → Filter specific MAC addressip proto 1 → Filter ICMP (IP Protocol 1)To test filters, network noise can be generated using:
curl -v 10.10.10.10nc 10.10.10.10 4444 -vw 5Using Terminator (a terminal emulator), one can split the screen for easier traffic monitoring:
tshark -f "host 10.10.10.10"curl 10.10.10.10tshark -f "host tryhackme.com"tshark -f "host 10.10.10.10"tshark -f "port 4444"tshark -f "udp"Alright. Start up two terminals. On the first one, start sniffing traffic:
tshark -f "host 10.10.10.10"On the second, send a cURL request:
curl -v 10.10.10.10Return to the first terminal (where you are sniffing traffic) and you will see traffic coming in.
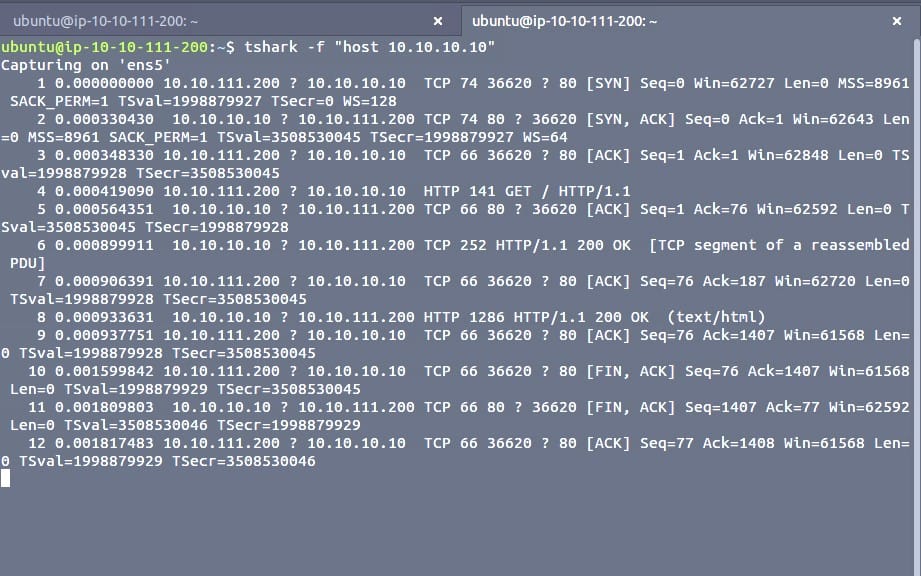
If you count the SYN flags, you can see two of them (packet 1 & 2).
Answer: 2
This time we can also refer to the previous screenshot. We have to count the packets that are sent towards the IP address 10.10.10.10. For this we look at the second IP address on either packet line. For example, if you look at the first packet you can find the target IP here:
1 0.000000000 10.10.111.200 ? 10.10.10.10 TCP 74 36620 ? 80 [SYN] Seq=0 Win=62727 Len=0 MSS=8961 SACK_PERM=1 TSval=1998879927 TSecr=0 WS=128If you count all packets with this destination you will find 7.
Answer: 7
Another simple count task. Count all packets in the above screenshot and hopefully you will count 8 🙂
Answer: 8
Wireshark’s display filters allow users to refine captured network traffic using specific criteria. The display filter syntax follows Wireshark’s rules, and users can reference the Display Filter Expression menu or official documentation for filter breakdowns. Boolean operators can also be used.
tshark -Y 'ip.addr == 10.10.10.10' (Filter packets involving a specific IP)tshark -Y 'ip.src == 10.10.10.10' (Filter packets from a source IP)tshark -Y 'ip.dst == 10.10.10.10' (Filter packets to a destination IP)tshark -Y 'ip.addr == 10.10.10.0/24' (Filter a network range)tshark -Y 'tcp.port == 80' (Filter packets on TCP port 80)tshark -Y 'tcp.srcport == 80' (Filter packets from source port 80)tshark -Y 'http' (Filter all HTTP packets)tshark -Y 'http.response.code == 200' (Filter HTTP packets with response code 200)tshark -Y 'dns' (Filter all DNS packets)tshark -Y 'dns.qry.type == 1' (Filter DNS “A” queries)Using the demo.pcapng file:
shark -r demo.pcapng -Y 'ip.addr == 145.253.2.203'This filters packets involving the specified IP. However, TShark assigns numbers based on capture time, not the number of filtered packets.
To count filtered packets, use:
shark -r demo.pcapng -Y 'http' | nlThis provides a numbered list, making it easier to determine the total count.
Alright. Last 4 questions, let’s go!
The command to use is very similar as the previously discussed example:
tshark -r demo.pcapng -Y 'ip.addr == 65.208.228.223'| nlWe used nl here to add a numbered list, which make it easier to count the number of packets.
You will see list of packets being listed, 34 in total:

Answer: 34
This time filter on port 3371:
tshark -r demo.pcapng -Y 'tcp.port == 3371'| nl
This time there are 7 packets.
Answer: 7
This time we should filter on ip.src instead of ip.addr to only filter on source addresses:
tshark -r demo.pcapng -Y 'ip.src== 145.254.160.237'| nl
We have 20 packets this time!
Answer: 20
Rerun the previous query and take another look at the output.
One of the packets should mention “Dup”. Be careful that THM does not expect the packet count index, but the packet number, in this case 37.

Answer: 37
Congratulations! You just finished the TShark: The Basics room. In this room, we covered TShark, what it is, how it operates, and how to use it to investigate traffic captures.
Now, we invite you to complete the TShark: CLI Wireshark Features room to boost your CLI packet hunting skills by implementing Wireshark features with TShark.
Answer: No answer needed

Congratulations on completing TShark: The Basics. It was great using some of the previously learned Wireshark methodology in the command prompt. We clearly can see that TShark is as powerful as Wireshark, with added scripting potential. Of course it hurts losing the UI though!
Come back soon for more walkthroughs of rooms on TryHackMe and HackTheBox, and other Cybersecurity discussions.
Read more of my walkthroughs here.
You are welcome to comment on this post, or share my post with friends.I would be even more grateful if you support me by buying me a cup of coffee:

I learned a lot through HackTheBox’s Academy. If you want to sign up, you can get extra cubes, and support me in the process, if you use the following link:


