Jasper Alblas
Jasper Alblas
Mastering Data & BI
Hi! In this walkthrough we will cover the Burp Suite: The Basics room on THM
Burp Suite is a comprehensive web application security testing tool used for identifying vulnerabilities, analyzing traffic, and performing penetration tests. Burp Suite is popular due to its user-friendly interface, extensive features, and adaptability for both beginners and advanced security professionals.

Room URL: https://tryhackme.com/room/burpsuitebasics
I am making these walkthroughs to keep myself motivated to learn cyber security, and ensure that I remember the knowledge gained by THMs rooms. Join me on learning cyber security. I will try and explain concepts as I go, to differentiate myself from other walkthroughs.
The Burp Suite: The Basics room provides a foundational understanding of Burp Suite, focusing on:
The core focus is on Burp Proxy, emphasizing theoretical content to build a strong base for practical applications in future modules. Users are encouraged to actively read and experiment with the tool for better understanding and preparation.
Answer: No answer needed
Burp Suite is a framework written in Java that provides a great package of tools for penetration testing of web and mobile apps. It does this by providing the ability to capture and manipulate all traffic between the attacker and a web server.
There are different editions of Burp Suite available, but in this room we will work with Burp Suite Community. This is free to use for any non-commercial use. Burp Suite Professional and Enterprise (provides continuous scanning*) provide more powerful features, but require experience licenses.
The Enterprise edition runs on a server and provides constant scanning.
Answer: burp suite enterprise
Burp Suite can be used both for web applications and mobile applications.
Answer: mobile
Burp Suite Community is free and therefore consists of less features than Burp’s premium products. But there are still many great tools available:
In addition to these features, it is very easy to write extensions to add functionality to Burp. These can be written in Java, Python or Ruby. The Burp Suite Extender module can quickly and easily load extensions into the framework, as well as providing a marketplace to download third-party modules (referred to as the “BApp Store”). Whilst many of these extensions require a professional license to download and add in, there are still a fair number that can be integrated with Burp Community.
The Burp Proxy feature in Burp Suite allows us to intercept requests between ourselves and the target. It acts as an intermediary, enabling users to view, modify, and analyze HTTP/S traffic before it reaches the target server or comes back to the client.
Answer: proxy
Burp Suite Intruder allows us to spray an endpoint with requests. This is often used for bruteforce attacks or to fuzz endpoints.
Answer: intruder
PortSwigger have made installing Burp Suite extremely easy on Linux, macOS, and Windows, providing dedicated installers for all three. As a Java application, Burp can also be downloaded as a JAR archive and run on effectively anything that will support a Java runtime environment.
Burp Suite comes pre-packaged with Kali Linux, so you should not need to install it there. If, for some reason, Burp is missing from your Kali installation, you can easily install it from the Kali apt repositories.
For other systems, we can download installers from the Burp Suite Downloads page.
Answer: No answer needed
After opening Burp Suite Community and opening a new project you are met by the Burp Dashboard:
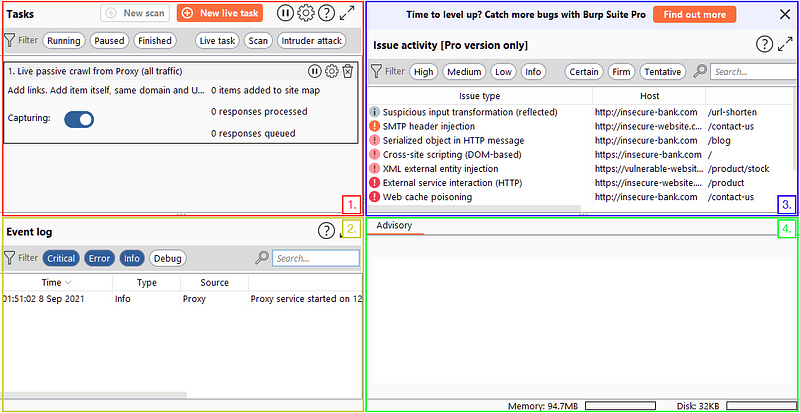
In short, the Dashboard interface is split into four quadrants:
The Event log tells us what Burp Suite is doing (e.g. starting the Proxy), as well as information about any connections that we are making through Burp.
Answer: Event log
Navigating around the Burp Suite GUI by default is done entirely using the top menu bars. These allow you to switch between modules. If the selected module has more than one sub-tab, then these can be selected using a second menu bar which appears directly below the original bar (the bottom row of the image above).
In addition to the menu bar, Burp Suite also has keyboard shortcuts that allow quick navigation to key tabs. By default, these are:
Ctrl + Shift + D
Switch to the Dashboard
Ctrl + Shift + T
Switch to the Target tab
Ctrl + Shift + P
Ctrl + Shift + I
Ctrl + Shift + R
Ctrl + Shift + P makes us switch to the Proxy tab
Answer: Proxy tab
Burp Suite offers two types of settings:
Familiarize yourself with these configurable options before proceeding to exercises on configuring Burp Suite.
Take a look at the sessions sub-tab:
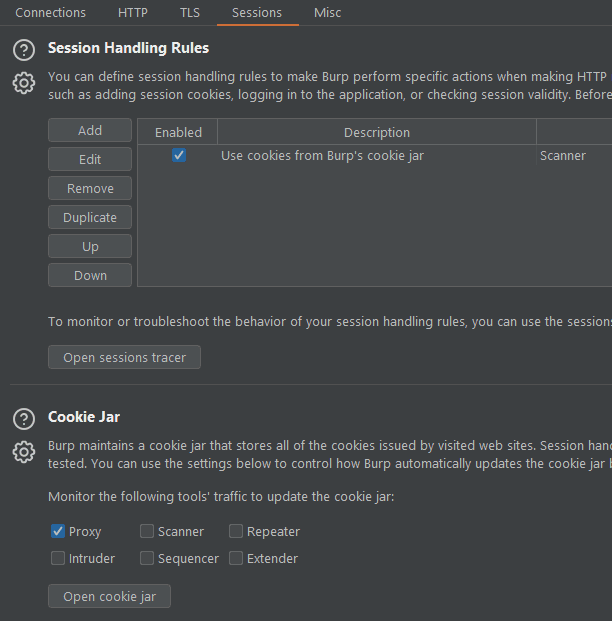
Answer: Sessions
The update behaviour settings can be found in the Suite base category.
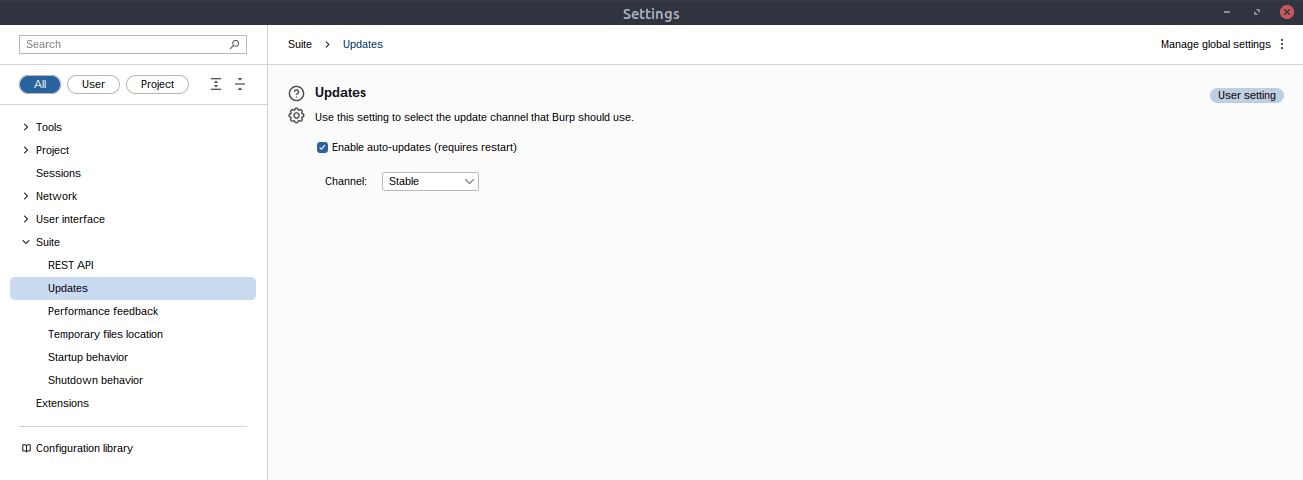
Answer: Suite
Keybindings are changed in the Hotkeys sub-category:
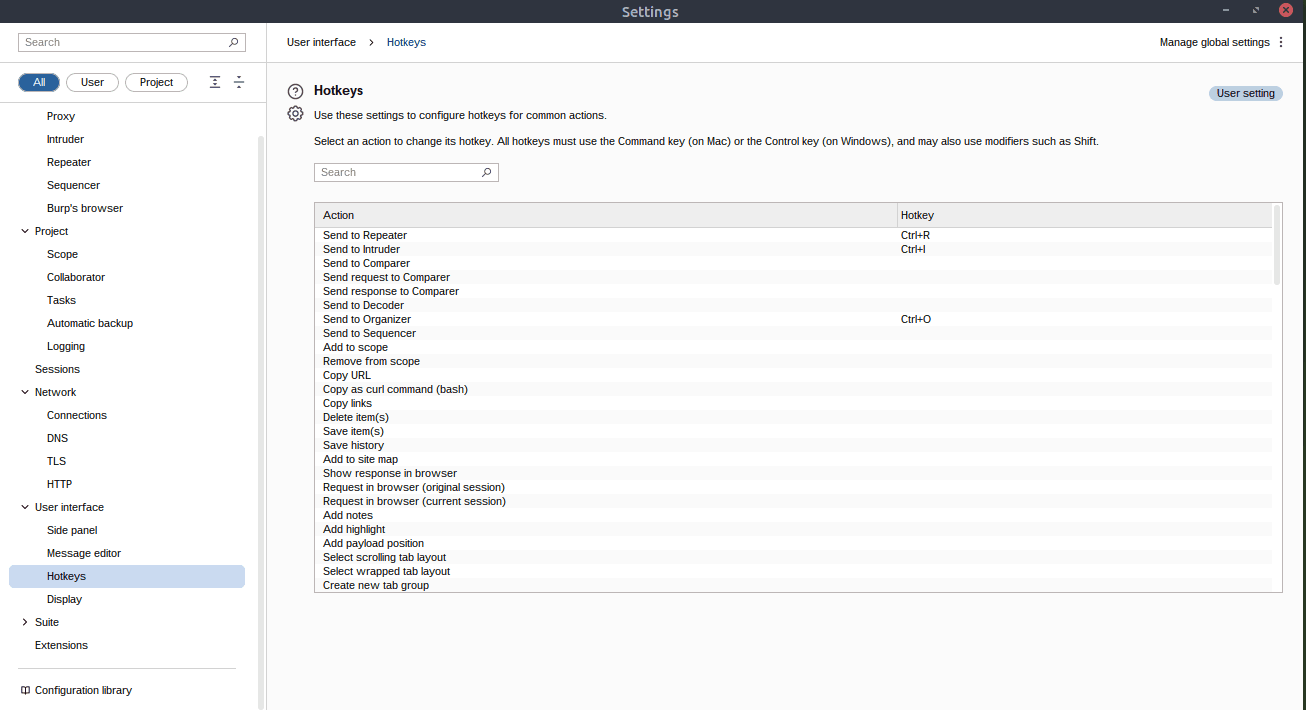
Answer: hotkeys
Yes, we can. If you search for TLS in the setting you will see the following Client TLS certificates section, which includes a switch to override options on a project basis.
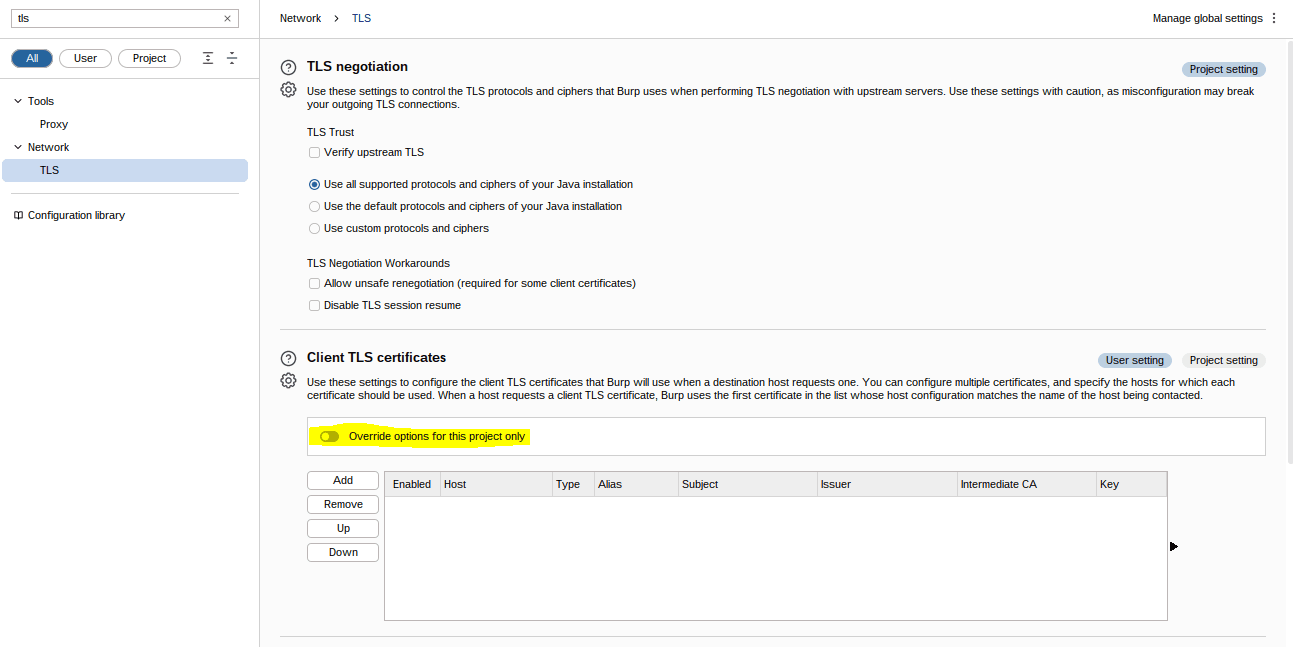
Answer: yea
The Burp Proxy is a core tool in Burp Suite that captures and manipulates traffic between the user and the target web server. Here’s a summary:
Answer: No answer needed
The Burp Proxy is a core tool in Burp Suite that captures and manipulates traffic between the user and the target web server. Here’s a summary:
Answer: No answer needed
The Target tab in Burp Suite offers several key features for controlling and analyzing the scope of web application testing:
Browse the site at http://MACHINE_IP/ and visit all pages linked on the homepage. Check the site map for an unusual endpoint that stands out.
Click around on the site while having your sitemap submenu open. There should pop a URL up with a bunch of numbers and letters. Then look at the response (or visit the URL in the browser).
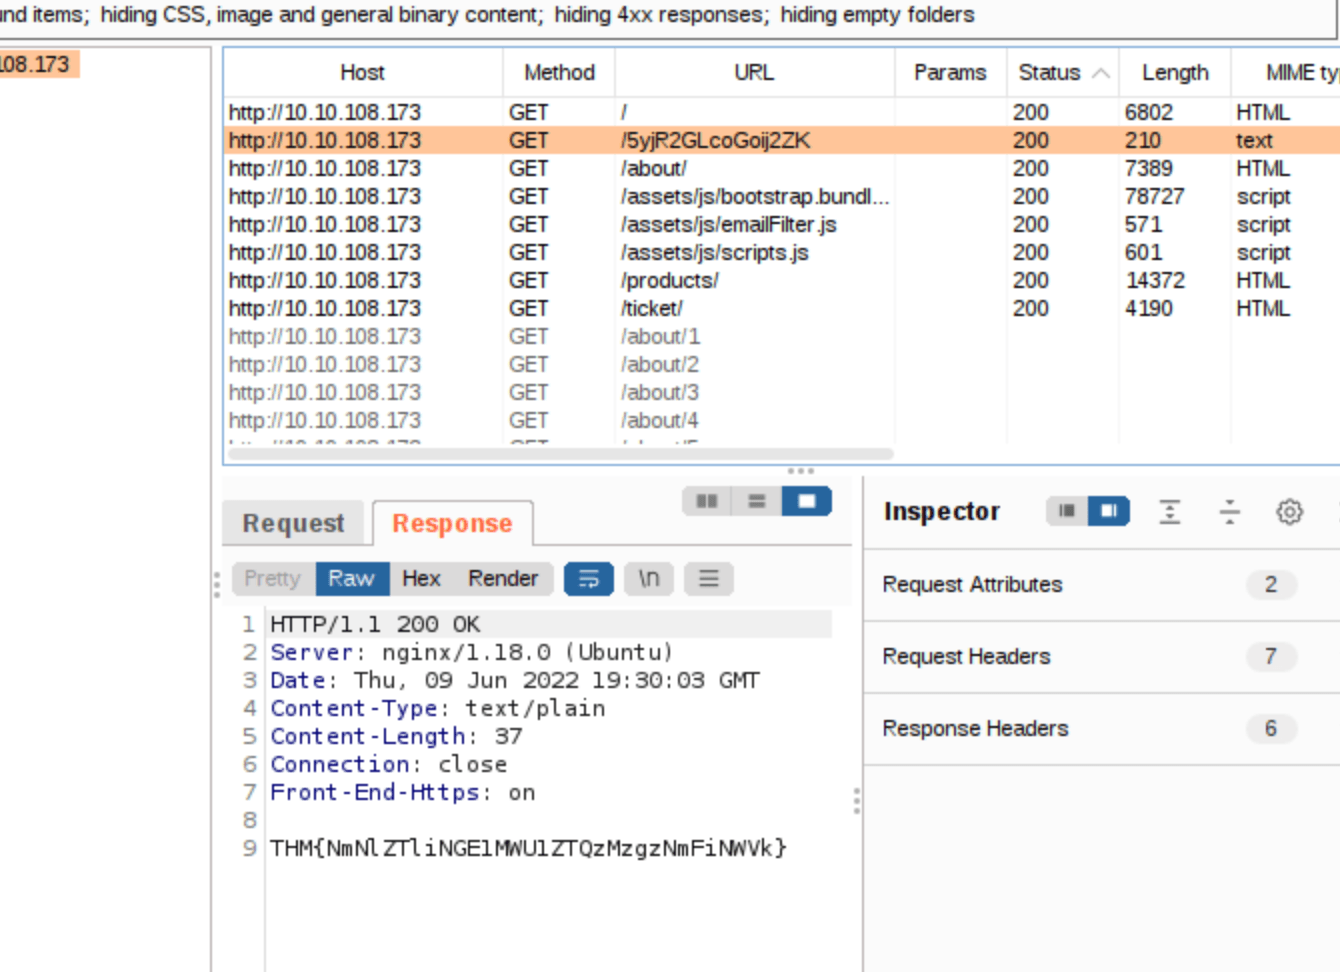
Answer: THM{NmNlZTliNGE1MWU1ZTQzMzgzNmFiNWVk}
Burp Suite includes a built-in Chromium browser, which is pre-configured to use the proxy without requiring modifications to your regular web browser. Here’s a breakdown:

Settings for Burp Browser:
Answer: No answer needed
Scoping in Burp Suite is crucial for focusing on specific web applications and avoiding the overload of unnecessary traffic. Here’s a summary of how it works:
Just play around with this. Limiting the scope helps make your day a lot easier.
Answer: No answer needed
Note: The AttackBox is already configured to solve the problem posed in this task. If you use the AttackBox and don’t wish to read through the information here, you can skip to the next task.
When intercepting HTTP traffic, you may encounter errors on sites with TLS enabled, such as receiving a message indicating that the PortSwigger Certificate Authority (CA) is not trusted. To resolve this, you need to add the PortSwigger CA certificate to your browser’s trusted list. Here’s how to do it:
http://burp/cert to download the cacert.der file. Save it on your machine.about:preferences in the Firefox URL bar and press Enter.cacert.der file you downloaded.After completing these steps, your browser will trust the PortSwigger CA certificate, allowing you to visit TLS-enabled sites through Burp Suite Proxy without encountering certificate errors.
Answer: No answer needed
In a simplified real-world web application penetration test, we can start by testing the support form at http://MACHINE_IP/ticket/. One common vulnerability to test for is Cross-Site Scripting (XSS), specifically Reflected XSS.
Reflected XSS occurs when a malicious script is injected into a webpage, but it only affects the person making the request. The injected JavaScript is reflected back to the user by the server and executed in their browser, potentially allowing attackers to steal cookies, session tokens, or perform actions on behalf of the user.
To test for reflected XSS, you would typically inject a JavaScript payload into the support form and check if it gets reflected back in the response. If the script executes in the browser, it indicates a vulnerability.
There are no questions here to answer, but be sure to read about the example attack on THM. Generally the process is as follows:
The goal is to bypass a client-side filter on the “Contact Email” field, which is preventing the injection of special characters like <script> tags. Here’s a step-by-step guide to bypassing this filter and triggering a Reflected XSS attack:
pentester@example.thmTest Attack<script>alert("Succ3ssful XSS")</script>.Ctrl + U to URL encode it, ensuring it can be safely sent through the form.This method demonstrates how easily client-side filters can be bypassed by modifying the request directly in the Burp Proxy.
Answer: No answer needed
Congratulations on completing the Burp Suite: The Basics room on TryHackMe! You now have a solid foundation in Burp Suite, including the interface, configuration options, and the Burp Proxy. These skills are crucial for your journey into web and mobile application penetration testing.
To continue improving, it’s a great idea to practice and experiment with Burp Suite. Explore its features, tweak different settings, and familiarize yourself with all the available tools. The more you use Burp Suite, the better you’ll become at identifying and exploiting vulnerabilities in web applications.
We have now reached the end of this walkthrough of the Burp Suite: The Basics room.
This room has hopefully given you a good grasp of the Burp Suite interface and configuration options, as well as given you a working knowledge of the Burp Proxy.
Answer: No answer needed
Congratulations, we are done!
It was great to learn some more essential Burp Suite skills in this Burp Suite: The Basics room, and I hope my walkthrough helped you on your cybersecurity journey.
See you next time. Happy hacking!
You can find my other walkthroughs here.
You are welcome to share my article with friends 🙂
I would be so grateful if you support me by buying me a cup of coffee:

I learned a lot through HackTheBox’s Academy. If you want to sign up, you can get extra cubes, and support me in the process, if you use the following link:


