Jasper Alblas
Jasper Alblas
Data Engineering • Analytics • Business Intelligence
You’ve completed Foundations (0.1–0.5) → This is where QuakeFlow actually begins
You have now completed the Data Fundamentals section of the series. Great job everyone!
You will now hopefully understand the following:
Until now, we have mostly been learning concepts.
That’s about to change.
Welcome to QuakeFlow.
QuakeFlow is a hands-on Data Engineering project that we’ll build step by step throughout this series.
Instead of learning Python, SQL, Git, data modeling, APIs, and other technologies as isolated tutorials, we’re going to use them to build one complete data platform.
By the end of the project, you’ll have built a pipeline that takes earthquake data from a real-world source and turns it into something that can be analyzed in Power BI.
But we’re not starting with APIs. We’re not starting with databases. We’re not starting with cloud platforms.
We’re starting with something much simpler:
Setting up a professional development environment.
| Part | Topic |
|---|---|
| 0.1–0.5 | Foundations (complete) |
| 1.1 | Setting Up Your Data Engineering Environment (This article) |
| 1.2 | Your First Data Source: Working With a CSV |
| 1.3 | Turning Inspection Into Ingestion |
| 1.4 | Loading Data Into PostgreSQL (and your first SQL) |
What do you actually need installed to start data engineering? Just three things to begin: Python, a code editor (we’ll use VS Code), and Git. Everything else — databases, cloud platforms, orchestration tools — gets introduced only when the project actually needs it, not before.
You’ve now completed the Data Fundamentals section of the series. Great job. You should understand how the data world works, the different data careers, what Data Engineers actually do, how data is stored, and how data moves through pipelines.
Until now, we’ve mostly been learning concepts. That’s about to change.
Welcome to QuakeFlow.
QuakeFlow is a hands-on Data Engineering project that we’ll build step by step throughout this series. Instead of learning Python, SQL, Git, data modeling, APIs, and other technologies as isolated tutorials, we’re going to use them to build one complete data platform.
By the end of the project, you’ll have built a pipeline that takes earthquake data from a real-world source and turns it into something that can be analyzed in Power BI.
But we’re not starting with APIs. We’re not starting with databases. We’re not starting with cloud platforms. We’re starting with something much simpler: setting up a professional development environment.
QuakeFlow is a data platform built around real earthquake data. Why QuakeFlow? I didn’t really want to start yet another project about some kind of online store tracking sales — there are plenty of other tutorials for that already. I’m an educated geographer, so yes, we’re going to work with earthquake data.
The project will eventually collect information about earthquakes, process it, store it, model it, and make it available for analytics. You don’t need to understand every component yet — that’s what the rest of the series is for.
By the end of QuakeFlow, we’ll have a system capable of answering questions such as:
The final project will contain several different layers.
Data Sources — I really want to keep this project from overwhelming people, so we’re taking this in steps. There’s a nice API to fetch data from, but I want to focus on building a simple pipeline first, before introducing APIs. We’ll get there. We start with a simple CSV file, and later switch to the USGS Earthquake API.
Ingestion — Python will collect the data.
Storage — We’ll store the raw data before transforming it, starting with a simple PostgreSQL database.
Transformation — We’ll use SQL to prepare the data.
Modeling — We’ll create an analytical data model.
Data Quality — We’ll add checks to make sure the data is trustworthy.
Analytics — We’ll eventually connect the final model to Power BI.
But before any of that, we need somewhere to build it.
For the first part of QuakeFlow, we only need a few tools.
Required: Python, to build logic. Visual Studio Code, to write code with. Git, to save our work — or fetch mine, hehe 🙂
Later: we’ll introduce other technologies when we actually need them. This is intentional. You don’t need to install Docker, PostgreSQL, SQL Server, Databricks, Airflow, Azure, or AWS today. Installing ten technologies before understanding why you need them is one of the easiest ways to make learning Data Engineering unnecessarily complicated. We’ll introduce each tool when QuakeFlow actually needs it.
Throughout this series, “open a terminal” means: on Windows, search for and open PowerShell or Command Prompt; on macOS, open the Terminal app (found in Applications → Utilities); on Linux, use whichever terminal your distribution provides. VS Code also has one built in — once it’s installed in Step 2, you can open it with Ctrl+` (backtick) on Windows/Linux or Cmd+`` “ on macOS, which is the easiest option once you get there. Every command in this article gets typed into one of these.
Python will be one of the main programming languages we use throughout QuakeFlow — for reading files, calling APIs, moving data, automating tasks, validating data, and building ingestion pipelines.
If Python is already installed, check the version from a terminal:
python --versionOn some systems you may need:
python3 --versionYou should see something similar to:
Python 3.x.xFor this series, use a currently supported Python 3 version. If you don’t have Python installed, download it from python.org/downloads. When installing on Windows, make sure the option to add Python to your PATH is enabled.
In my case I am running Python version 3.4.16.
We’ll use Visual Studio Code, usually called VS Code, as our code editor. You could use another editor — that’s completely fine. The important thing is having an environment where you can write Python, edit SQL, manage files, use Git, and work with a terminal, all in one place. VS Code is particularly useful for beginners because it combines these capabilities in one application.
Download it from code.visualstudio.com, install it, and open it. The exact version should not really matter as long as you install the latest version available.
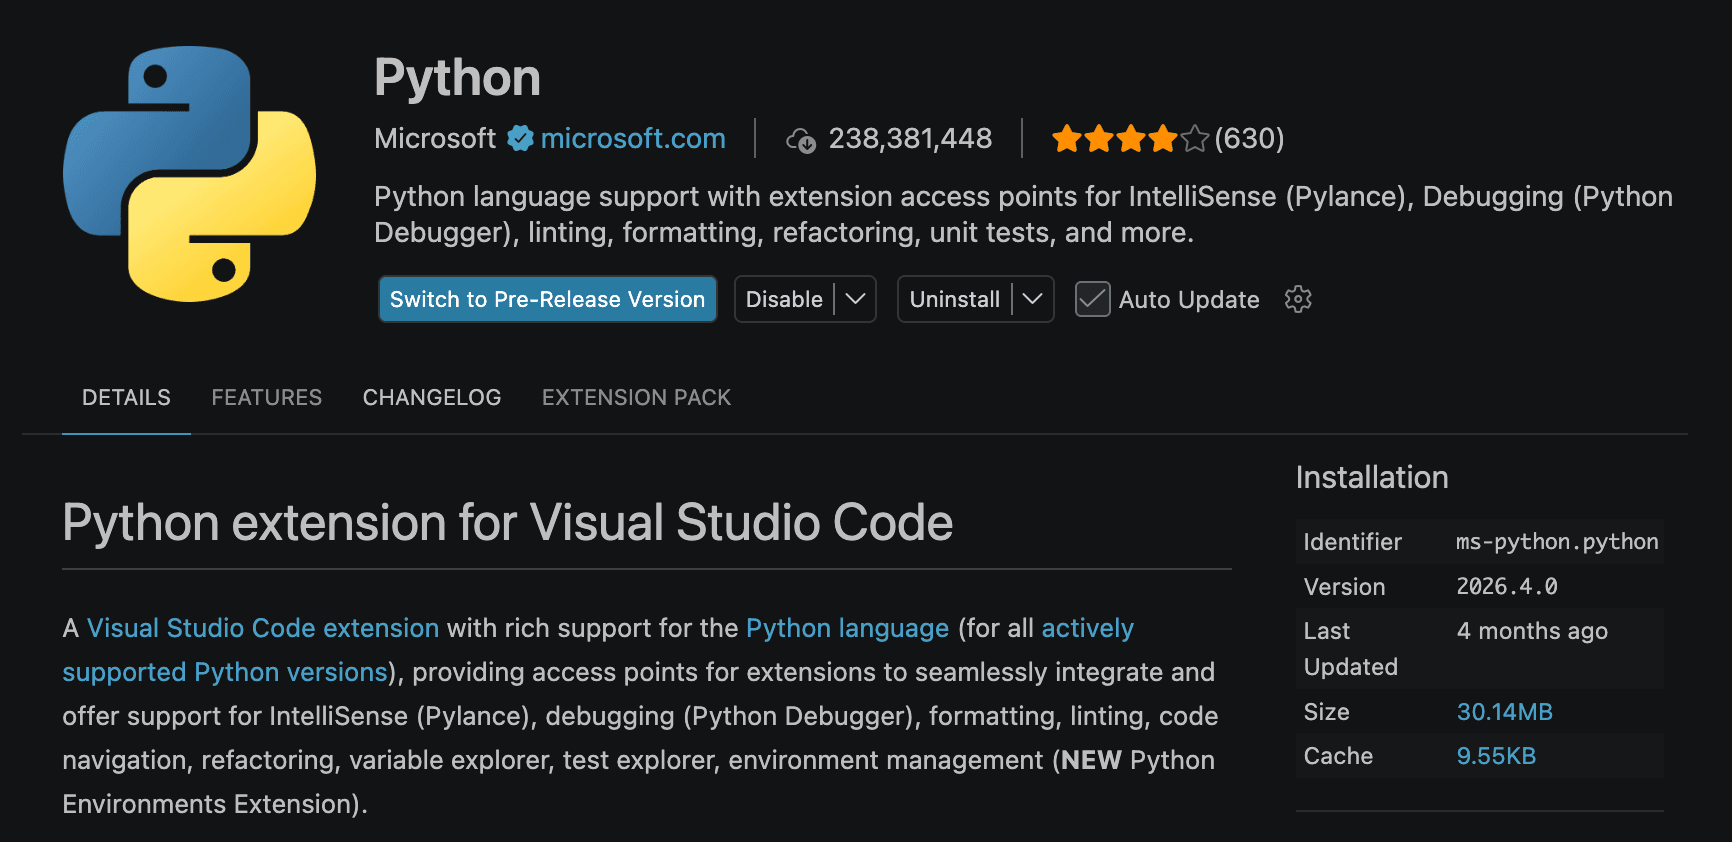
VS Code supports Python through an extension. Open the Extensions panel and search for “Python.” Install the official Python extension from Microsoft. This gives VS Code syntax highlighting, code completion, the ability to run Python directly, debugging, and virtual environment integration. We’ll use these features later.
Git is the version control system you learned about in the Fundamentals section — now we’re actually going to use it. Git tracks changes to your project, makes collaboration easier, and acts like a backup for your code. For all these reasons, Git is an essential professional skill for Data Engineers, and you’ll encounter it constantly on real teams.
Check its version by running:
git --versionYou should see something similar to:
git version 2.x.xIf it’s not installed, install it before continuing.
Now we’re going to create the actual project. Create a folder somewhere convenient, either through your OS’s file browser or from a terminal:
mkdir QuakeFlowOpen that folder in VS Code. A quick way to do this is by opening the folder in your terminal and running:
code .Your project currently contains nothing — that’s totally normal. We’re starting from scratch.
Before writing code, let’s create a basic structure. Our first version will look like this:
QuakeFlow/
  data/
  src/
  tests/
  README.md
.gitignoreYou can simply run the following:
mkdir data
mkdir src
mkdir tests
touch README.md
touch .gitignoreIt might look unnecessarily simple right now. That’s intentional — we’ll add more structure as the project grows.
data/ — where we’ll keep datasets used by the project. Later we’ll have subfolders like data/raw/ and data/processed/, but we aren’t creating those yet unless we need them.
src/ — where our Python code will live. Eventually we’ll have folders like src/ingestion/, src/transformation/, src/validation/ — again, built gradually.
tests/ — where we’ll eventually put automated tests. We’ll introduce testing later; for now it’s simply part of a professional project structure.
README.md — explains the project. It should eventually cover what QuakeFlow is, how to run it, its architecture, the technologies used, and how data flows through the system. A good README is part of a professional project.
.gitignore — tells Git which files it should not track. Python creates temporary files and virtual environments that generally shouldn’t be committed to Git. We’ll configure this shortly.
A virtual environment creates an isolated Python environment for your project. Why does this matter? Imagine Project A requires pandas 2.x and Project B requires a different version. Project A might work now, but then you upgrade Python to 3.x to make Project B work and update a bunch of packages. Suddenly project A does not work, right when there are some problems with the production environment. You can’t it before you fix your development environment. You roll everything back, but hey, now you can’t work on project B.
You get the drill: installing everything globally can eventually create conflicts. A virtual environment keeps each project independent.
From the QuakeFlow project directory, run:
python -m venv .venvThis creates a .venv/ directory containing the isolated Python environment.
Activating it — on Windows PowerShell:
.venv\Scripts\Activate.ps1On Windows Command Prompt:
.venv\Scripts\activateOn macOS or Linux:
source .venv/bin/activateOnce activated, your terminal should show (.venv) before your command prompt.
.venv should not be saved into Git? This is where .gitignore becomes important — we don’t want to commit the entire virtual environment. Add .venv/ to .gitignore. Git will now ignore it. Your .gitignore file should look like this:
.venv/Eventually, QuakeFlow will use Python packages — pandas, requests, and so on. We use these packages to make our lives easier. Instead of expecting another developer to guess which packages are required to make the code work, we record them in a dependency file.
Create requirements.txt.
touch requirements.txtWe don’t need to add anything to it yet — we’ll add packages when we actually use them. Another example of deliberately not over-engineering at the beginning.
Create src/main.py and add:
print("Welcome to QuakeFlow!")Save the file. Now we can run the Python script with the following Python command:
python src/main.pyYou should see:
Welcome to QuakeFlow!Congratulations — you’ve just run the first piece of the QuakeFlow project. It isn’t a data pipeline yet, but that’s fine; the purpose of this exercise is to confirm your development environment works.
From the root of the QuakeFlow folder:
git initGit will now track changes to the project. Check the status:
git statusYou should see the files Git has detected. The .venv directory should not appear as something to commit, if your .gitignore is configured correctly. It should look like this:
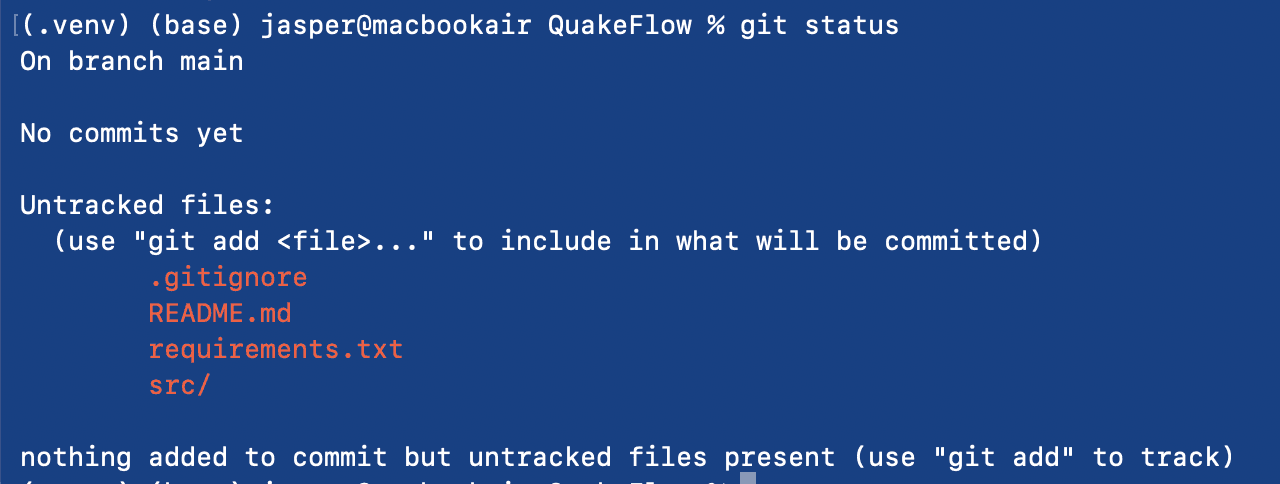
With the first files created, and our code running, we need to save our code in git.
We can add all our files in git by running:
git add .Check the status again, and you will see that the files are ready to be commited.
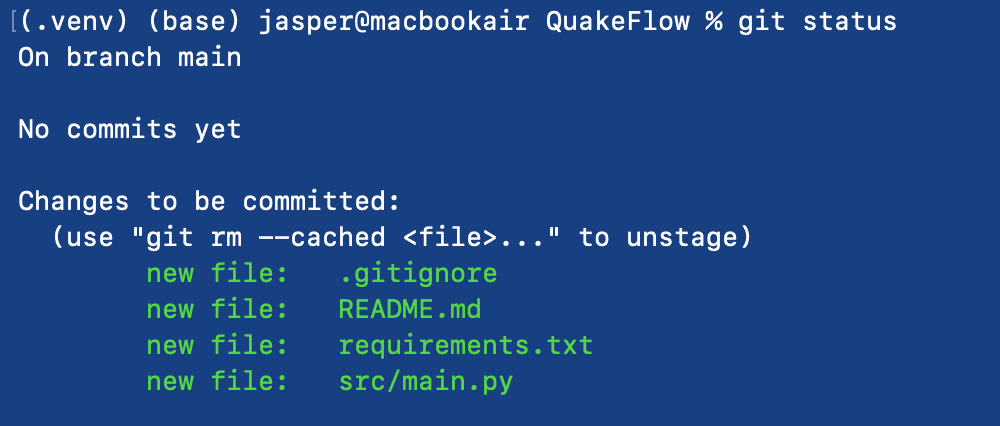
Now we can create our first commit:
git commit -m "Initial QuakeFlow project setup"You’ve now created the first version of the project.
What is a commit? A saved point in the history of your project — Version 1, then Version 2, then Version 3, and so on. Each commit records changes, and it’s possible to go back to a previous one when needed — for example, if you pushed code into production with a major bug. Roll back a commit, push again, and you’re fine. Any future developer (including future you) can look back and understand how your project evolved.
Git and GitHub are related but not the same thing. Git is the version control system; GitHub is a platform where Git repositories can be hosted and shared. For your portfolio, GitHub is useful because employers can actually see your project.
Create a new repository called QuakeFlow, then connect your local project to it:
git remote add origin <your-repository-url>
git branch -M mainNow we can push our code to Github:
git push -u origin mainYour QuakeFlow project is now available on GitHub.
At this point, you should have something similar to:
QuakeFlow/
  .venv/
  data/
  src/
    main.py
  tests/
  .gitignore
  README.md
requirements.txtAnd your Git history should contain your first commit. That’s a solid starting point.
My code is found here:
https://github.com/JAlblas/QuakeFlow
Notice what we haven’t installed: PostgreSQL, SQL Server, Docker, Airflow, Spark, Databricks, Azure, AWS. That’s completely intentional — at this stage, we don’t need them. Data Engineering involves a huge ecosystem of technologies, and a common mistake is trying to learn all of them simultaneously. Instead, QuakeFlow will introduce each one only when it solves an actual problem.
Our environment is ready, but we still don’t have any data. That’s the next step — and we’re not going to start with an API. Our first data source will be a simple CSV file.
This might seem almost too easy. That’s exactly why we’re doing it. Before we introduce HTTP requests, APIs, JSON, authentication, and databases, we want you to understand the fundamental process of moving data through a pipeline, starting as simply as possible:
CSV File → Python → Inspect DataThen we’ll build on it.
You’ve now installed Python, VS Code, and Git; created a Python virtual environment; created the QuakeFlow project and a basic project structure; written your first Python script; initialized Git; and made your first commit.
More importantly, you’ve created the foundation for the rest of the project. From here, every article will add another piece.
Part 1.2 — Your First Data Source: Working With a CSV
We’ll introduce the first QuakeFlow dataset. You’ll learn how to understand the dataset, inspect a CSV file, read CSV data with Python, explore rows and columns, understand data types, identify potential data quality problems, and start thinking like a Data Engineer.
For the first time, we’ll be working with actual data.



[…] Setting up our QuakeFlow project […]
[…] Setting up our QuakeFlow project […]
[…] Setting up our QuakeFlow project […]
[…] Setting up our QuakeFlow project […]
[…] Setting up our QuakeFlow project […]