Jasper Alblas
Jasper Alblas
Mastering Data & BI
Hi! It’s time to tackle the final part of the THM rooms on Linux Fundamentals. In this part we will cover more intermediate Linux skills, for example automation, package management, and service/application logging.

I am making these walkthroughs to keep myself motivated to learn cyber security, and ensure that I remember the knowledge gained by THMs rooms. Join me on learning cyber security. I will try and explain concepts as I go, to differentiate myself from other walkthroughs.
Room URL: https://tryhackme.com/room/linuxfundamentalspart3
Let us start this final Linux Introduction room in which we will learn about automation, package management, logging and more!
Answer: No answer needed
Nothing to do here either but logging in to your deployed machine using SSH.
Log into the deployed machine by using:
ssh <username>@<serverip>In this case the username is tryhackme. The password you will be prompted for is also tryhackme.
Answer: No answer needed
There are different text editors we can use in the terminal to more easily edit files. There are a few options that you can use, all with a variety of friendliness and utility. This task is going to introduce you to nano but also show you an alternative named VIM.
To create or edit a file using nano, we simply use:
nano filenameNano will launch and we can begin to start entering or modifying our text. You can navigate each line using the “up” and “down” arrow keys or start a new line using the “Enter” key on your keyboard.
Nano has a few features that are easy to remember & covers the most general things you would want out of a text editor, including:
You can use these features of nano by pressing the Ctrl key (which is represented as an ^ on Linux) and a corresponding letter. For example, to exit, we would want to press Ctrl and X.
VIM is a much more advanced text editor. Whilst you’re not expected to know all advanced features, it’s helpful to mention it for powering up your Linux skills. Some of VIM’s benefits include:
Answer: No answer needed
Write nano task3 to read the file.
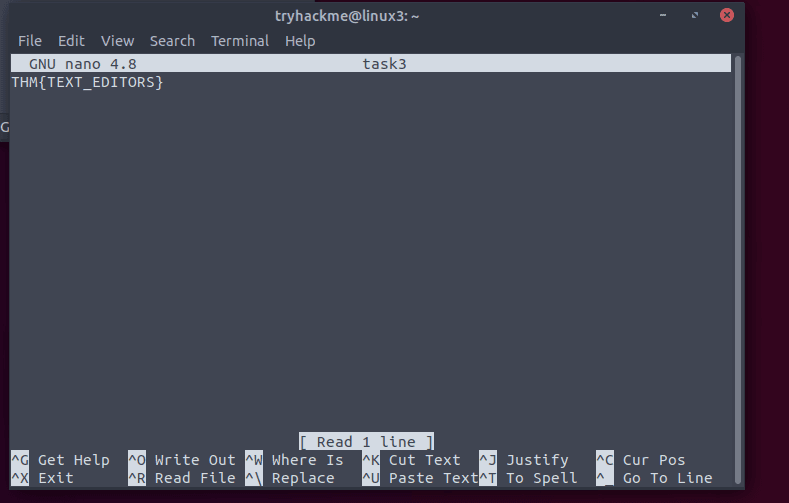
Answer: THM{TEXT_EDITORS}
A pretty fundamental feature of computing is the ability to transfer files. For example, you may want to download a program, a script, or even a picture. There are multiple ways in which we can retrieve these files.
wget allows us to download files from the web via HTTP. We simply need to provide the address of the resource that we wish to download. An example:
wget https://assets.tryhackme.com/additional/linux-fundamentals/part3/myfile.txtSecure copy, or scp, makes us securely copy files. It allows us to copy files just like cp. The difference being that this command allows you to transfer files between two computers using the SSH protocol to provide both authentication and encryption. It allows both:
Python provides a lightweight and easy-to-use module called HTTPServer. This module turns your computer into a quick and easy web server that you can use to serve your own files, where they can then be downloaded by another computing using commands such as curl and wget.
HTTPServer will serve the files in the directory that you run the command, but this can be changed by providing options that can be found in the manual pages. Simply, all we need to do is run:
python3 -m http.serverWe can then use wget to download the file using the computer’s IP address and the name of the file:
wget http://127.0.0.1:8000/fileAnswer: No answer needed
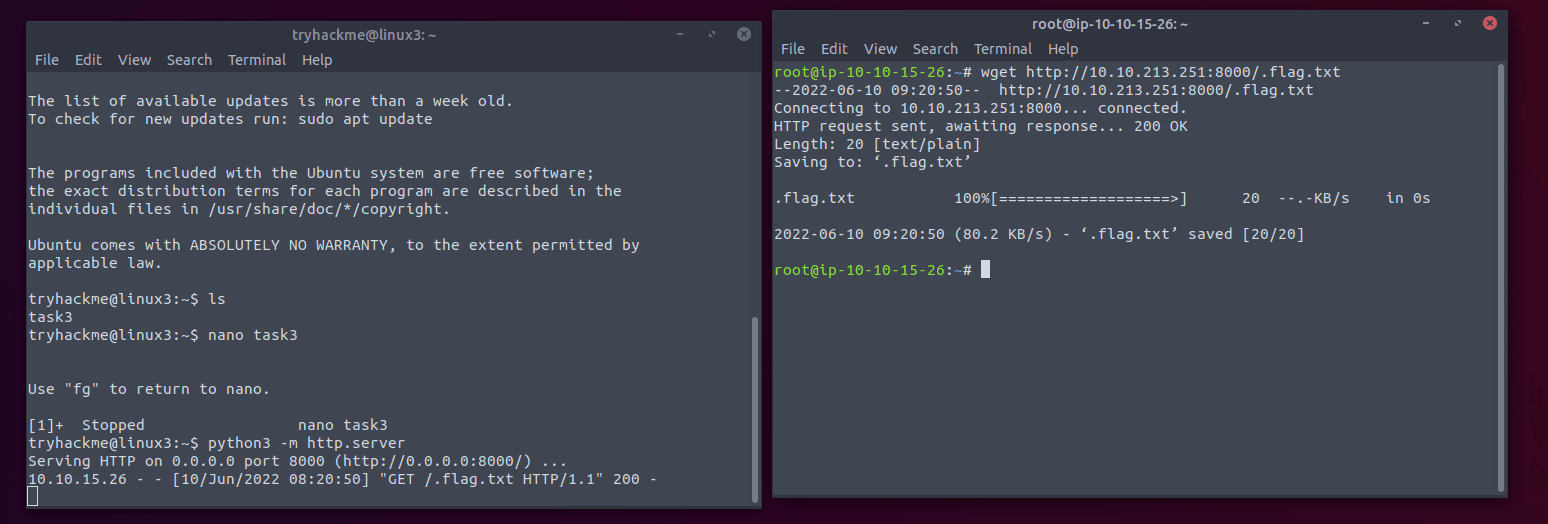
You will need to write python3 -m http.server to start a server on your deployed machine (the one you accessed with SSH).
Answer: No answer needed
Now that the server is running, you should be able to download the file by running a new terminal window.
In the new window write:
wget <serving machine ip>/.flag.txtNow you can access the file on your attacker machine.
Answer: THM{WGET_WEBSERVER}
Answer: No answer needed
Processes are the programs that are running on your machine. They are managed by the kernel, where each process will have an ID associated with it, also known as its PID. The PID increments for the order In which the process starts. I.e. the 60th process will have a PID of 60.
We can use the ps command to provide a list of the running processes as our user’s session and some additional information such as its status code, the session that is running it, how much usage time of the CPU it is using, and the name of the actual program or command that is being executed.
To see the processes run by other users and those that don’t run from a session (i.e. system processes), we need to provide aux to the ps command like so:
ps auxAnother very useful command is the top command; top gives you real-time statistics about the processes running on your system instead of a one-time view. These statistics will refresh every 10 seconds, but will also refresh when you use the arrow keys to browse the various rows.
You can use commands to manage processes. There are a variety of types of signals that change the way in which your stop a process. To kill a command, we can use the appropriately named kill command and the associated PID that we wish to kill. i.e., to kill PID 1337, we’d use:
kill 1337Below are some of the signals that we can send to a process when it is killed:
We use these signals by using their name (-SIGTERM) or number (-9) after the kill command as a flag.
kill -9 1337
OR
kill -SIGTERM 1337The process with an ID of 0 is a process that is started when the system boots. This process is the system’s init on Ubuntu, such as systemd, which is used to provide a way of managing a user’s processes and sits in between the operating system and the user.
Any program or piece of software that we want to start afterwards will start as a child process of systemd. This means that it is controlled by systemd, but will run as its own process (although sharing the resources from systemd).
Some applications can be started on the boot of the system that we own. For example, web servers, database servers or file transfer servers. This software is often critical and is often told to start during the boot-up of the system by administrators.
Enter the use of systemctl. This command allows us to interact with the systemd process/daemon. The syntax is like this:
systemctl [option] [service]To tell apache to start up we use:
systemctl start apache2We can provide four options to systemctl:
Processes can run in two states: In the background and in the foreground. For example, commands that you run in your terminal such as “echo” or things of that sort will run in the foreground of your terminal. We then expect the output to be returned to us.
But when we add the & operator to the command, we’re instead just given the ID of the echo process rather than the actual output, since we will run it in the background. This is great for commands such as copying files because it means that we can run the command in the background and continue on with whatever further commands we wish to execute (without having to wait for the file copy to finish first).
We can do the exact same when executing things like scripts — rather than relying on the & operator, we can use Control + Z on our keyboard to background a process. It is also an effective way of “pausing” the execution of a script or command.
When we have a background running in the background (which we can see by using the ps command), we can choose to foreground it again. We can use fg to bring this back to focus.
Answer: No answer needed
The PID increments each time you start a new process. So the answer should be 301.
Answer: 301
The answer is SIGTERM. If you want to avoid cleaning up you can use SIGKILL.
Answer: SIGTERM
Enter ps aux to list the current running services of all users. If you look carefully you can find a key:

Answer: THM{PROCESSES}
To stop a service we use the systemctl command, followed by stop and the service name:
systemctl stop myserviceAnswer: systemctl stop myservice
Same as before, but now using enable instead of stop.
systemctl enable myserviceAnswer: systemctl enable myservice
We can use the fg (foreground) command to bring a previously backgrounded process back to the foreground.
Answer: fg
To schedule tasks or actions to run after the system boots—like launching applications or backing up files—you can use the cron process, which is managed via crontabs. A crontab is a special file containing formatted instructions that the cron process executes step-by-step during boot.
Crontabs require six fields:
For example, to back up the “Documents” folder for user “cmnatic” every 12 hours:
0 *12 * * * cp -R /home/cmnatic/Documents /var/backups/ Using a wildcard * means a field can remain unspecified, allowing flexible scheduling (e.g., running every 12 hours regardless of the month, day, or year).
Answer: No answer needed
To figure this out simply write the following command in the terminal:
crontab -e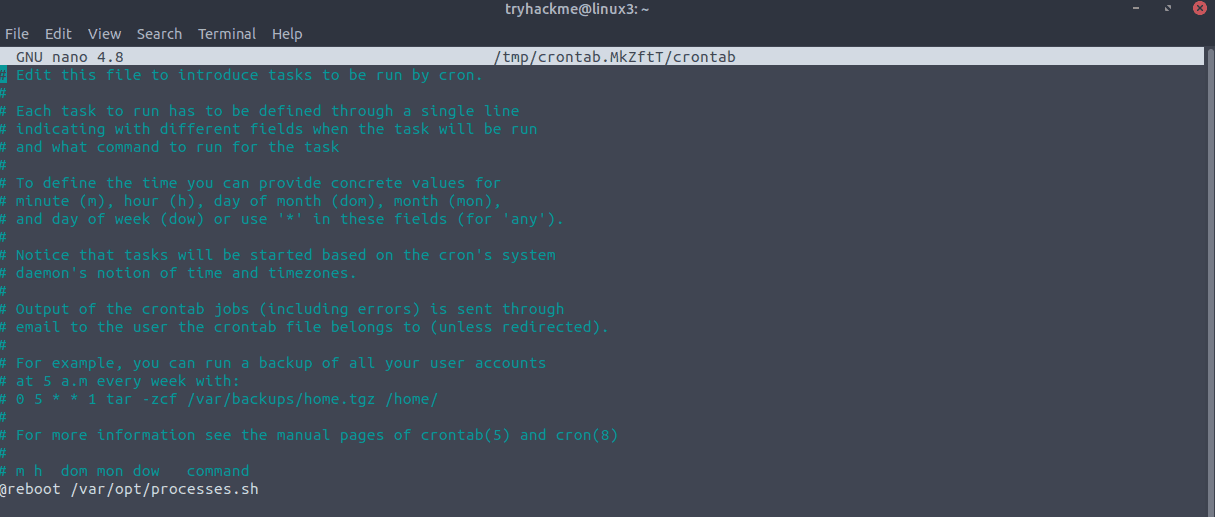
You can find the command in the bottom of the file. It runs on a interval specified by a special command: @reboot, which means that it runs verything the system reboots.
Answer: @reboot
When developers wish to submit software to the community, they will submit it to an apt repository. If approved, their programs and tools will be released into the wild.
In Linux, the repository is a storage location hosted on remote servers from which the system retrieves and installs software and updates. On TryHackMe’s systems, these repositories are listed in the /etc/apt/sources.list file and in the files under the /etc/apt/sources.
Whilst Operating System vendors will maintain their own repositories, you can also add community repositories to your list! This allows you to extend the capabilities of your OS. Additional repositories can be added by using the add-apt-respository command or by listing another provider! For example, some vendors will have a repository that is closer to their geographical location.
This gets pretty technical. Refer to the task page on THM to learn more about this.
Answer: No answer needed
Log files are located in the /var/log directory and contain logging information for applications and services running on your system.
These services and logs are a great way in monitoring the health of your system and protecting it. Not only that, but the logs for services such as a web server contain information about every single request — allowing developers or administrators to diagnose performance issues or investigate an intruder’s activity.
The apache2 logs are found at /var/log/apache2.

Answer: No answer needed
Access the access log by opening access.log.1 with cat:
cat access.log.1
The answer is right there at the start of the second line.
Answer: 10.9.232.111
Look at the screenshot above. They have accessed the file catsanddogs.jpg.
Answer: catsanddogs.jpg
To recap, this room introduced you to the following topics:
Continue your learning in some other TryHackMe rooms that are dedicated to Linux tools or utilities:
Answer: No answer needed
Answer: No answer needed
Congratulations, we are done!
It was great to learn some more essential Linux Fundamentals in this TryHackMe: Linux Fundamentals Part 3 room, and I hope my walkthrough helped you on your cybersecurity journey.
See you next time. Happy hacking!
You can find my other walkthroughs here.
I would be so grateful if you support me by buying me a cup of coffee:

I learned a lot through HackTheBox’s Academy. If you want to sign up, you can get extra cubes, and support me in the process, if you use the following link:


